Bienvenue sur depanetout, forum d’entraide au dépannage électronique › Forums › Schématèque › Les Modes Services › Mode Service plusieurs Marques › Mode Service plusieurs Marques
- Ce sujet contient 6 réponses, 1 participant et a été mis à jour pour la dernière fois par
 rocky, le il y a 7 années et 5 mois.
-
AuteurMessages
-
7 janvier 2019 à 7 h 09 min #2256rockyMaître des clés
voici un lien de mode service de different tv en espagnol
http://www.comunidadelectronicos.com/articulos/modo-serv.htm#PHILIPS
autres marques
http://www.turuta.md/service-mode-and-options.php?p=1
Mode de service (mode usine) – LG, JVC, MITSUBISHI, MAGNAVOX, PIONEER-Plasma, SANYO, SHARP, SAMSUNG, SONY (TV et projecteurs), RCA, GE, ZENITH
JVC
Appuyez sur DISPLAY et STATUS VIDEO sur la télécommande simultanément pour entrer dans le MENU DE SERVICE
Appuyez sur MENU UP / DOWN pour sélectionner un élément (y compris d’autres menus)
Appuyez sur MENU GAUCHE / DROITE pour régler
Appuyez sur EXIT pour revenir au menu précédent. Appuyez à nouveau pour SORTIR
ou
Appuyez sur SLEEP TIMER et réglez la minuterie SLEEP pour « 0 » MIN.
Appuyez sur DISPLAY et STATUS VIDEO en même temps (alors que
Les informations SLEEP TIMER est toujours à l’écran) pour entrer dans le MENU DE SERVICE
Appuyez sur MENU UP / DOWN pour sélectionner un élément (y compris d’autres menus)
Appuyez sur MENU GAUCHE / DROITE pour régler
Appuyez sur EXIT pour revenir au menu précédent. Appuyez à nouveau pour SORTIR
JVC définit à partir de 1995
Réglez l’horloge sur 3h21.
Démarrez l’horloge comme vous le feriez normalement, mais appuyez sur MUTE tandis que « Merci » clignote.
Appuyez sur MENU haut ou le bas juste après MUTE.
Utilisez UP / DOWN pour sélectionner les options et gauche / droite pour ajuster. Les réglages sont automatiquement enregistrés lorsque vous quittez.
LG
Acheter la télécommande LG service . LG 105-201M OR (tenant à la fois le menu et les boutons ‘Ok’ sur la télécommande et le panneau avant).
D’autres façons d’essayer sont:
1.Press et maintenez les boutons OK. Avec votre téléviseur allumé, appuyez et maintenez à la fois celle de la télécommande et celle sur la télévision elle-même.
Tenez-les pendant environ cinq à sept secondes, jusqu’à ce que le menu de service apparaît.
Certains modèles LG vous permettent d’accéder aux menus de service ou d’installation avec le bouton OK, mais d’autres nécessitent
1. Pour appuyer et maintenir les boutons MENU.
Pour encore d’autres modèles, ces deux méthodes fonctionnent, et vous apporteront aux menus séparés
2. Entrez le mot de passe. Votre téléviseur peut ou ne peut pas exiger un mot de passe pour accéder au menu de service. Si l’ on est tenu, il y a plusieurs options de mot de passe qui peuvent travailler, y compris:
0000, 7777
0413
8741, 8743,8878
3. Notez les paramètres de menu par défaut. Dans le cas où quelque chose se passe lorsque vous jouez avec le menu ou à l’avenir, vous voulez savoir ce que les paramètres d’ origine ont été de sorte que vous pouvez restaurer le téléviseur si nécessaire4. Effectuez les modifications souhaitées. Le menu du service LG vous offre plusieurs fonctionnalités et de réglage qui vous permettent d’ajuster les paramètres audio et visuels, de modifier les paramètres de couleur, la mise à niveau à la télévision, et plus encore.
Dans les paramètres standard du menu IMAGE, vous pouvez contrôler la luminosité, le contraste, la couleur, la netteté et la teinte. Dans les paramètres de balance des blancs, vous pouvez modifier les valeurs des couleurs et des températures. [6]
Sous SOUND, vous pouvez modifier les aigus et la base, la courbe de volume, et les volumes maximum et minimum, ou effectuer des réglages audio pour les paramètres de sortie.
Sous Général, vous pouvez apporter des modifications à la fréquence et de la luminosité scintillement rétro-éclairage, de tester les couleurs, et de définir les instructions du mode d’alimentation qui vous raconteront votre téléviseur ce qu’il faut faire après une coupure de courant vers le bas (ce qui est particulièrement utile pour les personnes qui souffrent de la puissance fréquente surtensions ou des pannes.
Avec UPGRADE, vous pouvez mettre à jour le firmware de votre télévision, ce qui permettra d’améliorer le fonctionnement de l’appareil. les mises à jour du micrologiciel sont généralement disponibles tous les deux mois.
5. Vérifiez les changements. Une fois que vous avez fait un changement, ne pas enregistrer les nouveaux paramètres jusqu’à ce que vous avez noté quels effets ces changements ont eu. De cette façon, si vous ne l’ aimez le résultat, vous pouvez réessayer ou éteindre la télévision pour restaurer les paramètres d’ origine et essayez à nouveau.6. Enregistrez les nouveaux paramètres. Si vous êtes heureux avec les effets des changements que vous avez faits, allez – y et enregistrer les nouveaux paramètres en appuyant sur OK sur la télécommande.
Accès au menu d’installation
1.Press et maintenez les boutons MENU. Avec votre téléviseur allumé, appuyez simultanément sur celui de la télécommande et celle sur la télévision elle-même. [10] Tenez-les pendant environ cinq à sept secondes, jusqu’à ce que le menu d’installation apparaît
2.Saisissez le mot de passe. Pour le menu d’installation, essayez le mot de passe 1105. [12] Si cela ne fonctionne pas, essayez les mots de passe utilisés pour le menu de service.
3.Make les modifications souhaitées. Le menu d’installation vous donnera accès au mode de l’hôtel et les réglages du téléviseur USB, et vous donner la possibilité de changer le mot de passe. Enregistrer les modifications en appuyant sur OK sur la télécommande.
Dans le menu d’installation, vous pouvez activer le mode de l’hôtel, ou le désactiver pour vous donner plus de contrôle sur les fonctions de télévision.Le réglage USB vous permet de programmer le téléviseur pour détecter automatiquement une clé USB qui est insérée dans la fente à l’arrière, ce qui permet d’accéder aux fichiers audio et vidéo sur la clé USB de votre téléviseur
1) avec l’ensemble ON, appuyez sur : 0 6 2 5 9 6 MENU.
Les chaînes vont changer , mais lorsque le menu est enfoncé, le téléviseur sera entrer dans le menu de service.
Appuyez sur MENU pour changer les ajustements
Pour enregistrer vos modifications, appuyez sur POWER le téléviseur. « Preset Memory » apparaît, l’ensemble se met hors tension.
Remarque: Avant d’ entrer dans le mode de menu de service, assurez – vous que vous mettez le téléviseur allumé, éteint, et à l’ arrière en utilisant le bouton POWER sur le téléviseur seulement.
Cela devrait vous permettre d’utiliser le bouton de mise hors tension du téléviseur, après avoir fait vos modifications, vous permettant de les sauver.
2) Avec la mise en OFF, appuyez sur 0-6-2-5-9-6 STATUS. Set viendra dans SERVICE MODE. Couper le courant à l’ensemble pour enregistrer les paramètres. Certains jeux nécessitent que vous débranchez l’appareil pour enregistrer les paramètres.
3) Appuyez sur MENU de la télécommande, tandis que le menu est toujours en place appuyez sur les numéros 0 6 1 5 9 6 ou 0 6 1 5 9 7. L’
un d’eux fera apparaître le menu de service.
Appuyez sur flèches gauche / droite pour sélectionner un élément
Appuyez sur HAUT / flèches vers le BAS pour ajuster
4) saisissez 1 6 2 5 9 6 MENU pour accéder au mode de réglage sur certains jeux.
entrez 0 6 2 5 9 7 puis MENU pour entrer dans le mode de convergence sur certains téléviseurs de projection ??? le cONVERGENCE pour PRO-JO Avec la mise en OFF, appuyez sur 0-6-2-5-9-7-STATUS.MITSUBISHI
Pour Menu Factory, appuyez sur MENU 1 3 7 0
Mode de réglage de service, appuyez sur MENU 2 3 5 7
Mode de convergence, appuyez sur MENU 2 3 5 9
Utilisez les touches VIDEO ou VIDEO pour entrer dans deux groupes différents de réglages
Utilisez les boutons VIDEO / VIDEO à passer à travers les ajustements
Utiliser les touches + et – pour ajuster
Lorsque vous avez terminé avec les ajustements, appuyez sur ENTRÉE pour enregistrer
Appuyez deux fois sur MENU pour quitter le mode de service
NOTE: Si les combinaisons de numéros de menu ci – dessus ne fonctionnera pas pour entrer en mode de service, essayez l’ une des opérations suivantes :
MENU 1 2 5 7
MENU 1 2 5 9
MENU 2 3 5 6
MENU 2 3 5 8
MENU 8 2 5 7
PANASONIC
1 Pour les châssis AMEDP, APEDP, AREDP …
Appuyez sur ACTION (TV activée)
Sélectionnez l’icône SET-UP, réglez antenne CABLE
Sélectionnez l’icône TIMER, réglez la minuterie de sommeil à 30
Appuyez sur ACTION à deux reprises pour quitter les menus et syntoniser le canal 124
Ajuster le volume à 0
Appuyez sur VOL – sur le panneau de commande du téléviseur et rouge ‘CHK’ apparaîtra dans le coin supérieur gauche
Pour basculer entre Serviceman et modes de vieillissement appuyez sur ACTION et VOL + simultanément sur le panneau de commande
L’ensemble est maintenant en mode Serviceman, appuyez sur POWER sur la télécommande pour sélectionner l’un des cinq modes de réglage Serviceman:
B = VCJ Sous Ajustements
Réglages C = VCJ Cut-off
S = Options (PIP et Clock Adjsutments)
M = MTS Adjsutments
‘CHK’ = Fonctionnement normal des contrôles CHANNEL et VOLUME
Appuyez sur CHAN UP / DOWN sur la télécommande pour sélectionner un élément
Appuyez sur VOL GAUCHE / DROITE pour régler.
2. Court point de test FA1 à FA2 froid au sol (A bord: broche de TP 8 à la broche 3) Le
récepteur est sur le vieillissement mode jaune ‘CHK’ dans le coin supérieur gauche
Appuyez sur ACTION et VOL + simultanément sur le panneau de commande et «CHK »devrait être en rouge
L’ensemble est maintenant en mode Serviceman, appuyez sur POWER sur la télécommande pour sélectionner l’ un des cinq modes de réglage Serviceman:
B = VCJ sous Ajustements
C = Ajustements CRT
D = Pincushion Réglages
S = Réglages des options (PIP et l’ horloge)
Appuyez sur CHAN UP / DOWN sur la télécommande pour sélectionner un élément
Appuyez sur VOL GAUCHE / DROITE pour régler.
3. TX-W28R3 (et modèles similaires)
Set BASS à la position maximale, réglez TREBLE en position minimum
Appuyez sur REVEAL sur la télécommande et en même temps , appuyez sur VOLUME sur le téléviseur.
Cela placera le téléviseur dans le mode de service
Appuyez sur la RED boutons / VERT pour sélectionner un élément
Appuyez sur les touches jaune / bleu pour régler
Appuyez sur STORE sur le panneau preset après chaque ajustement a été fait pour stocker les valeurs requises
pour quitter le mode de service, appuyez sur NORMALISATION RCA / GE CTC175 thru CTC187 Turn TV sur – Appuyez et maintenez MENU – Appuyez sur POWER – Appuyez sur VOL + P00 et V00 seront affichés (côtés gauche et droit de l’ écran) MENU de sortie – Appuyez sur VOL + pour régler V00 à pas. V76 Appuyez sur CH + pour sélectionner un réglage que vous souhaitez modifier. Appuyez sur VOL + et VOL- pour ajuster. P01 Horiz Freq P07 Red Bias P02 Horiz Phase P08 Grn Bias P03 EWDC P09 Blu Bias P04 EW amp P10 Rouge Variateur P05 Vert Cent P11 Grn lecteur P06 Vert Taille P12 Blue DriveSAMSUNG
Mettre le téléviseur en veille
Appuyez sur les {INFO} {MENU} {MUTE} {} PUISSANCE touches de la télécommande dans les 3 secondes (dans cet ordre, un par un)
Utilisez le bouton {POWER} pour quitter le menu de service. OU
Tournez téléviseur
Appuyez sur: MUTE 1 8 2 POWER
TV se met sous tension en mode service et GAMMA GAIN1 sera affiché sur l’écran
Utilisez VOL + et VOL – pour sélectionner un élément
Utilisez MUTE et le MENU pour régler
Utilisez ADD pour enregistrer les paramètres.
CHASSIS: SCT51A
Tournez téléviseur
Appuyez sur SLEEP P.STD MUTE
CHASSIS: SCT11A, SCT11B, SCV11A, SCV11B
Appuyez sur P.STD MENU SLEEP POWER ON
Effectuer les réglages avec VOL + et VOL –
Sélectionnez entre les ajustements avec CH + et CH –
SANYO
Maintenez MENU tout en branchant situé dans l’ alimentation secteur
Utilisez les touches VOLUME et CHANNEL pour ajuster au besoin
SHARP 1. Nouveaux téléviseurs débranchent tv pendant quelques secondes puis maintenez vol.down et entrée boutons prise TV suivant le cordon d’ alimentation dans le code de popup doit apparaître. puis maintenez ch- et VOL- pour entrer dans le menu, l’ utilisation ch – + et vol + – pour régler les paramètres, appuyez sur Entrée pour sélectionner puis débrancher de la télé ou éteindre la télévision pour quitter. 2. Appuyez sur menu Menu 9,9,9,2,2,2 de service devrait apparaître 3. Maintenez VOLUME UP et CHANNEL UP dans tout colmatage mis au pouvoir. TV est en mode service. Appuyez sur CHAN + ou CHAN – pour sélectionner un réglage que vous voulez changer Appuyez sur VOL + ou VOL- pour régler Allumez le téléviseur. Appuyez sur RESET (dans la vidéo menu réglage) pour assurer les contrôles des clients sont dans la bonne position de remise à zéro. Momentanément court TP2001 à TP2002. Appuyez sur CHAN + ou CHAN – pour sélectionner un réglage que vous voulez changer Appuyez sur VOL + ou VOL- pour régler.SONY
Utilisation de la télécommande:
Éteignez le téléviseur.
Appuyez sur [DISPLAY] [5] [VOL +] [POWER ON].
OU
Appuyez sur [DISPLAY] [5] [POWER ON].
Le menu de service sera affiché.
Utilisez les numéros [1] et [4] pour sélectionner l’élément à régler.
Utilisez des nombres [3] et [6] pour ajuster la valeur des données.
Appuyez sur [MUTE] puis [ENTER] pour enregistrer nouveaux paramètres.
Les mots « WRITE » en rouge apparaîtra dans le coin supérieur droit si elle est enregistrée.
Eteignez le téléviseur pour quitter le menu de service.
PROJECTEURS Sony
Menu Service
Utilisation de la télécommande
Appuyez sur {ENTRER} {} {ENTRER HAUT} {BAS} {ENTER}
Puis {HAUT} quand il demande: « Voulez – vous entrer dans le mode de service? ».
Mode usine
Utilisation de la télécommande
Appuyez sur {ENTRER} {} {ENTRER GAUCHE} {ENTER}
Puis {HAUT} quand il demande: « Voulez – vous entrer dans le mode Factory? ».
Tous les autres menus pop habituellement sous le menu principal de l’information.Accès « Menu » et assurez – vous « Status » est activée.
Quittez le « Menu ».
Menu Service
Utilisation de la télécommande
Appuyez sur {ENTRER} {ENTER} {} {HAUT BAS} {ENTER}
Sélectionnez « Oui » quand il demande: «Voulez – vous entrer dans le mode de service ».Mode usine
Utilisation de la télécommande
Appuyez sur {ENTRER} {ENTER} {GAUCHE} {ENTER}
Sélectionnez « Oui » quand il demande: «Voulez – vous entrer dans le mode Factory »
[ Modèles : G-Series,J-Series,KV-G21M1,KV-G14F2RS,KV-2197M3(RM-870),KV-G14M1,KV-G14MD1,KV-G14P1,KV-G14P1,KV-G14P11,KV-G14Q1,KV-G14S1(RM-870),KV-J21MF1,KV-J21MH1,KV-J21MN11(RM-870),KV-2168MT,KV-2169MNT(RM-870),KV-XF29M35,KV-XF29M63,KV-XF29M93,KV-XF25M21,KV-XF25M63,KV-XF25M93 (RM-945).KV-XA21M80,KV-XA21M83.KV-XA21M50,KV-XA21M61,KV-XA21M60(RM-952),KV-XF25M81,KV-XF25M80(RM954),KV-F29MF1,KV-F29MH11,KV-F29MH31,KV-F29MN11,KV-F29MN31(RM-857),(RM-858)]
Pour entrer dans le mode de service:
Appuyez sur la touche de la télécommande dans l’ordre suivant
STANDBY – DISPLAY – VOL + – POWER
Pour soulever / point bas de service pas: appuyez sur les touches numériques « 1 » ou « 4 »
Pour augmenter / valeur de données inférieure: appuyez sur: Bouton « MUTING » sur le combiné
Pour exécuter l’écriture dans la mémoire; appuyez sur « 0 » sur le combinéPour annuler le mode de service; mettre le téléviseur en mode veille en appuyant sur la touche « POWER » sur le combiné, puis passer à nouveau sur le téléviseur en appuyant sur le même bouton.
Châssis: AE2, AE-2B, AP-2
Models: KV-E5231,KV-E2931,KV-E3431,KV-E2551A/B/E/K,KV-S29JN1/MN1/SN1,KV-S34/JN1/MN1/SN1/,KV-B2911,KR-S4613
Pour entrer en mode de service:
Allumez l’interrupteur principal de l’ensemble tout en appuyant sur tous les deux boutons sur le panneau avant. « TT » apparaîtra dans le coin supérieur droit de l’écran. Appuyez sur la touche « MENU » sur la télécommande. Dans le menu sélectionner « DEMO », puis appuyez sur Select DEVICE « OK » correspondant au réglage que vous avez besoin.
Ranger; « D’ACCORD »Pour quitter: désactiver l’ensemble.
Châssis: AE-2
Modèles: KV-B2911 / A / D / B / K, KV-B2913E
Pour entrer dans le mode de service:Allumez l’interrupteur principal de l’ensemble tout en appuyant sur tous les deux boutons sur le panneau avant. « VOL » apparaît dans le coin supérieur droit de l’écran. Appuyez sur la touche « MENU » sur la télécommande.
Châssis: BE-4
Modèles: KV-2170, KV-2180, KV-2540
Pour entrer dans le mode de service:
Appuyez sur les touches de la télécommande dans l’ordre suivant
VOL + – TV – MENUPour quitter: 00.
Châssis: VE-3V, BE-3B
Models: KV-C2171K,KV-C2171K,KV-C2171KR,KV-X2501K,KV-X2581K,KV-X2581KR,KV-M2540K,KV-M2541K,KV-X2901K,KV-X2981K,KV-X2981KR,KV-M1440,KV-M2170,KV-M2171,KV-M2181,KV-M2101,KV-24WS1A/B/D/E/K/RU(RM-837)
Processeur: CXP85340A-116Q / 117Q
Pour entrer en mode de service:
Appuyez sur les touches de la télécommande dans l’ordre suivant
AFFICHAGE SUR ÉCRAN – VOL + – TV« TT » apparaîtra dans le coin supérieur supérieur.
Châssis: G1
Modèles: KV-S29RN1, KV-S34RN1
Pour entrer en mode de service:
Réglez le téléviseur dans le mode de service. Presse de la carte suivante séquence de boutonsDISPLAY – VOL + – POWER.
Châssis: AE-2F
Modèles: KV-S2941A / B / D / K, KV-2943E (RM-831)
Pour entrer dans le mode de service:Deux fois le bouton de presse « VKL » à bord. Dans un coin droit supérieur « TT » apparaît puis appuyez sur la touche « MENU »
Châssis: BE-3D, BE-4
Modèles: KV-24WS1A / B / D / E / K / R / U (RM-862)
Processeur: MSP3410B-PS-F7-T, MSP3410C-PS-C6-T
KV-2181KR, KV-M2540, KV-29X1A / B / D / E / K / L / R / U
Pour entrer en mode de service:
Réglez le téléviseur dans le mode de service. Presse de la carte suivante séquence de boutonsON SCREEN DISPLAY – VOL + – TV.
OU
Débranchez le cordon d’alimentation du téléviseur de la prise électrique.
Permettre que le téléviseur reste sans alimentation pendant une minute.
Branchez le cordon d’alimentation dans la prise électrique. IMPORTANT : Le téléviseur doit allumer automatiquement. Si elle ne le fait pas, allez – y et allumez-le.
Alors que le téléviseur est allumé, débranchez le cordon d’alimentation de la prise électrique avant.
Laisser le téléviseur à rester sans électricité pendant une autre minute.
Effectuer une réinitialisation d’usine.
Après une image ou d’afficher des informations apparaît, attendez deux secondes, puis appuyez et maintenez la arrowButton sur la télécommande.
IMPORTANT : Assurez – vous que la télécommande est pointée vers l’avant et le centre du téléviseur.
Tout en maintenant le bouton de la flèche, appuyez et relâchez la puissance sur le bouton sur le côté du téléviseur. Réinitialiser apparaîtra momentanément sur le coin inférieur gauche du téléviseur. REMARQUE : Si la procédure de réinitialisation ne démarre pas immédiatement après l’image ou afficher des informations apparaît, la réinitialisation ne fonctionnera pas correctement. Dans ce cas, recommencez cette procédure.
Relâchez le bouton de flèche vers le haut de la télécommande et attendez que le téléviseur pour réinitialiser.
NOTES:
Si la réinitialisation message ne semble pas et le téléviseur éteint et, recommencer à l’étape 5.
Si le voyant de veille commence à clignoter huit fois, revenir à l’étape 1.
Après la réinitialisation message apparaît, laissez le téléviseur pour réinitialiser. Ne pas appuyer sur les boutons de la télécommande ou sur le téléviseur et ne pas faire d’autres ajustements pendant 1 minute.
Débranchez le cordon d’alimentation de la prise électrique.
Laisser le téléviseur reste sans alimentation pendant 10 secondes.
Branchez le cordon d’alimentation dans la prise électrique.
Allumez le téléviseur.
Avec le jeu de OFF, appuyez rapidement sur DISPLAY 5 VOL + PWR. Le mot SERVICE sera affiché
Appuyez sur 1 ou 4 pour sélectionner un réglage que vous voulez changer
Appuyez sur 3 ou 6 pour régler
Appuyez sur MUTE puis sur ENTER pour enregistrer chaque réglage.
Téléviseurs Sony fait dans la presse 1990 et tenir un bouton encastré à l’arrière de l’ensemble que vous tournez le téléviseur au lieu d’appuyer sur DISPLAY, 5, VOL +, PWR (trou pour le bouton est sous prises VIDEO)
TOSHIBA
Avec l’ensemble ON, appuyez sur MUTE une fois à distance, puis appuyez sur MUTE et maintenez enfoncée tout en appuyant sur MENU sur le téléviseur
La lettre S apparaît à l’écran pour montrer que l’ensemble est en mode de service
Pour sélectionner le réglage que vous voulez changer appuyez sur CH + ou CH –
Appuyez sur VOL + ou VOL- pour régler
oU
Avec l’ensemble oN, appuyez sur le bouton MUTE de la télécommande 3 fois et la troisième fois le maintenir
vers le bas puis appuyez sur MENU sur le plateau.
Vizio
2ways
1.
Allumez le téléviseur Vizio off.
Appuyez sur la touche « CH + et CH – » boutons du téléviseur.
Ensuite, appuyez sur et relâchez le bouton « POWER » sur la « TV ».
Relâchez les boutons CH + et CH-.
Appuyez sur le bouton MENU de la télécommande.
Vous devriez obtenir votre menu régulier, mais (reset usine) avec un « F » dans le coin inférieur droit du menu
Appuyez et maintenez enfoncé le bouton MENU pendant quelques secondes.
Le menu de service sera affiché.
2
Éteignez le téléviseur Vizio.
Appuyez et maintenez les boutons « CH + & CH- » à la télévision.
Ensuite, appuyez et maintenez le bouton POWER sur le téléviseur.
Conservez tous les trois touches enfoncées pendant quelques secondes.
Appuyez sur le bouton MENU de la télécommande.
Vous devriez obtenir votre menu régulier, mais avec un «F» dans le coin inférieur droit du menu
Appuyez et maintenez enfoncé le bouton MENU pendant quelques secondes.Menu Service sera affiché.
Pionnier
Plasma Pioneer 3ème génération
Assurez – vous que l’appareil est en veille
Maintenez la touche ENTREE + VOL + boutons sur le panneau.
Allumez le Plasma Pioneer sur le panneau.
Le menu du service viendra.
4e plasma, 5e, 6e et 7e génération
Assurez-vous que le plasma et la Media Box sont en mode veille.
Utilisation de la télécommande, appuyez sur le bouton DISPLAY (uniquement de la presse, ne tient pas) et attendre 5 secondes.
Appuyez sur {GAUCHE + HAUT + GAUCHE + DROITE + boutons POWER.Le Plasma Pioneer se met en marche et être dans le menu de service.
ZENITH
Appuyez et maintenez MENU jusqu’à ce que le menu utilisateur disparaît (5 -. 10 sec)
La télécommande ou le clavier sur l’ensemble peut être utilisé
immédiatement appuyez sur 9, 8, 7, 6, ENTRER (cela va faire apparaître le menu de service)
Sur les modèles avec 10 touches clavier, sans délai, appuyez sur ADJ simultanément. DROITE et CH +
Le modèle avec 6 bouton carte clé, sans délai, appuyer simultanément sur VOL + et CH –
Appuyez sur MENU jusqu’à ce que le menu disparaît
L’ensemble devrait maintenant être en mode menu de service.
Pour accéder à la plupart de la sélection des caractéristiques 00 besoins pour être basculés 0-1
Après vos réglages 00 besoins d’être basculées 1-0
pour quitter le menu , appuyez sur ENTER de service===============================================
Le mode de service n’est généralement pas visible pour les réglages du système de messagerie de l’utilisateur où vous pouvez modifier les principaux paramètres internes de l’appareil grâce à un menu à l’écran.
Le moyen d’y accéder dépend du fabricant, modèle, puce, etc, mais peut se résumer en trois façons:- 1 – par une combinaison de touches sur la télécommande ou l’unité elle-même (dans la liste sont dans le panneau du milieu).
- 2 – grâce à un logiciel spécifique (!. Un débrouiller agents ne partagent pas de services ou de l’information, ni le mou ni les interfaces.).
- 3 – en utilisant un service distant.

Évidemment, il n’est pas possible d’avoir tous les services de télécommandes différentes marques, donc je utiliser l’universel que, outre le fonctionnement normal de tout universel peut entrer manuellement les codes pour accéder à certains menus de service. Cette commande est Toptel 2 or, mais ne sais pas si les nouvelles versions continuent avec cette fonctionnalité.
En mode liste, vous verrez que, dans certains cas, vous obtenez: universel: Code: 3702, sm: 042, cela signifie que le code first’d obtenir à un téléviseur normal (serrer (pe) TV1 et des installations à la fois, baisse appuyez sur 3-7-0-2 presse TV1), puis le code du mode de service (appuyez et maintenez sous-texte, 0-4-2 presse, presse) et serait entrer dans le menu.
Si la boîte sur la droite de la liste ne précise rien car la navigation dans le menu est intuitif, à savoir, à travers les touches de programme + et -, volume + et -, et OK, menu ou mémoire.
Je dois vous avertir que je suis pas responsable de la mauvaise utilisation ou échecs ultérieurs causés par les informations contenues dans ce site, en tout cas. Ne devrait réaliser le mode de service qui sait ce qu’il fait et est familier avec son fonctionnement.MARQUE CLASSE MODE NOTES Amiral TV · Affichage, muet, sommeil, floue
Aiwa TV · Clé cachée dans la télévision, 8, système
· Désactiver pendant 35 minutes, tourner, le volume ร ญ m minimum, appuyez simultanément pour 2 + v-sg sur tv et 9 dans le contrôle
· grundig
Akai TV · Tension en appuyant sur + et – sur le clavier à un moment
· Mute, ok, tv. mémoire ok
· Canal 60, tandis que v et hors minuterie
· 182 pwr muet
· 183 muet
· Micro-A024 sda5254
Akai VIDEO · Vous ne jouez pas et apparaît L; appuyez sur play sur les distance de quelques SGS
Akira TV · Menu, menu, v.wiev, muet, le sommeil. hommes รบ s: minuterie et télétexte
· basic line
Allstar TV · Hôtel sur: 38 programme, alors que pendant 3sg. + Magasin et sur le front
· Hôtel off: 38 programme, alors que pendant 3sg. stocker et – sur le devant
Ansonic TV ·basic line
Sommet TV · Volume à 0, appuyez en sourdine jusqu’à ce qu’il change de couleur et le menu sur le front
Audinac TV ·daewoo
Audioton TV · Tension en appuyant sur + et – sur le clavier à un moment
Avest TV · Allumez la télé et appuyez sur l’affichage de vol de la télécommande une fois. changement dans muet
· Tension en appuyant sur vol-osd รณ sur tv et tv / av de la télécommande une fois. changement de pwr
Bang & Olufsen TV · Luminosité 32, couleur 32, contraste à 44, TV à distance et le sommeil à 60. pulsar, si il ya une clé cachée (PCB5)
Basic Line TV · Dans le menu (installer) 4725. sauver bot รณ n rouge. tv sur
· Universal: c รณ je dis 5577 – installation: 011 (รณ Menu: 067) 4-7-2-5
· Sur tv v + v รณ commande et p, « -« , tv
· V-8sgs à la télévision, p 8sgs en commande -/– 8sgs en commande, contrôler 8sgs tv
· P ร ฉ perte de la broche: débranchez dessouder la broche 5 de ic502, caractéristiques, fonctionnalités, joue nouveau mot de passe, relie la broche 5, magasin, resuelda débrancher
· Déverrouiller: appuyez 3 fois PP (avec la permission de Emilio Alonso de Bilbao)
· Micro sda5457
· Micro sda5252 / A016 (avec tda8840): n รณ options: 0-Rouge ,1-vert, 2 bleu ,3-relèvement v ,4-CAF ,10-ampli, de 12 h stade ,13-ampli … v.inf. ,14-ampli. v ,15-linéaire. ,16-pos. v ,17-large ,18-baril. ,20-trapèze
· Micro st92195c3b1/0be
· Micro st92195c3b1/0bf
Beko TV · Branchez appuyant sur P + et P-clavier à la fois
· Hommes รบ en 9301 (avec la permission de Jos ร ฉ รก Rold n)
Blaupunkt TV · Hôtel off: en appuyant je branche commande
· Appuyer sur je branche dans la commande, je, aux รณ 3200
· grundig
Bluesky TV · basi line
Brandt TV · PWR OFF, arrêt, attendre 5SG, virage serré avec le bouton vt, vt
Broksonic TV · orion
Provocateur TV · daewoo
Citoyen TV · zenit
Continental TV · Tourner avec P + et P-tant sur le plan, baisse, et p + รบ hommes à la fois, v + et – en même temps
·grundig
· Micro st6365bb1/blm / / G1000-1.2
Couronne TV · Clé cachée dans la commande
· Déverrouiller: simultanément p + et p-
Cs TV · Menu, 2358,2357,23595
DAENYX TV · noblex
Daewoo TV · PWR, 1, rappel affichage muet, รณ, muet. affichage magasin รณ rappel. Afin de menu
· PWR OFF, affichage, menu, 38, PWR
· Clé cachée de la télécommande
· PWR, affichage, muet
· Canal 91 m ร ญ netteté au minimum, rouge, vert, le menu
Daytek TV · Affichage, muet, sommeil, floue. affichage, le sommeil
Double TV · Bleu et rouge dans la commande à la fois, et v + w + à la fois frontale
Elbe TV · V et v + à l’avant et dans le contrôle stby. mettre au vert
Elenberg TV · Menu, menu, Q.VIEW, muet
Emerson TV · daewoo
Ferguson TV · Hôtel off: PWR OFF, off, on STDBY avec un contrôle serré sur les déjà trav s les hommes ร ฉ รบ régler le volume au maximum m รก
· Lumière et maintenir la touche v et p +
· telefunken
· beko
Finlux TV · Mute, ok (m), TV
Première ligne TV · basic line
Pêcheur TV · sanyo
Funai TV · Mise hors tension, 271, muet
· BASIC LINE
· Soudage d’une touche bot รณ n entre les broches 2 et 16 pt 2461-103
· Soudage d’une poussée bot รณ n entre les broches 2 et 14 d6600a
General Electric TV · Appuyer sur รบ hommes dans la télévision, pwr, V +, V + pour indiquer รณ V76 V076-79
· Combi déverrouillage: stop-eject menu TV et de contrôle tout
General Electric VIDEO · Déverrouiller: ARRÊT MENU vidéo et de contrôle tout
Goldstar TV · PWR, à la télévision et la commande de menu. mémoire ok.
· 7392, entrer, pwr. puis installation +, –
· Si la commande prend la ci. saa3010t: ร ฑ petit ou court-circuit entre les broches 1 et 11. idem pour quitter ou tv
· Tactile tandis que les hommes รบ, v + (v-รณ), p + (p-รณ) sur la face avant
· Ok d’adhérence et l’avant à la fois
· Lumière avec ok à la télévision et jaune en commande
Goldstar VIDEO · Passer l’image: inverser la ctl tête de câble
· Modèle 4 cab à jour: broche 3 de IC 203 mettra une résistance 33 K ohms à la jonction de la R 253 232 YC
Grundig TV · Je dis c รณ service: 8500 089 รณ รณ 7038
· V +, V-, p-, p +, 8500 … 7038 … 4934
· Déverrouiller: en commande V +, V-, p-, p + (ok +)
· Débrancher jusqu’à ce que vous perdez du temps (env. 30 min.); Serrer la v-avant et la touche 1 (reset), 2 (n รณ position OSD), 3 (. Pg shifter automatique), 4 (pg manu shifter), 5 (centre), 6, 7 (supprimer le mot de passe ร ฑ a), 8, 9 รณ (hommes principale รบ)
· Je me tourne serré
· Reset: en appuyant sur le bouton p-tour
· Hôtel: tour serrant iop / c
· Hôtel: touche p / c-volume de lumière 36-i
· Ecran 00:00 supprimer: pag télétexte. 697-i-clés avec un carré et 3 bandes horizontales de-i-3-vert
· En commande: n ย บ canal, pause, ap. dev, norme
· Caché touche de commande, puis affichage. Départ pour emballer ร ฉ s
· Clé cachée dans la commande
· Tourner avec P + et P-tant sur le plan, baisse, et p + รบ hommes à la fois, v + et – en même temps
· I, fonctions spéciales, le service, le code 8500
· I, centre de dialogue, le service, «pour revendeur agréé», le numéro de code, 8500
· Déverrouiller: (code) 4934, ok, arrêter
· Micro st6365bb1/blm / / G1000-1.2
· Micro-a101 sda5252Grundig VIDEO · KEY, 4, 9, 3, 4, OK et puis sur STOP
Modulateur · OFF: 8, 5, 1, 8, OK
· Modulateur ON: 8, 5, 1, 9, OK
Hitachi TV · Im-dev
· Mettez appuyant sur v + et v-Sur le front; géométrie ร ญ à (parfois pendant au moins 10 SGS.): Appuyer sur deux boutons deux fois รณ de l’enregistrement n bas de la commande, touches de télétexte sélectionnez withthe
· Dans le menu du téléviseur ou en appuyant sur PWR 3-5 SGS, audio, SGS 5 + AVX l’image. audio et vidéo montre a00 et ensemble de données de p00 d000.para p: d030.para à: D020
· 2 clés sous contrôle
· Remplacer le mot de passe: débrancher le micro à 3 broches
· -/–, Hommes รบ, tv en moins 1sg.
· P, *, ou / v, #, m
· Mettez appuyant sur TV / AV sur le front
· Menu, tv, i
· Dans รณ n tv et l’enregistrement vidéo en commande Turn serrage v-
· noblex
Hitachi VIDEO · (Serie600) CTL: Dernière mise à jour: en remplaçant R 630 K 680, R 632 avec une 330 ohm, R 629 par un anneau de 680 ohms et le condensateur C 638
Itt TV ·nokia
Itt VIDEO · Vous ne jouez pas: contrôle de bouton dans un trou
Jvc TV · Deux la norme de commande et d’affichage vsm ou cinéma ou état de la vidéo ou du cinéma / jeu ou le mode d’image
· Bien que le commandement ei muette pendant 4 SGS.
· Veille à 0 min. et ci-dessus
· Menu 3 fois, 1 heure à 3h21, std ensemble, VSM (menu) et affichage
· Menu, heure à 3h21, muet
· 03h21-heure, tandis que « thant vous » muet, menu vers le haut
· Luminosité ou le contraste à 04 affichage, le menu
· Appuyer sur f en commande, en p + tv
· Menu 4725 InstallerKen Brown TV · Passer, muet, bande
Kneissel TV · PWR, central sur la touche 5 et q est hors tension, puis de nouveau avec commande marche / arrêt dans serré
Kneissel VIDEO · VK2 de la vidéo: universel: c รณ dire 1551, sm: 054
· Valeurs planifiées :0-1 ,1-E1, 2 à 9-0, A-30, B-20, C-43, D-41, E-4
Lg TV ·goldstar
Loewe TV · Appuyez sur menu sur le téléviseur jusqu’à ce qu’il disparaisse, puis la commande de menu
· Appuyez sur le bot n caché รณ avant et après la commande de mémoire ร ฉ de
· Appuyer 5 fois รณ fonction « > » sur l’avant (en moins de 1 seconde) et mem dans la commande; magasins x
· Déverrouiller: Code-E3001
· Presser caché à l’avant, cm (รณ vt) dans la clé de commande. รก articles avec p + รณ la page télétexte -. com mémo ok, pp รณ image. tv out. universel: c รณ d: 1577 cm: touche « 20 », article: touche « * ».
· Sur le front: menu, le service et le menu r รก rapidement aux commandes
· Tour Ok avec l’avant-commande
· PWR OFF, affichage, menu, muet, PWR
· รบ hommes à la télévision et de contrôle à la fois
Lumatron TV · Menu 4725
Louxor TV · Mute, ok (m), TV
Magnavox TV · 062 596, le menu
· Menu, รณ 061 596 061 597
Magnum TV · Menu, servise, 089
Marque TV · Menu, 4725
Medion TV · Menu 1675
Micromax TV · Menu 1675
Microsonic TV · daewoo
Mitsubishi TV · Menu, 1257
· Menu, 1259
· Menu, 12579
· Menu, 1370
· Menu, 2356/7/8/9
· Menu, 23579
· Menu, 2579
· Menu, 8257
· Menu-install-config-tv 457 925
· « TV verrouillé » alors qu’il commandait qv (vue rapide) et 9; Menu: ร qv verrouillage parental et 9 ร
· TV allumé, appuyez sur le bouton qui se trouve sur le dos รก attendre 5 SGS, appuyez sur 9 sur la télécommande. 2 et 8 sélectionnez le c รณ dire, 4 et 6 valeurs 1 annuler les paramètres, les paramètres d’enregistrement 0
· Vidéo-audio, des menus Menu mémorisés 2 fois
Munstang TV · couronne
Noblex TV · Boutons de contrôle cachés
· PWR OFF, pause / mute, 182 372 รณ รณ 3272, pwr
· Affichage, muet, sommeil, floue
· La touche menu de tv et 2 contrôle
Nokia TV · Silence-ok (m)-tv
· Stby-v-serrage à l’avant et dans le contrôle menu déroulant ci-tv-i, pour réinitialiser: bleu-254-ok-ok-attendre 15 SGS
· -/–, Menu, tv pour une sg
· Mono / Stéréo, chanel c, hypersonique pour une sg
· I (information), m (mémoire), prog (touche de programme)
· Universal: c 0509 รณ je dis, la mémoire 061
· PWR OFF, muet, 372, pwr
· C, *, ou / v, #, m
· Magasin, -/–, TV / SAT
· Menu, tv, i en moins de 5 secondes
· Ok, muet, TV / SAT
· Silence, 9, pip
· Serrage v-en tv, menu i TV, goutte, i
· Micro zc410938p.con universelle: c 0509 รณ je dis, la mémoire 061
· 10 touche de sélection. pwr surNordmende TV · Stby-débranchez-tour avec la clé rouge serré, la mémoire: rouge; sortie: muet
· Stby-débranchez-tour avec vt serré en commande
· Stby-débranchez-bleu clair avec la commande serrée et vt avant à la fois, bleu
· Lumière avec v + et v-serré pendant 8SG
Océanique TV ·hitachi
Orion TV · Clé cachée de la télécommande
· Tourner avec menu et sam.
· TV, osd, p-, v-
Orson TV · Passer, vol, peaufiner, –
Pace Prima TV · Menu, 0, magasin, anow droite, gauche anow
Palladium TV · Alors que les boutons de contrôle bleu-rouge et goutte-P + et P-avant
· Touchez service de touche, c en commande
· Menu, service, ok, 089
· V + et V sur l’avant et tournez le bouton
Panasonic TV · Programme et le volume à 60 netteté 0-tout minuterie dans le contrôle et la v-en tv; mémoire: str, à n
· 60 netteté ร ญ programme de m-v minimum minuterie d’arrêt à l’avant et dans le contrôle tout en
· AUTO-DIAG รณ diagnostic: v devant et l’état de contrôle à la fois
· Rappeler à la fois le contrôle et la v-avant, sur: normal
· Pour m รก maximale basse, tripler le minimum m ร ญ révéler ou réinitialiser ou de rappel alors que dans le v-tv; paramètres: touches télétexte
· Mettre en set-up fil d’antenne dans la minuterie à 30, laissant de la chaîne 124 hommes, allant de 0, v-en tv.salir action et pwr à la fois
· Terrain court fa1 fa2 (tp 8 broches à la broche 3)
· Court r รก demander action et v + plateau fa1 et fa2 et tv
· Déverrouiller: le menu à la fois p + et de l’action ou
· Hôtel: à la fois: le contrôle de la minuterie et v-avant
· TV sur le canal รบ Enfin, v / w tv, v en commande pour 5 SGS.
· Rappeler la commande et v-avant, laissant la normale
· Volume à 0, une minuterie de 30 min, p + avant et mémo commande tout
· Volume à 0, de la minuterie 30 min, V + et V-du temps
· Mettez en v-tv, affichage, minuterie d’arrêt
· Intensité à zéro, menu, fetures, minuterie d’arrêt, et v-mémoire à la fois
· Rouge-Vert-menus
· Jaune-bleu-valeurs
· Mémoire de magasin
· Ne pas normePanavox TV · daewoo
Philco TV · daewoo
Philips TV · 062 596, menu (osd รณ รณ i)
· 162 596, le menu hommes รบ +
· 062 597, le menu
· 20pt424a et 21pt263a: tige courte 1 eeprom (24C08) à la terre et à son tour
· M24 Châssis l7.3 de ll3 et tige courte m25
· Anubis sdd: courte m31 broches et m32
· Ligne noire: broche court devant et tour. รบ hommes: v et p +. 6578 commande: les hommes et les sous-couleurs รบ
· 25pt4523/36: court encender broches รบ-clavier et hommes – à la fois.. 6578: commande curseurs
· Programme 38 ensemble, tandis que les boutons sur le devant
· Singe à la télévision et dans le contrôle de diamant plateau 4 d ร ญ chiffres: les 2 premiers sont la forme et le second avec le pp valor.guardar
· Mode d’hôtel de sortie: 38 canaux air bouton rouge (photo)-OSD
Programme 38 :: v et p + ou magasin ou minuterie sleeo tout en laissant plusieurs SGS · Mode d’hôtel.
· Mode d’hôtel de sortie: programme 38: v et v + osd à la télévision et dans le contrôle tandis que plusieurs SGS.
· Mode d’hôtel de sortie: 38 programme, alors que lors de l’installation et P-3sg
· Mode d’hôtel de sortie: 38 programme, alors que pendant 4SG ou MENU SELECT dans la télévision à l’écran et la minuterie de sommeil ou sur commande
· Mode d’hôtel de sortie: sélectionnez SEULEMENT VIDEO SOUND 2 ou moins et robinet 1sg et Fonction Télétexte
· Si le menu n’apparaît pas sinton ร ญ à: régler le canal 38 de serrage ou de magasin et de contrôle + v + off
· V + et p-dans-commande à la fois
· Tmp87cm36n micro-3089: broche de terre 18
· Micro p83c770aar / 048 bs / / 90904781 / / de bsm9925: Pin 7: résister. 100 wa terrestresPortland TV · daewoo
Précision TV · basic line
Proscan TV · general electric
Quasar TV · R court รก demander fa1 et fa2 entre, v + et l’action de menu ou les deux, avec le pouvoir: les hommes รบ s, l’action et le pouvoir tout de suite pour 3 SGS.
Radiotone TV · V-avant, dans la commande prog (sinton ร ญ a), -, tv. universel: c รณ dire 3515, v-à la télévision, 4, sous hommes รบ: 028,7. note: ok
· Micro: st6387b1/fia
Rca TV · general electric
Revox TV · loewe
Roadstar VIDEO · goldstar
Saba TV · telefunken
Saba VIDEO · Déverrouiller: Alors que nous pressons jouer 6-7-0 รก en plateau
Saivod TV · basic line
Sakura TV · basic line
Salora TV · nokia
Samsung TV · PWR OFF, muet, 182, PWR
· PWR OFF, le sommeil, P.STD., Mute, PWR
· PWR OFF, P.STD., Av, hors minuterie, pwr
· PWR OFF, P.STD., Menu, sommeil, PWR
· PWR OFF, P.STD, aide, sommeil, PWR
· PWR OFF, affichage, menu, muet, pwr
· PWR OFF, affichage, P.STD, muet, pwr
· Dessin didodo en commande: mettre un sur et le menu
· Universal: c รณ digo3702, sm: 042
· PWR OFF, P.STD, ascenseur, sommeil, PWR
· PWR OFF, ascenseur, sommeil, PWR
· Mémoire et tv norme en commande
· Av, minuterie, affichage
· Av, minuterie, pwr
· Affichage tour de serrage
· Mute et le menu valeurs
· Micro zilog3593 / / szm157wtx / / 9818
· Micro sony / / ssom720 / / 85332a3235 / / 827e06e: universel: c รณ je dis 3702, sm: 042
Sankey TV · daewoo
Sansei TV · PWR: en appuyant sur le menu à la télé: 12345 รณ 7 (différente de รบ hommes)
Menu · Appuyer sur 2
· sanyo
Sansui TV · Serrage écran v-up 0 9
Sanyo TV · Mémo à la télévision et dans le contrôle
· La touche menu de tv-2
· 3SGS Tv mémo, contrôle mémo, son
· Universal: codigo1775, SM128, off129, 160, …
· Définir et son + son
· Micro-p sab8032b: universel: codigo1775, SM128, off129, 160, …
Ins TV · Menu 1675
· Menu, 4725
Schneider TV · Bleu et rouge dans la commande à la fois, et v + w + à la fois frontale
· paladium
· basic line
Seleco TV · Mute, ok (m), TV
Net TV · Jumper sur les broches 2 et 6-mode en commande despuentear
· รณ tourner avec v + v et p + serré
· Court et tp502 tp501 pour une seconde (environ รณ IC501 IC001)
· Dv1406 pont รบ 1er et dernier axe de m รณ module numérique (broche 41 tvpo2066 sol) et universel: 5087. sm: 038. changer: 014. modifier p + -. mémoire ok. sur *. despuentear
Dv 1506 · broches sn-cavaliers 1 et 2-clé « n audio » apparaît-dservd; modifiée avec les touches aigus: Règle p + et -; note « n », sortie: « PR / CH / cc »-off
· Déverrouiller: inviolable dans plusieurs SGS de commande.Shimasu TV ·daewoo
Siemens TV · Centre d’Information »,« fonctions spéciales »,« service », numéro de code 089
· grundig
Siera · TV
· Micro: saa5531ps/n4/0128
Silva TV · Menu, service, ok, 089
Sonitron TV · C Universal รณ je dis 1775, sm 216 #
· Micro: st92195b1b1/exo
Sony TV · PWR OFF, disp, 5, v +, PWR
· PWR OFF, disp, 5, PWR
· PWR OFF, disp, 5, image, PWR
· PWR OFF, 5, v +, télétexte
· PWR OFF, disp, 5, v +, TV
· En appuyant sur les 3 boutons tournent le menu TV et entrer démo
· Tournez le bouton de service pressé (dans le cadre de atr รก s)
· Universal: Menu 5087.sub: 170
· Précédente un menu, menu à 4 suivant, 3-up valeur, 6-bas valeur; muet entrer enregistrées
· Menus audio et vidéo
· Pour ร 0 ร (photo) déprogrammé: universel: 9674, essai: 255, mémoire (Figure diamant dans l’original)
· Micro saa5497ps Telefunken TV · PWR OFF, débrancher, tourner le bouton en appuyant sur le télétexte
· PWR OFF, débrancher, appuyant vt (รณ bleu) dans le contrôle, la fiche attendre 8 secondes, la chute (vt (รณ bleu))
· PWR OFF, débrancher, tournez serrant p et v-attendre 8 SGS.
· Photo, usine, PWR OFF, muet, 182, PWR
· Menu Configuration dans la télévision et de contrôle tout
· Déverrouiller: PWR OFF, débrancher, tourner serrant stby volume max.
· Déverrouiller: c รณ je dis 0000
· PWR OFF, débrancher, tournez sur le renforcement du contrôle vt, vt
· Mute, ok (m), TV
· Bleu pour le changement
Telefunken VIDEO · Déverrouiller: être courte pièce pour sol sg TP8
· CLÉ, 0000, OK, touche STOP, 4934, OK, STOP
Thomson TV · telefunken
Thomson VIDEO · Lors de l’insertion de la bande de l’arrêt de รณ: av en commande sur sg
· Déverrouiller: presser encore en jeu + et –
Tonomac TV · Clé cachée de la télécommande
Toshiba TV · Mute, appuyez sur muet, menu TV, le menu
· À la télévision par le menu en appuyant sur, resserré. v serré. deux p-
· Débranchez une sg, tournant, en appuyant sur v-télévision dans le contrôle 9 (paramètres) รณ 2 (OSD)
· 2 clés ci-dessous sur le bouton
· Déverrouiller: sectionneur avec une sg-v-0 et
· Appuyer sur vol-avant et 9 m รก s commande pendant 10 sg
Toshiba VIDEO · Déverrouiller: Alors รก dans squeeze play et jouer quelques SGS rec
· Déverrouiller: Appuyez sur canal + et quelques SGS plateau de canal-
Universum TV · Menu, tv, i (, tv, tv, i)
Vestel TV · basic line
Watson TV · basic line
White-Westinghouse TV · zenit
Zenit TV · Appuyez sur menu jusqu’à ce qu’il disparaisse dans la commande, 9876, entrez รณ affichage
· 999
· La touche menu, v et p-
LISTO
Comment débloquer ou déverrouiller votre LISTO TV 28 HD-2T-139
Comment débloquer ou déverrouiller votre LISTO TV 28 HD-2T-139
Le possible verrouillage « hôtel » ou « hôpital » sur votre LISTO TV 28 HD-2T-139procéder ainsi : appuyz simultanément sur les touches « Menu » du téléviseur et de la télécommande, en commençant par la touche menu du téléviseur.
Cela pendant 7 secondes environ. Le menu usine appraît alors.
Comment débloquer ou déverrouiller votre LISTO TV 28 HD-2T-139Appuyez de nouveau sur la touche « Menu » de la télécommande, et ensuite sur « OK » pour sélectionner la ligne : « [Nom du constructeur] mode hotel/hopital setup ». Vous vous trouvez dans le menu du mode hôtel ou hôpital de votre LISTO TV 28 HD-2T-139. Sélectionnez « Non » sur la première ligne avec la touche « OK » de la télécommande.
Appuyez sur la touche « Menu » de la télécommande et éteignez votre LISTO TV 28 HD-2T-139. Enfin, rallumez la télévision.
Un mot de passe non supprimé
pour déverrouiller le mot de passe de votre LISTO TV 28 HD-2T-139Les codes par défaut sont 0000, 1234, 1111, 7777 ou 9999. Votre télévision LISTO TV 28 HD-2T-139 ne se bloque pas comme un téléphone, vous pouvez essayer autant que vous voulez. Si aucun de ceux là fonctionne, il va falloir prendre le manuel d’utilisation, ou vous rendre sur le site internet du constructeur de votre LISTO TV 28 HD-2T-139, et aller dans sa fiche produit pour télécharger le manuel. Là doit ête indiqué, dans la section aide et dépannage, un code de dévérouillage qui permet de redéfinir le mot de passe.
Entrez-le et redéfinissez le mot de passe de votre LISTO TV 28 HD-2T-139. Enfin, dans les réglages de votre télévision, désactivez le mot de passe.
=======================================
Model Code mode service LCD &LED condor
CL22TR11 MENU + 2513
CL32TR12 MENU + 2513
LCD24E100 MENU + 8202
LCD24E101 MENU + 8202
LCD32CA1S, CA2S, CA3S MENU + 8202
LCD32E200 MENU + 8202
LCD32E200C MENU + 8202
LCD32E200D MENU + 8202
LCD32E210 MENU + 8202
LCD40LF1S MENU + 8202
LED19F300- LED19F300B MENU + 8202
LED24DL1M MENU + 8202
LED24F300 MENU + 8202
LED24F300P MENU + 8202
LED24L2000 MENU + 8202
LED24T01 MENU + 8202
LED24T02 MENU + 8202
LED28F200 MENU + 8202
LED28L2100 MENU + 8202
LED32C02 /B MENU + 8202
LED32F300 MENU + 8202
LED32F310 MENU + 8202
LED32F311 MENU + 8202
LED32F320 MENU + 8202
LED32F321 MENU + 8202
LED32F322/22B MENU + 8202
LED32T01 MENU + 8202
LED32T28GP MENU + BALANCE + 3205 / MENU + BALANCE + 1969
LED40T28GP MENU + BALANCE + 3205 / MENU + BALANCE + 1969
LCD19W57 MENU + BALANCE + 3205 / MENU + BALANCE + 1969
LCD2001EU MENU + BALANCE + 3205 / MENU + BALANCE + 1969
LCD2233EU MENU + BALANCE + 3205 / MENU + BALANCE + 1969
LCD22V68A MENU + BALANCE + 3205 / MENU + BALANCE + 1969
LCD22V68EU MENU + BALANCE + 3205 / MENU + BALANCE +1969
LCD22V88 MENU + BALANCE + 3205 / MENU + BALANCE + 1969
LCD24V78P /AP MENU + BALANCE + 3205 / MENU + BALANCE + 1969
LCD24V86P MENU + BALANCE + 3205 / MENU + BALANCE + 1969
LCD24V88AP MENU + BALANCE + 3205 / MENU + BALANCE + 1969
LCD26V68N MENU + BALANCE + 3205 / MENU + BALANCE + 1969
LCD26V79 MENU + BALANCE + 3205 / MENU + BALANCE + 1969
LCD26V88 MENU + BALANCE + 3205 / MENU + BALANCE + 1969
LCD3233EU MENU + BALANCE + 3205 / MENU + BALANCE + 1969
LCD32V68UE MENU + BALANCE + 3205 / MENU + BALANCE + 1969
LCD32V79 MENU + BALANCE + 3205 / MENU + BALANCE + 1969
LCD32V79H MENU + BALANCE + 3205 / MENU + BALANCE + 1969
LCD32V88 MENU + BALANCE + 3205 / MENU + BALANCE + 1969
LCD32V88H MENU + BALANCE + 3205 / MENU + BALANCE + 1969
LCD32V88M MENU + BALANCE + 3205 / MENU + BALANCE + 1969
LCD32V88S MENU + BALANCE + 3205 / MENU + BALANCE + 1969
LCD39V77PK MENU + BALANCE + 3205 / MENU + BALANCE + 1969
LCD42V68EU MENU + BALANCE + 3205 / MENU + BALANCE + 1969
LCD42V68PK MENU + BALANCE + 3205 / MENU + BALANCE + 1969
LCD42V79P MENU + BALANCE + 3205 / MENU + BALANCE + 1969
LCD42V88GP MENU + BALANCE + 3205 / MENU + BALANCE + 1969
LCD42V88P MENU + BALANCE + 3205 / MENU + BALANCE + 1969
LCD42V88PH MENU + BALANCE + 3205 / MENU + BALANCE + 1969
LCD47P69GP MENU + BALANCE + 3205 / MENU + BALANCE + 1969
LCD47V88GP MENU + BALANCE + 3205 / MENU + BALANCE + 1969
LCD50C10P MENU + BALANCE + 3205 / MENU + BALANCE + 1969
LCD55V88GP MENU + BALANCE + 3205 / MENU + BALANCE + 1969
LED55T29 MENU + BALANCE + 3205 / MENU + BALANCE + 1969
LEDN29K300 MENU + BALANCE + 3205 / MENU + BALANCE + 1969
LEDN29K300N MENU + BALANCE + 3205 / MENU + BALANCE + 1969
LEDN32D20 MENU + BALANCE + 3205 / MENU + BALANCE + 1969
LEDN32D20A MENU + BALANCE + 3205 / MENU + BALANCE + 1969
LEDN32D33 MENU + BALANCE + 3205 / MENU + BALANCE + 1969
LEDN32K160M MENU + BALANCE + 3205 / MENU + BALANCE + 1969
LEDN32K26 MENU + BALANCE + 3205 / MENU + BALANCE + 1969
LEDN32K300M MENU + BALANCE + 3205 / MENU + BALANCE + 1969
LEDN32K310 MENU + BALANCE + 3205 / MENU + BALANCE + 1969
LEDN40D33P MENU + BALANCE + 3205 / MENU + BALANCE + 1969
LEDN40K160P MENU + BALANCE + 3205 / MENU + BALANCE + 1969
LEDN40K160P MENU + BALANCE + 3205 / MENU + BALANCE + 1969
LEDN40K160P1 MENU + BALANCE + 3205 / MENU + BALANCE + 1969
LEDN40K26P MENU + BALANCE + 3205 / MENU + BALANCE + 1969
LEDN40K366X3D MENU + BALANCE + 3205 / MENU + BALANCE + 1969
LEDN42K560R3D MENU + BALANCE + 3205 / MENU + BALANCE + 1969
LEDN42T36R3D MENU + BALANCE + 3205 / MENU + BALANCE + 1969
LHD32K21SEU MENU + BALANCE + 3205 / MENU + BALANCE + 1969
LHD32V79CEU MENU + BALANCE + 3205 / MENU + BALANCE + 1969
LTDN42K26CEU MENU + BALANCE + 3205 / MENU + BALANCE + 1969
LTDN42K310R3D MENU + BALANCE + 3205 / MENU + BALANCE + 1969
LTDN42V79CEU MENU + BALANCE + 3205 / MENU + BALANCE + 1969
LTDN50C10CEU MENU + BALANCE + 3205 / MENU + BALANCE + 1969
LTDN50K310XCEU3D01 MENU + BALANCE + 3205 / MENU + BALANCE + 1969
LTDN55K610XWAU3D MENU + BALANCE + 3205 / MENU + BALANCE + 1969
LTDN55XT770XW3D MENU + BALANCE + 3205 / MENU + BALANCE + 1969
LTDN65K560XW3D MENU + BALANCE + 3205 / MENU + BALANCE + 1969
LCD29E130 MENU + CONTRAST + 1950
LCD39E120 MENU + CONTRAST + 1950
LED39D3000 MENU + CONTRAST + 1950
LED40D000 MENU + CONTRAST + 1950
7 janvier 2019 à 7 h 22 min #2259rockyMaître des clésCoby
Enter menu, hi-lite “audio” then enter 8893
mode/source 2580 select “other setting”,select “shipment” then yes, after it exits service menu you need to power set off.
Dynex
source/input 2580
hold vol down on tv and hold #1 button on remote, vol will jump to halfway and set shuts off. Turn back on have 1st time setup screen.
source/input 2580
menu 1999 (tv is on)
DELL 19 verrouiller
pressé MENU pendant 15 secondesElement
menu 0000
menu 1147
Haier
pull up menu, hi-lite “audio” then enter 8893
Hisense
In customer menu go to”Parental” enter 0000 then select”Clean All” then power the set off and back on and first time setup menu will be there.
For some models, same as above model except in menu it is labeled “Lock”
Insignia
input 2580 (tv is on)
Mitsubishi
Menu 123 or menu 2470 (tv is on)
Panasonic
Hold vol- on TV, press and hold menu button on remote
Philips
Push menu, select”Features”then select”current software info” push 062596-info on remote then push info again then red”initialize appears and changes color then complete. Push power button to exit
TV is on,push 062596-info on remote,then push info again, red”initialized”appears it turns green when completed, then push power button to exit
Polariod
Hold vol- and chan- or hold vol+ and chan+ (tv is on)Proscan
In customer menu go to setup,select parental control menu, enter 0000 then select “clear channel list”.
RCA
Menu 1147
Sanyo
hold vol down on TV, press and hold #1 button on remote, vol will jump to halfway and set shuts off. Turn back on have 1st time setup screen.
Samsung
Mute 182 power (tv is off)
(On some models, Factory Reset is on this menu, on some, you must go into the “Options” submenuSeiki
Menu 0000
Sharp
(Note – On Sharp models, you will need to look through the menus to find the reset option)menu 1999
menu, 3481
menu 1147
while holding vol– & input buttons on tv plug in set when “k” appears push vol– & chan-
Sony
Hold “arrow up” on remote and push power button on tv (tv is on)
Symphony
Source/input 2580
Toshiba
on Menu, select “Installation”, then “System Information” press the right arrow button, (“System Information” will change to “Factory Reset” or something similar) follow on-screen instructions
Vision Quest
Source/input 2580Vizio
In customer menu under “Help” tab is Factory Default enter 0000
Vestel (most):
Menu 4725 then select « RESET »Samsung (European):
Power off, Info – Menu – Mute – Power, then find factory reset and execute option.LG/Zenith:
Hold MENU on TV and MENU on remote for 5~10 seconds, then select reset option.NEC:
While powering on hold « MENU » or « INPUT » on TV, depending on model. (Only disables error lock out/buffer and puts TV in temporary service mode.)A little googling to the service mode
Vizio Service Menu Method 1
1. Turn The TV off.
2. Press and hold the {CH +} & {CH -} buttons on the TV.
3. Then press and release the {POWER} button on the TV.
4. Release the {CH +} & {CH -} buttons.
5. Now press the {MENU} button on the remote.
6. You should get your regular menu up, but with a « F » in the bottom right corner of the menu (This is for factory).
7. Press and hold the {MENU} button for few seconds.
8. The Service Menu will be displayed.
Vizio Service Menu Method 2
1. Turn The TV off.
2. Press and hold the {CH +} & {CH -} buttons on the TV.
3. Then press and hold the {POWER} button on the TV.
4. Keep all three buttons pressed for few seconds.
5. Now press the {MENU} button on the remote.
6. You should get your regular menu up, but with a « F » in the bottom right corner of the menu (This is for factory).
7. Press and hold the {MENU} button for few seconds.
8. The Service Menu will be displayed.
Vizio Service Menu Method 3
1. Press and hold the {EXIT} button on the remote for 3 seconds then release it.
2. Then press the {1} {2} {3} buttons on the remote.
3. To exit, press the {EXIT} button.
—————————————————————
GV42L FHDTV10A / JV50 / SV42 / SV320XVT / SV370XVT / SV420M / SV470M / SV420XVT1A / SV470XVT1A /
VECO320L1A / VO22L / VO32 / VO37 / VO47L / VOJ320 / VOJ370 / VP322 / VP42 HDTV20A / VP422 / VS420LF1A /
VU42 / VW32 / VW37 / VW42 / VX20 / VX32 / VX37 HDTV10A /VX42Push « Menu » on remote and then push « Vol- » and « Input » on keypad
GV46 / P50HDM / P50HDTV10A
Press « Ch- » and « Ch+ » buttons together once on keypad
GV42 / L42 / VP42HDTV10A / VP50 / VX37
Press and release « Menu » on keypad. Hold « Ch- » and « Ch+ » buttons on keypad, then hold « Menu » on remote.
P42
Hold « Ch+ » and « Ch- » along with « Power » on keypad. OSD will show « F » on right bottom portion of OSD.
VM60P
Press « Info » on remote, then press « Right Arrow, » « Down Arrow, » « Left Arrow, » « Up Arrow, » « Right Arrow. »
The TV will show « Enter Factory Mode. » Press « Menu » after message disappears and go do to « Setup. »GV47
Press « Menu » then press the following combination: « Info, » « 8, » « 2, » « 0, » « 6. »
SV420M / SV470M / VF550M / VF550XVT1A / VF551XVT / VL260M / VL320M / VL420M / VL470M / VO320E /
VO320EP8 / VO370M / VO420E / VP504 / VP505Press « Menu, » and then press « 2, » « 4, » « 8, » « 9. »
SV420M / SV470M / VF550M / VF550XVT1A / VF551XVT / VL260M / VL320M / VL420M / VL470M / VO320E /
VO320EP8 / VO370M / VO420E / VP504 / VP505Press « Menu, » and then press « 2, » « 4, » « 8, » « 9. »
VA19 / VA22LF / VA220E / VA26
Press « Menu » and then press the following combination: « 0, » « 6, » « 2, » « 5, » « 9, » « 6 »
VA320E / VA320M / VA370M / VT420M / VT470M
Press « Menu » and then press the following combination: « 1, » « 9, » « 9, » « 1 »
VW22 / VS370E
Press « Mute » once OR « – » twice (the dash next to the « 0 ») and then press the following combination: « 9, » « 8, » « 7, » « 6 »
To reset to factory, on remote, Off Timer – Menu – Exit – Off Timer, then select reset option.
=======================================
LCD SAMSUNG LE 40R81B
1 Entering Factory Mode
Power OFF->INFO ->MENU-> MUTE-> Power ON
– If you have Factory remote – control
PICTURE ON ->DISPLAY ->FACTORY
– The buttons are active in the service mode.
1. Remote – Control Key : Power, Arrow Up, Arrow Down, Arrow Left
Arrow Right, Menu, Enter, Number Key(0~9)
2. Function – Control Key : Power, CH +, CH -, VOL +, VOL -,
Menu, TV/VIDEO(Enter)======================================
COMMENT ENTRER SERVICE MODE TOSHIBA
- Appuyez sur « Mute » et « Menu » boutons sur la télécommande simultanément.
- Appuyez sur « Menu » bouton sur la télécommande, et entrez {4 => 7 => 2 => 5}
- Appuyez sur Volume Down « bouton sur le panneau avant du téléviseur et appuyez et maintenez chiffres ‘9 ‘sur la télécommande.
OU
- Avec aucun menu affiché sur l’écran, appuyez sur « AV » et « F » boutons simultanément.
- Entrez le code {1 => 0 => 4 => 8} par la télécommande.
OU- De Mute Appuyez sur le bouton de la télécommande.
- Appuyez sur le bouton «Mute» à nouveau. Bien maintenir la touche ‘Mute’ bouton, appuyez sur le bouton « Menu » sur la TV SET.
- « S » sera affiché dans le coin supérieur droit de l’écran.
- Appuyez sur ‘TV (ANT) bouton sur TV / VIDEO »; d’obtenir une seule ligne horizontale On | Off [à ADJUST tension de l’écran]
- Appuyez sur ‘TV (ANT) / VIDEO’ bouton de la télécommande, pour sélectionner des signaux de test internes.
- Utilisez ‘Ch Up | Ch Dn’ boutons pour appeler un élément à régler.
- Utilisez «Vol Up | Vol Dn ’boutons pour ajuster la valeur de données de l’élément sélectionné.
- Pour faire le menu de réglage, pressez la touche «Menu» \ OFF.
- Pour appuyer sur le bouton « Recall + Canal + » ‘initialiser la mémoire IC (QA02), sur la’ TV ‘.
- De la touche de rappel + Canal Dn « sur le » Press TV « , pour initialiser les données auto diagnostic.
======================================
LCD Polaroid FLM 40 Comment débloquer le MOT DE PASSE (PARENTAL)
Les mots de passe prédéfinis usine à ces ensembles sont ‘0000 ‘. Ce mot de passe doit être utilisé avant de régler votre propre mot de passe personnel. Il est recommandé de garder le mot de passe personnel dans un endroit sûr et loin des enfants. Dans le cas où vous perdez le mot de passe, le mot de passe principal est [8202]. Ce mot de passe maître remplace tous les mots de passe. Rappelez-vous que, ce mot de passe ne peut pas être modifié par toute façon, et le garder dans un endroit sûr.
Si l’image dans l’image ne fonctionne pas en utilisant le composant-1 et composants-2 que les sources d’entrée? Réglez le téléviseur sur ses réglages d’usine.
usine Procédure mode- Mise sous tension du téléviseur.
- Appuyez sur [Volume +] et [Canal +] simultanément et de les libérer.
- TV Power Off avec télécommande ou la touche Power ‘Exit’.

=================================================
MODE DE SERVICE – AOC-LT2722
POUR ENTRER MODE SERVICE
- nombre de Appuyez sur la touche ‘100 => 9 => 9 => 1 ‘pour passer en mode d’ingénieur.
- Appuyez sur ‘Menu’ touche de répétition à la page « ADC », puis sélectionner appuyez sur la touche «droite» pour initialiser EEPROM « EPrint » et.
- touche Appuyez sur le numéro ‘100 => 9 => 9 => 9 ‘pour passer en mode usine.
CONTRÔLE PARENTAL
- Verrouillage Menu: Mettez la fonctionnalité pour configurer notes On / Off.
- MPAA: Configurer MPAA.
- TV PG NOTE: Configurer TVPG COTE.
- Mot de passe: Changer le mot de passe (par défaut est ‘1111 ‘). Suivez les instructions à l’écran. Une fois changé, n’oubliez pas le mot de passe. Si le mot de passe a été oublié {Arrêt => Menu => V-Chip => Silence} pour revenir le mot de passe ‘1111 ‘
- ============================================
- LC4.31E
Modes de service
Comment faire pour activer
Pour activer la D Gest SB , mettre le téléviseur en mode numérique (via
le bouton A / D sur la télécommande ) .
Une . Appuyez sur le bouton « Digital » Menu de la télécommande pour
activer le menu utilisateur numérique ( « Setup » ) .
2 . Activez l’option » Informations »
sous-menu ( par l’intermédiaire du «bas» et
«Bonnes» les touches de curseur ).
3 . Dans la partie « Informations » sous-menu ,
appuyez sur les touches suivantes
sur la télécommande pour activer la D Gest SB :
»
VERT ROUGE JAUNE 9 7 5 9
» . Ensuite , le menu » Service »
apparaît ( voir
chiffres ci-dessous) .
Explication de Menu
Figure 5-1 Menu Gest SB – 1
Figure 5-2 Menu Gest SB – 2
Figure 5-3 Menu Gest SB – 3
Une .
Version du matériel :
Ceci indique la version de l’IBO
Zapper matérielle du module .
2 .
Demande SW :
La version du logiciel de l’application.
3 .
NOR Version:
Le NOR version du logiciel d’image de Flash
4 .
Fréquence numérique :
La fréquence numérique que l’ensemble est
accordé à .
5 .
Taux d’erreur binaire :
Le taux d’erreur mesuré avant que l’erreur
un circuit d’algorithme de correction . ( cette valeur donne une
impression du signal reçu )
6 .
Tuner AGC :
Tuner valeur AGC .
7 .
COFDM Lock:
Indication si décodeur COFDM est verrouillé .
8 .
AFD Statut:
Statut de l’ actif Format de l’image
Descripteur .
9 .
Livraison terrestre Paramètres système:
–
Bande passante:
La bande passante du signal reçu .
–
Constellation Motif :
Affiche le signal
constellation .
–
Valeur Alpha :
Affiche la valeur alpha .
–
FEC schéma :
Affiche le Forward Error Correction
programme
–
Intervalle de garde :
Affiche la valeur de la Garde
Intervalle .
–
Mode de transmission :
Affiche la transmission
Mode.
10 .
Audio Type de Comp :
Type de flux audio détecté .
11 .
MHEG actuelle :
Indique si MHEG est présent ou pas .
12 .
CIM Carte actuelle :
Indique si la carte CIM est présent ou pas .
Comment sortir
appuyez sur la
BLEU
bouton de la télécommande pour quitter DGSBModes de service , codes d’erreur et de recherche des pannes
LC4.31E AB
5 .
5.2 Codes d’erreur
La mémoire tampon de code d’erreur contient toutes les erreurs détectées depuis la dernière
moment où le tampon a été effacé . Le tampon est écrit de gauche à
droite. Quand une erreur se produit , ce n’est pas pour l’instant dans le code d’erreur
tampon , il est affiché sur le côté gauche et toutes les autres erreurs déplacer un
position vers la droite .
5.2.1 Comment lire l’ erreur Buffer
Vous pouvez lire le tampon d’erreur de 3 façons :
• Sur l’écran via la SAM ( si vous avez une image ) .
Exemples:
– ERREUR: 0 0 0 0 0 : Pas d’erreur détectée
– ERREUR: 6 0 0 0 0 : code d’erreur 6 est la dernière et la seule
erreur détectée
– ERREUR: 9 6 0 0 0 : code d’erreur 6 a été détecté la première et
code d’erreur 9 est la dernière détection ( plus récent ) erreur
• Via la procédure LED clignotante ( lorsque vous n’avez pas
image ) . Voir «Le Bl
encrage intérieur LED » .
• Via ComPair .
5.2.2 Comment effacer l’ erreur Buffer
La mémoire tampon de code d’erreur est effacée dans les cas suivants :
• En utilisant la commande EFFACER dans le menu SAM :
– Pour entrer SAM , appuyez sur la séquence de touches suivante sur la
distance émetteur de commande : »
062596
» Directement suivie
par l’OSD / i bouton + (ne pas laisser l’écran en temps
entre les entrées en tapant la séquence ) .
– Assurez-vous que l’élément de menu est sélectionné EFFACER . Utilisez l’
Boutons MENU UP / DOWN
, Si nécessaire.
– Appuyez sur le bouton DROIT MENU pour effacer l’erreur
tampon . Le texte sur le côté droit de la ligne » Clear »
changer de « CLEAR ? » à » EFFACE »
• Si le contenu de la mémoire tampon d’ erreur n’ont pas changé depuis 50
heures , la mémoire tampon d’erreur réinitialise automatiquement .
Remarque:
Si vous quittez SAM par déconnexion
Ting secteur de la
poste de télévision, la mémoire tampon d’ erreur n’est pas réinitialisé.
5.2.3 Codes d’erreur
En cas de Faul non intermittente
ts , notez les erreurs présentes
dans l’erreur de tampon et effacer le tampon d’erreur avant de commencer
la réparation . Cela garantit que
les codes d’erreur ne sont plus vieilles
présente .
Si possible , vérifier l’ensemble du c
ontenu de la mémoire tampon d’erreur . dans
certaines situations, un code d’erreur est seulement le résultat d’une autre erreur
et pas la cause réelle de la pr
oblème ( par exemple , un défaut dans
la détection de la protection
un circuit peut également conduire à une protection ) . - ================================================
- PHILIPS 32PF5320/28 LC4.3
POUR ENTRER MODE SERVICE
Pour entrer en mode de service [SAM], suivez parmi ces méthodes.
- Appuyez sur la séquence de touches suivante sur la télécommande (062 596), suivie directement par bouton OSD / ETAT. Ne pas permettre l’affichage de temps entre les entrées en tapant la séquence.
- Ou WIA ComPair [couplage avec l’ordinateur]
Après être entré dans le mode SAM, un écran avec SAM dans le coin supérieur droit s’affiche, indiquant que le téléviseur est en mode de réglage de Serive.
MENU EXPLICATIONS
- LLLLL => Cela représente la minuterie de l’exécution. La minuterie de fonctionnement compte les heures de fonctionnement normal. Ne pas compter les heures de veille.
- AAABCD-XY => C’est l’identification du logiciel du microprocesseur principal. A = le nom du projet (LC04.x), B = Région, E-Europe, A-Asie-Pacifique, U = ALENA, L = LATAM. C = la diversité des logiciels. [Europe: contrôle T = 1 page TXT, F = Full TXT, V = voix. LATAM et l’ALENA: N = stéréo non-dBx, S = stéréo dBx. Asie-Pacifique: T = TXT, N = non TXT, C = NTSC. Toutes les régions: M = Mono, D = DVD, Q = Mk2. __ D = nombre de cluster Langue. X = numéro principal de la version du logiciel, mis à jour avec un changement majeur qui est incompatible avec les versions précédentes. _ Y = logiciel sous le numéro de version. mise à jour avec une modification mineure qui est compatible avec les versions précédentes.
- EEEEE-F.GG. => C’est l’identification du logiciel de la Scaler. __ EEEEEE = le cluster sw scaler. __ F = La version principale de sw pas. __ GG = la sous-version sans.
- SAM => Affichage du mode d’alignement de service.
- Erreur Buffer => Affiche toutes les erreurs détectées depuis la dernière le tampon a été effacée. Cinq erreurs possibles.
- Option Octets => Permet de définir Octets d’option. Sept codes sont possibles.
- Effacer => Efface le contenu de la mémoire tampon d’erreur. Sélectionnez le menu « Effacer » et appuyez sur la touche «droite Menu ». Le contenu de la mémoire tampon d’erreur sera effacée.
- Options => Permet de définir l’option octets.
- Tuner => permet d’aligner tuner.
- Balance des blancs => Utilisé ot aligner Tone Blanc.
- Alignement audio => Audio est nécessaire pour ce poste de télévision.
- NVM éditeur => Peut être utilisé pour modifier les données de la NVM dans le poste de télévision.
- ComPair => Peut être utilisé pour allumer la télévision pour En mode programmation système [ISP], pour le téléchargement du logiciel via ComPair. ATTENTION: Lorsque ce mode est sélectionné sithout ComPair connecté, le téléviseur sera bloqué. Coupez l’alimentation secteur pour réinitialiser le téléviseur.
COMMENT NAVIGUER
- Dans SAM, sélectionnez les éléments de menu avec les touches Menu-Up/Menu-Dn sur la télécommande. L’élément sélectionné est mis en surbrillance. Lorsque tous les éléments de menu ne conviennent pas à l’écran, utilisez les touches Menu-Up/Menu-Dn pour afficher le menu suivant / précédent.
- Avec le menu à gauche de touches Menu-droite, il est possible de: [. Activer le point de menu sélectionné; Modifiez la valeur de l’élément de menu; Activer le sous-menu sélectionné]
- Dans SAM, Lorsque vous appuyez deux fois sur le bouton Menu, le jeu passera en menus utilisateurs normaux; avec le mode SAM est toujours actif sur le fond. Pour revenir au menu SAM, appuyez sur les boutons STATUS / EXIT Menu ou.
- Lorsque vous appuyez sur la touche Menu pendant que dans un sous-menu, vous revenez au menu précédent.
COMMENT CONSERVER [SAM] REGLAGES.
Pour mémoriser les réglages modifiés en mode SAM, quitter le menu en haut de levlel SAM en utilisant le bouton « Power » sur la télécommande, ou sur le téléviseur.
POUR SORTIR DE SERVICE MODE
Éteignez l’appareil en appuyant sur le bouton de réseau sur la télécommande, ou au téléviseur. Si vous éteignez le téléviseur en débranchant la TV, sans l’aide du bouton d’alimentation, le téléviseur reste en mode SAM, lorsque l’alimentation est ré-appliquées, et le tampon d’erreur n’est pas effacé.
- ================================================
- PHILIPS – LC4.1E
CODES D’ERREUR
La mémoire tampon de code d’erreur contient toutes les erreurs détectées depuis la dernière fois que le tampon a été effacé. Le tampon est écrit de gauche à droite. Quand une erreur se produit qui n’est pas encore dans la mémoire tampon de code d’erreur, il est affiché sur le côté gauche et toutes les autres erreurs déplacer d’une position vers la droite.
COMMENT LIRE LES CODES D’ERREUR
Sur l’écran via la SAM ( si vous avez une image ).
Exemples:
ERREUR: 0 0 0 0 0: Pas d’erreur détectée
ERREUR: 6 0 0 0 0: code d’erreur 6 est la dernière et la seule erreur détectée.
ERREUR: 9 6 0 0 0: code d’erreur 6 a été détecté la première et le code d’erreur 9 est la dernière détection (plus récent) erreur
Via la procédure LED clignotante (lorsque vous n’avez pas de photo).
Via ComPair.POUR EFFACER ERREUR TAMPON
En utilisant la commande EFFACER dans le menu SAM: [ en savoir plus sur le menu SAM, consultez le post précédent ici ]- Pour entrer SAM, appuyez sur la séquence de touches suivante sur la télécommande: » 062596 » , directement suivie par l’OSD / ETAT bouton (ne permettent pas l’affichage de temps entre les entrées en tapant la séquence).
- Assurez-vous que l’élément de menu CLEAR souligné. Utilisez les touches HAUT / BAS MENU, si nécessaire.
- Appuyez sur le bouton DROIT MENU pour effacer le tampon d’erreur. Le texte sur le côté droit de la ligne « CLEAR » passe de « EFFACER? » À « EFFACE »
- Si le contenu de la mémoire tampon d’erreur n’a pas changé pendant 50 heures, le tampon d’erreur se réinitialise automatiquement.
Remarque : Si vous quittez SAM par débrancher la prise secteur de la télévision, le tampon d’erreur n’est pas remis à zéro.
CODES D’ERREUR
En cas de défauts non intermittents, notez les erreurs présentes dans le tampon d’erreur et effacer le tampon d’erreur avant de commencer la réparation. Ceci garantit que des codes d’erreur anciennes ne sont plus présents. Si possible, consultez l’intégralité du contenu de la mémoire tampon d’erreur. Dans certains cas, un code d’erreur est seulement le résultat d’une autre erreur, et pas la cause réelle du problème (par exemple, un défaut dans le circuit de détection de protection peut aussi conduire à une protection).
Erreur
Dispositif
Description de l’erreur
Vérifiez article 0
Non applicable
1
Non applicable
2
Non applicable
3
Non applicable 4
GM5221
I2C erreur lors de la communication
avec la Genèse Scaler et / ou Flash-ROM est défectueux / vide7401
7403
5
Non applicable
Protection +5 v
7930 6
bus I2C
Erreur générale I2C
7011, 3083,
30847
Non applicable
8
M24C32
I2C erreur lors de la communication
avec l’EEPROM de Scaler7402
9
M24C16
I2C erreur lors de la communication
avec la mémoire EEPROM7099
10
Tuner
I2C erreur lors de la communication
avec le tuner PLL1302, 3302,
3303, 3327
11
Non applicable
12
Non applicable
13
Non applicable
PROCÉDURE LED clignotante
Lorsque le SDM est entré, le voyant se met à clignoter avant le contenu de l’erreur-tampon:- La Led clignote avec autant d’impulsions que le numéro de code d’erreur, suivis d’une période de temps de 1,5 secondes, dans laquelle le voyant est éteint.
- Ensuite, cette séquence est répétée commence. Toute commande RC5 termine cette séquence.
Exemple de tampon d’erreur : 12 9 6 0 0
Après avoir entré SDM, la suivante se produit:
- 1 long clignotement de 5 secondes pour démarrer la séquence,
- 12 clignotements brefs suivis d’une pause de 1,5 secondes.
- 9 clignotements brefs suivis d’une pause de 1,5 secondes,
- 6 clignotements brefs suivis d’une pause de 1,5 secondes,
- 1 long clignotement de 1,5 secondes pour terminer la séquence,
- La séquence commence à nouveau à 12 clignotements brefs.
- ==================================================
- APPLICABLE À : [ SONY KDL-26U3000_KDL-32U3000_KDL-37U3000_KDL-40U3000 ]
POUR ENTRER MODE SERVICE- Mettre la tension de la TV et entrer en mode stand-by. {Bouton d’alimentation de presse sur le tlc à distance, après Allumez le téléviseur par son principal pouvoir interrupteur ON / OFF à sa face avant}
- Appuyez sur les touches suivantes de la télécommande dans l’ordre sans laisser le temps d’affichage de réduction.
- {« (I) » => 5 => Volume (-ve) => TV | Puissance}: [(i) = Le bouton d’affichage de l’écran].
- L’affichage « TT » apparaîtra dans le coin supérieur droit de l’écran, indiquant que le téléviseur est en mode de service.
- Menu de ‘l’Appuyez sur le bouton de la télécommande.
- Un écran suivant s’affiche.
************************************************** ********
ECLAIRAGE
HDMI
SOUND
SI RÉGLER
PANNEAU TEMP
ERREUR MENU
SE2v0.10.
valeurs d’usine: 11111111
NUMERO DE SERIE: 4294967295
TEMPS workig: 00:22
************************************************** **********
- Passer à l’élément de adjsutment correspondant avec [Up] ou [DN] boutons fléchés de la télécommande.
- Bouton – (>) pour entrer dans le menu requis article de presse.
- Appuyez sur la touche « Menu » de la télécommande pour EXIT du mode de service, après tous les réglages ont été fait.
- NB: Après avoir effectué les ajustements de service, pour empêcher l’accès à la clientèle du menu de service, mettez le téléviseur hors tension et à nouveau sous tension.
« TT » MODE- mode TT est disponible par le réglage du téléviseur pour un fonctionnement en mode de service, tel que décrit ci-dessus. OSD « TT » apparaît. Pour désactiver le mode Test 2: presse (00, 10, 20) … deux fois, ou basculer le téléviseur à mode Stand-by. En mode Menu TT, il est possible de télécommande « Menu » de l’écran en appuyant une fois sur le bouton «Président Off». Appuyez sur le bouton «Président Off» une deuxième fois le « Menu » sera de nouveau apparaître. La fonction est conservée même lorsque le menu n’est pas affiché sur l’écran.
FONCTIONS PRINCIPALES- Taille du panneau confuguration.
- DA: D est indiqué lorsque le mode numérique est activé. «A» montre, lorsque le mode analogique est activée. Modifié par TT53.
- TT … Invite de commandes.
- ECS => ECS activé. désactivé [TT31].
- ABC => ABC est affiché lorsque le téléviseur est en mode ABC. Ce mode est disponible à partir de l’usine Mode-TT19. Modifié par [TT27]
- Norm Fact => Mode Normal Factory. Modifié par [TT19].
- DDC => DDC est activé désactivé. Modifié par [TT74]
- 0 1 2h00 ou 2 entrées HDMI bascule. Modifié par [TT73]
- E => ‘E’ est affiché lorsque EDID WP est activée – est représenté, sinon changé par [TT33].
- M HO => ‘M’ est affiché lorsque le moniteur de PC est activé changé par [TT37]. «H» est affiché, lorsque le mode Hôtel est activé. Modifié par [TT35]. «O» est affiché lorsque Otrum est activée. Modifié par [TT38] – preuve contraire.
- C => ‘C’ {} Valu défaut apparaît lorsque MSP Auto transporteur Muet fuunction est activée – est démontré le contraire. Modifié par [TT57].
- MA: M {Valeur par défaut} s’affiche lorsque son heure est démodulé dans MSP. «A» est représenté quand démodulateur AFRIC est utilisé. Modifié par [TT72].
- NA => Auparavant utilisé pour indiquer Clk activé.
- T => ‘T « est affiché lorsque le test numérique est activé – est indication contraire Modifié par [TT39]..
- W => « W » s’affiche lorsque cette surveillance est de permettre – est démontré le contraire. Modifié par [TT54].
- C => ‘C’ est affiché lorsque chip select est activée – est démontré le contraire. Ce mode est disponible uniquement en mode usine. Modifié par [TT58].
- V => ‘V’ est affiché lorsque I2C visuelle est activée – est démontré le contraire. Modifié par [TT59].
- D => ‘D’ apparaît lorsque le délai audio est activée – est démontré le contraire. Modifié par [TT55].
- K => ‘K’ est affiché lorsque étalement de spectre est activée – est démontré le contraire. Modifié par [TT94].
- B => ‘B’ est représenté pour les modèles BRAVIA – est démontré le contraire. Ce mode est disponible uniquement en mode usine. Modifié par [TT56].
- S => ‘S’ est affiché lorsque le capteur de température est activée – est démontré le contraire. Modifié par [TT52].
- L => ‘L’ s’affiche lorsque HDMI est activée – est démontré le contraire. Modifié par [TT14].
- TX est affiché lorsque le télétexte est centré. [Valeur par défaut] – preuve contraire. Modifié par [TT14].
- HA => ‘H’ est affiché lorsque tuner hybride est sélectionné. «A» est affichée si ALPES tuner est sélectionnée. Modifié par [TT51].
- =================================================
- SHARP LC-32DH510E643
POUR ENTRER & EXIT MODE SERVICE [USINE MODE]
par clé-unité.- Débranchez le cordon d’alimentation.
- Appuyez sur la touche » V- « et » à [] touches « , en même temps, puis branchez le cordon d’alimentation.
- « K » apparaît sur l’écran.
- Appuyez sur la touche » V- « et » -P « , touches simultanément.
- « SHARP FACTORY MENU » apparaît.
- Débranchez le cordon d’alimentation à la sortie de processus de réglage.
Par propre R / C- Allumez le téléviseur.
- Appuyez sur » à [] « , » 2 « , » 5 « , » 8 « , » 0 « ( le temps est limité à 5 sec. env., pour entrer ce code ).
- « SHARP FACTORY MENU » apparaît.
- Appuyez sur » OK « sur les lignes 5 ~ 12 pour aller au sous-menu.
- Appuyez sur » MENU « pour revenir au menu principal.
- Appuyez sur » FIN « à la sortie du mode de réglages.
- =========================================================
- MODE SERVICE DE LA MAJORITÉ DES Sony Trinitron
Pour entrer en mode de service Appuyez sur les boutons de la télécommande en suivant rapide séquence . STANDBY => DISPLAY => 5 => VOLUME (+) => POWER. Press chiffres boutons 1 et 4 pour appeler un élément de réglage Appuyez chiffres boutons 3 et 6 pour augmenter ou diminuer la valeur des données de l’élément sélectionné. Appuyez sur le bouton « Mise en sourdine » pour écrire la valeur de données ajusté à. mémoire de Appuyez sur la touche « 0 » (zéro) pour exécuter l’écriture. Si vous n’appuyez pas sur le bouton Zéro pour exécuter les données de réglage dans la mémoire, la valeur ajuster ne sera pas inscrit dans la mémoire. Pour quitter le mode de service, appuyez sur Alimentation bouton une fois. Le téléviseur se mettra en mode veille. Appuyez sur Puissance nouveau sur le bouton, le téléviseur s’allumera avec les valeurs de données ajustées.
MODE SERVICE PHILIPS PLASMA – 42PF5521D – 42PF7521D – 50PF7521D
[ mode de service à la clientèle numérique]
- Appuyez sur la touche «menu numérique» de la télécommande pour activer manu utilisateur numérique [Configuration]
- Activer le sous-menu «Information» (via les touches de curseur «droit» le «bas» et)
- Dans le « sous-menu de l’information», appuyez sur les touches suivantes ‘VERT ROUGE JAUNE 9 7 5 9. Ensuite, le menu de service apparaît.

MENU EXPLICATIONS
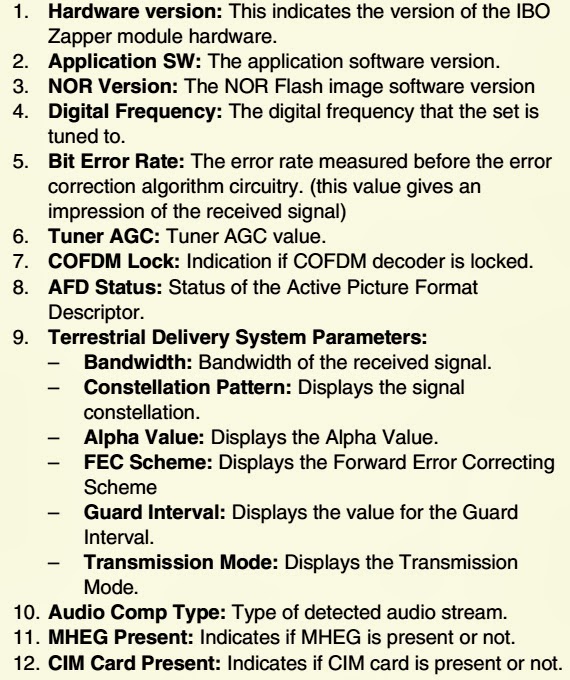
POUR SORTIR
Appuyez sur le BLEU bouton de la télécommande.
CODES D’ERREUR
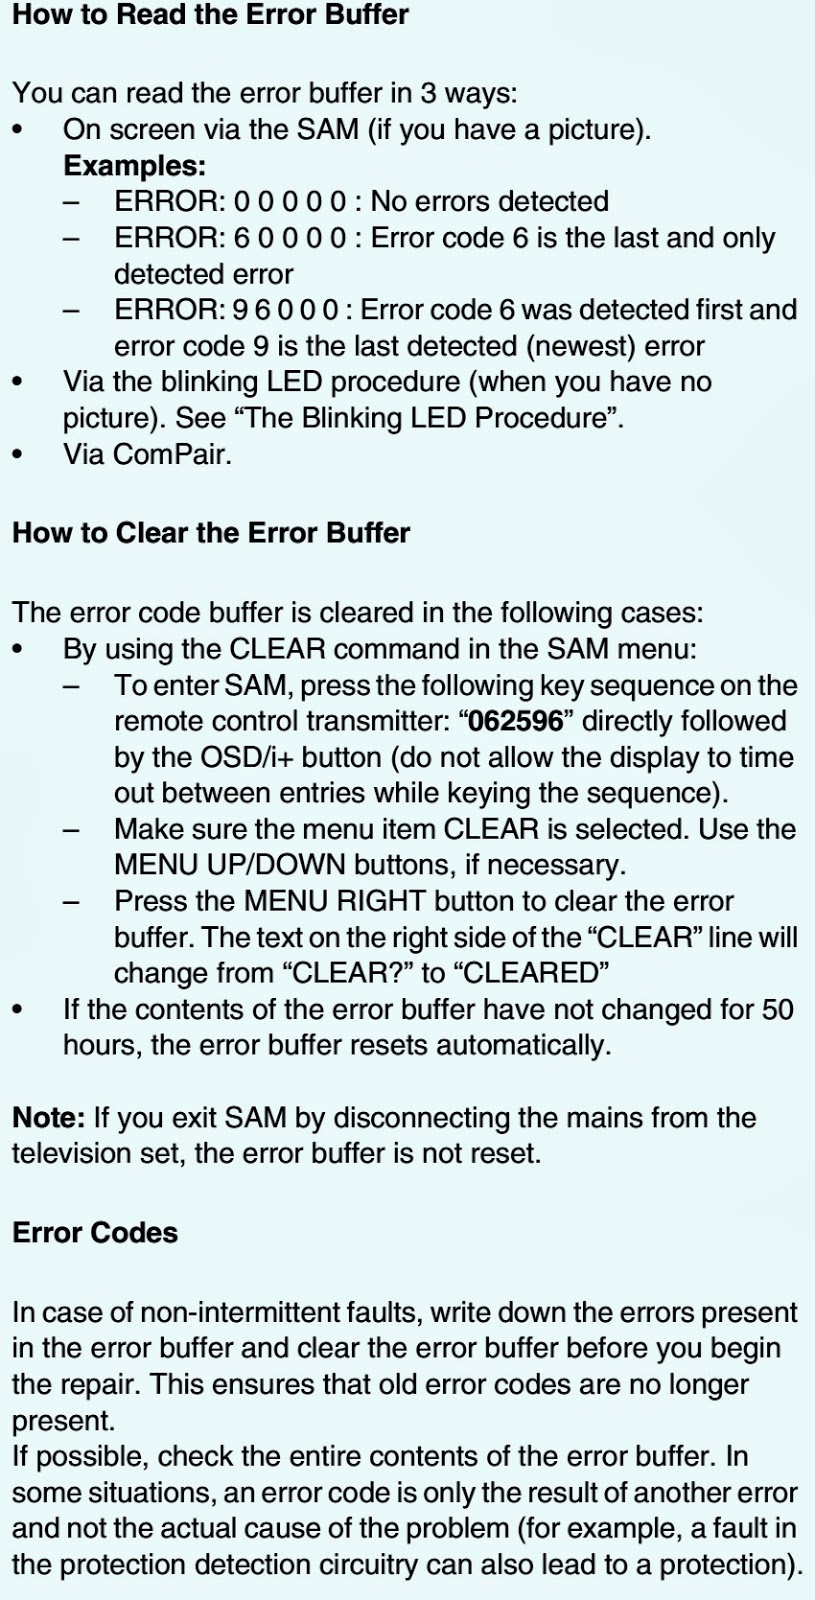
CODE D’ERREUR – APERÇU
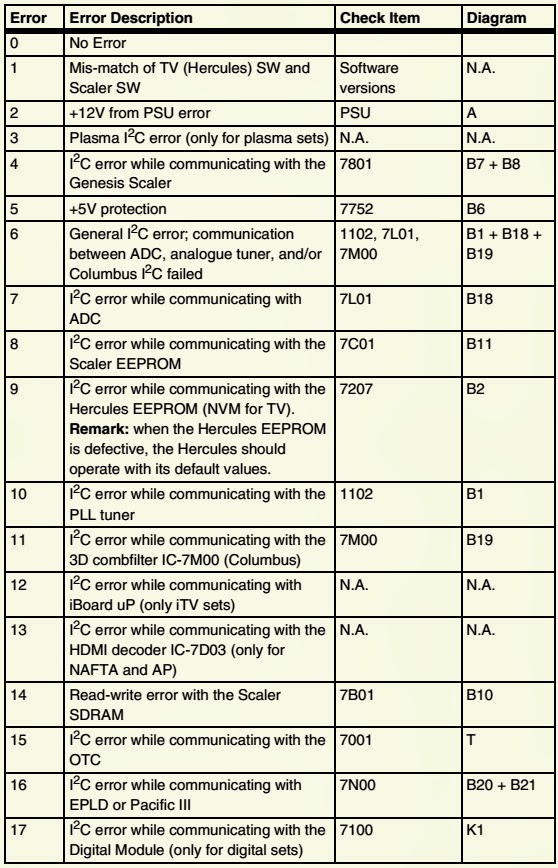
=====================================================================
vestel 17MB37
REGLAGES 17SERVICE MENU
Pour atteindre le menu de service , First Press
« MENU »
Ensuite, appuyez sur le code de la télécommande , ce qui est
» 4725 »
. En mode DTV , appuyez d’abord sur
» MENU
« Et sélectionnez
» TV SETUP »
. Ensuite, appuyez sur
» 4725 »
.
17.1Video installation
panneau d’informations
< ……………………………. >
32_LC_SAC1
Fond bleu <…..>
Si « Menu » est sélectionné,
» Fond bleu »
article est vu dans
» Entité »
menu.If » Oui » est sélectionné,
» Fond bleu »
est sur et pas vu
» Entité »
menu
Mode Film
<…..>
Si » Oui » est sélectionné,
»
Mode Film
»
fonction est active.
Contraste dynamique
<…..>
Si » Oui » est sélectionné,
»
Contraste dynamique
»
fonction est active.
Mode de jeu
< ……….. >
Si » Oui » est sélectionné,
»
Mode de jeu
»
fonction est active
SRGB pour PC
< ……….. >
Si » Oui » est sélectionné, les PC peuvent utiliser l’option sRVB .
Dynamic Noise Reduction < ……….. >
Si » Oui » est sélectionné,
»
Dynamic Noise Reduction
»
fonction est active
Option WSS < ……….. >
Si » Oui » est sélectionné, l’option WSS peut être utilisé
17.2AudioSetup
BG <…..> EuropeNew Zelland AustraliaNoDK <…..> I < ….. > L <…..> Equalizer <…..>
Si » Oui » est sélectionné,
» Equalizer »
article est vu dans
« Son »
menu.
Casque <…..>
Si » Oui » est sélectionné,
» Casque »
article est vu dans
« Son »
menu.
Marche / Arrêt Mélodie <…..>
Si » Oui » est sélectionné, lors de la mise en / hors conditions , la tension / hors tension mélodie peut être entendu .
Dynamic Bass <…..>
Valeur comprise entre 0 et 12
Effet <…..>
Valeur comprise entre 0 et 7
Audio Delay , décalage <…..>
Valeur entre 0-190
Configuration Audio Cont … 2https://translate.googleusercontent.com/translate_c?depth=1&hl=fr&p…
================================================================
PHILIPS MODE SERVICE & REGLAGES-Description détaillée-SAM _ SDM
Ne jamais essayer d’entrer en mode service, et ajuster les valeurs de données stockées, sans connaissances et l’expérience nécessaires. Lisez attentivement toutes ces descriptions, et être sûr que vous pouvez le faire.
MODE DE SERVICELa fonction Mode Service est divisé en quatre parties:
> Mode par défaut de services (SDM).
> Mode de réglage de service (SAM).
> Mode de service client (CSM).
> Mode de réparation assistée par ordinateur (ComPair).
SDM et SAM offre des fonctionnalités qui peuvent être utilisées par l’ingénieur de service pour réparer / aligner un téléviseur. Certaines fonctionnalités sont:
> Une situation pré-défini pour assurer des mesures peut être effectuée dans des conditions uniformes (SDM).
> Active la procédure de clignotement de la LED pour l’identification d’erreur quand aucune image n’est disponible (SDM).
La possibilité de passer outre les protections logicielles quand SDM est entré par les broches de service.
Effectuer alignements (par exemple, dans les tons blancs), (de) sélectionner des options, entrez les codes d’options, de réinitialiser le tampon d’erreur (SAM).
> Affichage des informations («SDM» ou la mention «SAM» dans le coin supérieur droit de l’écran, le tampon d’erreur, la version du logiciel, heures de fonctionnement, les options et les codes d’options, sous-menus).Le CSM est un mode de service qui peut être activé par le consommateur. Le CSM affiche des informations de diagnostic, que le client peut transmettre au revendeur ou centre de communication. En mode CSM, « CSM », est affiché dans le coin supérieur droit de l’écran.
* Augmenter le taux de succès de réparation à domicile.
* Réduire le nombre d’appels de nuisance.
* Le problème de clients Résolu sans une visite à domicile.Mode ComPair est utilisé pour la communication entre un ordinateur et d’une télévision à niveau I2C / UART et peut être utilisé par un technicien de service pour diagnostiquer rapidement le téléviseur en lisant les codes d’erreur, lire et écrire en NVM, communiquer avec CI et le uP ( PWM, registres, etc), et en faisant usage d’une base de données de diagnostic. Il sera également possible de vous et de télécharger le logiciel du téléviseur via I2C avec l’aide de ComPair. Pour ce faire, ComPair doit être connecté à la télévision par l’intermédiaire du connecteur ComPair, qui sera accessible par l’arrière de l’ensemble (sans enlever le couvercle arrière).
Minuterie viePendant le cycle de durée de vie de l’ensemble de la télévision, une minuterie est conservé (appelé « op. Hour »). Il compte les heures de fonctionnement normales (pas les heures de stand-by). La valeur réelle de la minuterie est affichée dans SDM et SAM en une valeur décimale. Tous les deux réinitialisation logicielle augmentent l’heure par une. Stand-by heures ne sont pas comptées.
Identification du logiciel, la version, et Cluster
L’ID du logiciel, la version et groupe seront affichés dans le affichage du menu principal de SDM, SAM, et CSM. L’écran affiche: « aaaaaab-XX.YY », où: • AAAAAAis le nom de châssis: L11M11. Bis de la région indication: E = Europe, A = AP / Chine, U = ALENA, L = LATAM. XXis le numéro de version principal: il est mis à jour avec un changement majeur de la spécification (incompatible avec la version précédente du logiciel). Numérotation ira de 01 à 99 et AA – ZZ.
> Si le numéro de version principal change, le nouveau numéro de version est écrite dans la mémoire non volatile.
> Si le numéro de version principal change, les paramètres par défaut sont chargées.
> YYis sous le numéro de version: il est mis à jour avec un changement mineur (rétrocompatible avec les versions précédentes) Numérotation ira de 00 à 99.
> Si le numéro de version sous change, le nouveau numéro de version est écrite dans la mémoire non volatile.> Si la NVM est frais, l’identification du logiciel, la version et groupe seront écrites dans la mémoire permanente
Sélection de code d’option d’affichageQuand, après un échange de SSB ou affichage, le code de l’option d’affichage n’est pas réglé correctement, il en résultera une télévision avec « pas d’affichage ». Par conséquent, il est requiredto mis ce code option d’affichage après une telle réparation. Pour ce faire, appuyez sur la séquence de touches suivante sur un émetteur RC norme: « 062598 » directement suivi par MENU / homeand « xxx », où « xxx » est une valeur décimale à 3 chiffres DELA type de panneau, voir autocollant sur le côté / fond de l’armoire. Lorsque la valeur est acceptée et enregistrée en mémoire non volatile, l’appareil se met en stand-by pour indiquer que le processus est terminé.
Mode par défaut de services (SDM)
Objectif: Réglez le téléviseur en mode SDM afin d’être en mesure de créer un paramètre prédéfini pour les mesures à prendre. Dans cette plate-forme un SDM simplifiée est introduite (sans protection prioritaire et sans accord sur une fréquence prédéfinie).
Caractéristiques
> Définir vidéo linéaire et les paramètres audio à 50%, mais le volume de 25%. Paramètres d’utilisateur stockées ne sont pas affectés.
> Définir Smart Picture pour « Game ».
> Définir Smart Sound pour « Standard ».
> Canal Tune pour:
> Pour l’analogique SDM: canal 3 (61,25 MHz)
> SDM numérique: canal 26 (545,143 MHz).
> Pour SDM numérique: mettre en défaut PID du flux.
> Tous les modes de service-hostile (le cas échéant) sont désactivés, car ils interfèrent avec le diagnostic / réparation d’un ensemble. Ces modes hostiles de services sont les suivants:
> (Sommeil) minuterie.
> Blue mute / papier mur.
> Détecteur « off » (quand il n’y a pas de signal « ident »).
> Hôtel ou le mode de l’hôpital.
> Verrouillage ou verrouillage parental (manuelle ou via V-chip).> Saut, suppression de « Non favori », « sauté » ou « verrouillés » presets / canaux.
> Enregistrement automatique de présélection personnelle ou Derniers réglages d’état.
> Utilisateur avec un menu temporisation automatique (menu de revient / OFF automatiquement.
Comment faire pour activer
Pour activer analogueSDM, utilisez ONEOF les méthodes suivantes:
> Appuyez sur la séquence de touches suivante sur l’émetteur RC: « 062596 » directement suivi par le bouton MENU.
> Court un des patins « de service » sur le plateau de télévision au cours de démarrage à froid puis appuyez sur le bouton d’alimentation (enlever le court après le démarrage).
Attention : Quand vous faites cela, le service-technicien doit savoir exactement ce qu’il fait, car cela pourrait endommager le téléviseur.
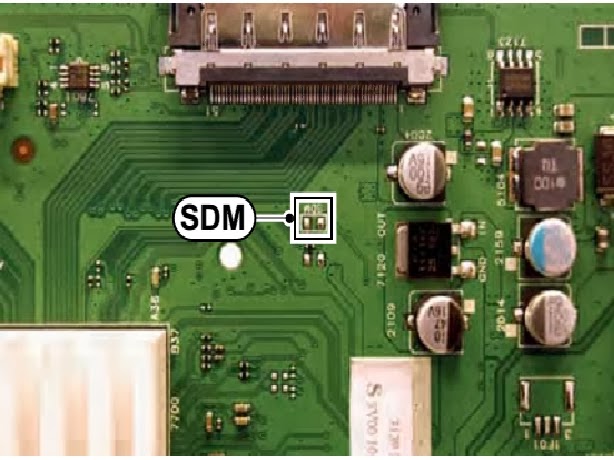
Pour activer digitalSDM:> Appuyez sur la séquence suivante sur l’émetteur RC: « 062593 » directement suivi par le bouton MENU.
Le menu à l’écran
Après l’activation SDM, les éléments suivants sont affichés, avec « SDM » dans le coin supérieur droit de l’écran pour indiquer que le téléviseur est en mode par défaut du service.
Les éléments de menu et l’explication:
> Xxxxx: heures de fonctionnement (en décimal).
> Aaaaaab-XX.YY: Voir le paragraphe Software
Identification, version, et Clusterfor le nom de définition SW.
> ERR: Affiche toutes les erreurs détectées depuis la dernière fois le tampon a été effacé au format <xxx> <xxx> <xxx> <xxx> <xxx> (cinq erreurs possible).> OP: Permet de lecture des octets d’option. Dix codes (en deux lignes) sont possibles.
Comment naviguer
Comme ce mode est en lecture seule, il n’ya pas beaucoup à naviguer. Pour passer à d’autres modes, utilisez l’une des méthodes suivantes:
> Menu des commandes de l’utilisateur distant va entrer dans le menu utilisateur normal (luminosité, contraste, couleur, etc ..) avec OSD « SDM » restant, et appuyez de nouveau sur la touche MENU pour revenir au dernier état de SDM à nouveau.
> Pour éviter l’OSD d’interférer avec les mesures de SDM, commande « OSD » ou « i + » (« STATUS » ou « INFO » pour l’ALENA et LATAM) de l’utilisateur à distance permet de basculer l’affichage OSD « on / off » avec « SDM » OSD reste toujours « on ».# Appuyez sur la séquence de touches suivante sur la télécommande: « 062596 », directement suivie par l’INFO / bouton OK pour accéder au SAM (ne permettent pas l’affichage de temps entre les entrées en tapant la séquence).
Comment quitter
Mettre l’appareil en stand-by par
> En appuyant sur le bouton de veille sur la télécommande ou sur le téléviseur, ou
> Via un émetteur RC norme en entrant la séquence « 00 ». Si vous passez la télévision « off » en supprimant le réseau (c.-à débrancher la télévision), la télévision restera dans SDM lorsque l’alimentation est ré-appliquées, et le tampon d’erreur n’est pas effacé. Le tampon d’erreur ne sera effacée lorsque la commande «clair» est utilisé dans le menu SAM.
Remarque : Si le téléviseur est allumé « off » par une interruption de puissance tandis que dans SDM, la TV apparaîtra dans le dernier état de menu SDM dès que l’alimentation est fournie à nouveau. Le tampon d’erreur ne sera pas effacée.Dans le cas de l’ensemble est accidentellement en mode usine (avec un «F» s’affiche à l’écran), appuyant sur « VOL- » pendant 5 secondes, puis suivi par le « CH » bouton appuyant pendant encore 5 secondes devraient quitter le mode usine.
Mode Alignement de service (SAM)
But
> Pour modifier les paramètres d’options.
> Pour afficher / effacer la mémoire tampon de code d’erreur.
> Pour effectuer des alignements.
Caractéristiques
> Heures de fonctionnement compteur (maximum de cinq chiffres affichés).
> Afficher la version du logiciel, les codes d’erreur et les paramètres de l’option.
> Erreur de compensation de tampon.
> Paramètres de l’option.
> Alignements de logiciels (blanc de tonalité).
> NVM éditeur.
> Réglez le mode de l’écran en plein écran (tout le contenu est visible).
> Définir Smart Picture pour « Game ».
Comment faire pour activer
Pour activer SAM, utilisez l’une des méthodes suivantes:
> Appuyez sur la séquence suivante clé sur la télécommande: « 062596 » directement suivi par le INFO / bouton OK. Ne pas permettre l’affichage de temps entre les entrées en tapant la séquence.> Ou via ComPair.
Après avoir entré SAM, les éléments suivants sont affichés, avec «SAM» dans le coin supérieur droit de l’écran pour indiquer que le téléviseur est en mode de réglage de service.
Informations sur le système.
> Op Heure: Cela représente le compteur de durée. La minuterie compte les heures de fonctionnement normales, mais ne compte pas les heures Stand-by.
> MAIN SW ID
> ERR: Affiche toutes les erreurs détectées depuis la dernière fois le tampon a été effacé. Cinq erreurs possibles.
> OP1/OP2: Permet de lecture des octets d’option. Dix codes sont possibles.
Tuner.
> Réglage AGC:
Magasin : Pour stocker les données.
# Effacer . Efface le contenu de la mémoire tampon d’erreur. Sélectionnez cette option de menu et appuyez sur la touche DROITE MENU de la télécommande. Le contenu de la mémoire tampon d’erreur est effacé.
# Option s.To définir les bits d’option.
# RGB Align . Pour aligner la tonalité blanc.
# NVM Edito r.To modifier les données en mémoire non volatile dans le poste de télévision.
# Charger USB .
# Télécharge USB.
# Initialiser NVM . Pour initialiser un (corrompu) NVM. Attention, cela effacera tous les paramètres!
# Auto ADC .
# EDID Écrire Activer . Permet EDID écrit (ne s’applique pas aux ensembles Berlinale).# Service Data . du Conseil clé virtuel pour la saisie de la saisie de caractères.
Comment naviguer
> Dans le menu SAM, sélectionnez les éléments de menu avec les touches UP / DOWN sur la télécommande. L’élément sélectionné sera indiqué. Lorsque tous les éléments du menu affiché à l’écran, utilisez les touches HAUT / BAS pour afficher les éléments suivants / précédents de menu.
> Avec les touches gauche / droite, il est possible de: – Activez l’élément de menu sélectionné. – Modifiez la valeur de l’élément de menu sélectionné. – Activer le sous-menu sélectionné.
> Lorsque vous appuyez sur le bouton MENU à deux reprises alors que dans le niveau haut SAM, l’appareil passe au menu utilisateur normal (avec le mode SAM toujours actif en arrière-plan). Pour revenir au menu SAM appuyez sur le bouton MENU.
> La touche «INFO / OK » de l’utilisateur distant permet de basculer l’affichage OSD « on / off » avec OSD « SAM » reste toujours « on ».
> Appuyez sur la séquence suivante clé sur la télécommande: « 062596 » directement suivi par le bouton MENU pour passer à SDM (ne permettent pas l’affichage de temps entre les entrées en tapant la séquence).
Comment mémoriser les réglages SAM
Pour mémoriser les réglages modifiés en mode SAM (sauf les options et les paramètres RVB ALIGN), quitter le menu de niveau supérieur SAM en utilisant le bouton POWER de la télécommande ou du téléviseur. Les exceptions mentionnées doivent être stockés séparément via le bouton STORE.Comment quitter
Mettre l’appareil en veille en appuyant sur le bouton de réseau sur la télécommande ou du téléviseur, ou en entrant dans la séquence « 00 » sur un émetteur RC standard.
Remarque : Lorsque le téléviseur est allumé « off » par une interruption de puissance tandis que dans SAM, le téléviseur affichera en mode « fonctionnement normal » dès que l’alimentation est fournie à nouveau. Le tampon d’erreur ne sera pas effacée.> Dans le cas où le jeu est en mode usine par accident (par « F » est affiché à l’écran), appuyant sur « VOL- » pendant 5 secondes, puis suivi par le bouton « CH- » la touche enfoncée pendant 5 secondes devraient quitter le mode usine.
Codes d’erreur
Les codes d’erreur sont tenus d’indiquer les défaillances dans le téléviseur. En principe, un code d’erreur unique est disponible pour tous les:
> Activé (SW) protection.
> A défaut périphérique I2C.> Erreur générale I2C. Les cinq dernières erreurs, stockées dans la mémoire non volatile, sont affichés dans le menu service de. C’est ce qu’on appelle la mémoire tampon d’erreur. La mémoire tampon de code d’erreur contient toutes les erreurs détectées depuis la dernière fois que le tampon a été effacé. Le tampon est écrit de gauche à droite. Quand une erreur se produit qui n’est pas encore dans la mémoire tampon de code d’erreur, il est affiché sur le côté gauche et toutes les autres erreurs déplacer d’une position vers la droite. Une erreur sera ajoutée à la mémoire tampon si cette erreur est différente de toute erreur dans la mémoire tampon. La dernière erreur est affiché sur la gauche. Une erreur avec un code d’erreur désigné neverleads à une situation de blocage. Il doit toujours être (par exemple tampon d’erreur via le menu OSD ou LED clignotante ou via ComPair) diagnostiquée. Dans le cas où une panne identifiée par un code d’erreur entraîne automatiquement d’autres codes d’erreur (de cause à effet), seul le code d’erreur de l’échec PRINCIPAL s’affiche .
Comment lire le tampon d’erreur
Vous pouvez lire le tampon d’erreur de trois façons:
> Sur l’écran via le SAM / SDM / CSM (si vous avez une image).
Exemple:
# – ERREUR: 0 0 0 0 0: Pas d’erreur détectée
# ERREUR: 6 0 0 0 0: code d’erreur 6 est la dernière et la seule erreur détectée
# ERREUR: 9 6 0 0 0: code d’erreur 6 a été détecté la première et le code d’erreur 9 est la dernière détection (plus récent) erreur
# Via la procédure LED clignotante (lorsque vous n’avez pas de photo).
Les codes d’erreur
Les codes « couche 1 » d’erreur pointent à la carte défectueuse. Ils sont déclenchés par LED clignotant quand CSM est activée. Dans la plate-forme de LC10, seuls deux conseils sont présents: le SSB et le PSU / IPB, ce qui signifie que la couche suivante 1 erreurs sont définis:
> 2: SSB
> 3: IPB / PSU
> 4: Affichage
Comment faire pour effacer le tampon d’erreur
La mémoire tampon de code d’erreur est effacée dans les cas suivants:
> En utilisant la commande EFFACER dans le menu SAM:
> En utilisant la séquence suivante sur la télécommande: « 062599 » directement suivi par le bouton OK.
> Si le contenu de la mémoire tampon d’erreur n’a pas changé pendant 50 heures, le tampon d’erreur se réinitialise automatiquement.
Remarque : Si vous quittez SAM par débrancher la prise secteur de la télévision, le tampon d’erreur n’est pas remis à zéro ..
CODE D’ERREUR TABLE
La procédure LED clignotant
Le logiciel est capable d’identifier différents types d’erreurs. Parce qu’il est possible que plus d’une erreur peut se produire au fil du temps, une mémoire tampon d’erreur est disponible, qui est capable de stocker des cinq dernières erreurs qui se sont produites. Ceci est utile si l’OSD ne fonctionne pas correctement. Des erreurs peuvent également être affichées par la procédure de clignotement de la LED. La méthode consiste à laisser à plusieurs reprises l’avant impulsion LED avec autant d’impulsions que le numéro de code d’erreur, suivis par une période de 1,5 secondes, la diode est « off ». Puis cette séquence est répétée.
Exemple (1) : le code d’erreur 4 se traduira par quatre fois la séquence LED « sur » pour 0,25 secondes / LED « off » pendant 0,25 secondes. Après cette séquence, la LED sera « off » pour 1,5 Sconds. Toute commande RC termine la séquence. clignotant LED Le code d’erreur est de couleur rouge.
Exemple (2) : le contenu de la mémoire tampon d’erreur est « 129600 »
Après avoir entré SDM, la suivante se produit:
> 1 long clignotement de 5 secondes pour démarrer la séquence,
> 12 clignotements brefs suivis d’une pause de 1,5 secondes,
> 9 clignotements brefs suivis d’une pause de 1,5 secondes,
> 6 clignotements brefs suivis d’une pause de 1,5 secondes,
> 1 long clignotement de 1,5 secondes pour terminer la séquence,
> La séquence reprend avec 12 clignotements brefs.
Affichage de la mémoire tampon d’erreur entier
En outre, le tampon d’erreur complet est affiché lorsque le mode service « SDM » est entré.============================================================
MODE SERVICE TOSHIBA LCD TV / DVD COMBO – 19DV713B
MODE HÔTEL
19DV713B – 19DV714B – 22DV713B – 22DV714B – 26DV713B – 32DV713B_ TV LCD / DVD COMBINAISON
Pour définir le mode Hôtel, suivez les étapes ci-dessous:
Une. Au pouvoir sur le mode, réglez le volume au minimum.
2. Bouton sur le téléviseur – Appuyez et maintenez le bouton VOL [].
3. Appuyez simultanément sur la touche [3] de la télécommande pendant plus de 2 secondes. Le menu de réglage du mode Hôtel apparaîtra.
4. Utilisez la touche UP / DN sur la télécommande pour sélectionner l’élément désiré, puis appuyez sur ENTRÉE.
5. Utilisez la touche GAUCHE / DROITE pour régler le paramètre de réglage désiré.
6. Le mode Hôtel a été mis en place.
Pour réinitialiser le mode Hôtel, suivez les étapes ci-dessous:
Une. Au pouvoir sur le mode, réglez le volume au minimum.
2. Bouton sur le panneau latéral – Appuyez et maintenez le bouton VOL [].
3. Appuyez simultanément sur la touche 3 de la télécommande pendant plus de 2 secondes. Le menu de réglage du mode Hôtel apparaîtra.
4. Utilisez la touche UP / DN sur la télécommande pour selectReset, puis appuyez sur ENTRÉE. Les éléments de réglage ont été mis à leur valeur initiale.

* 1 Même si l’option est réglée sur « Non Réagir », l’opération de touches de fonction du mode de service est efficace.
* 2 Même si les trois points sont réglés sur « Off », le téléviseur se met en place dans les mêmes paramètres si vous avez désactivé le pouvoir dernière fois.
* 3
(I) Appuyez sur « OK » sur l’élément de l’option « TV USB » pour démarrer la copie. Une fois qu’il est terminé, la valeur repasse à « Off ».
(Ii) Appuyez sur « OK » sur l’élément de l’option « USB à la télévision » pour lancer la copie. Une fois qu’il est terminé, la valeur repasse à « Off » et le téléviseur redémarre automatiquement.
(Iii) « Tous les paramètres » signifie « paramètres Hôtel Menu» et «utilisateurs réglages de menu» (Image / Son / Chaîne / de configuration), y compris « la liste des chaînes ATV / DTV ».
(Iv) Hôtel Clone ne peut pas être activé dans les situations suivantes:
> Hôtel Clone n’inclut pas les réglages d’usine de sauvegarde Zone, comme ADC, la Banque mondiale, Groupe ID, données SN, etc
> La valeur par défaut des éléments d’option de Réglage de l’image et de préférence l’image (à l’exception de « Mémoire ») restera inchangé même après Hôtel Clone.
> Hôtel Clone ne peut être activé entre les différents modèles.> Hôtel Clone ne peut être activé entre les différentes versions de firmware. Si cela se produit, un message d’avertissement apparaîtra comme ci-dessous, et la valeur repasse à « Off », sans aucune action de clone.
La valeur maximale que le volume fixe peut être réglé est basé sur celui du volume maximum. Par exemple, si le volume maximum est réglé sur « 30 », la plage de volume que le volume fixe peut être réglé de 0 à 30 ou de réduction.
tests de la fonction _ REMOTE CONTROL CODES CLÉS

LISTE MODE SERVICE
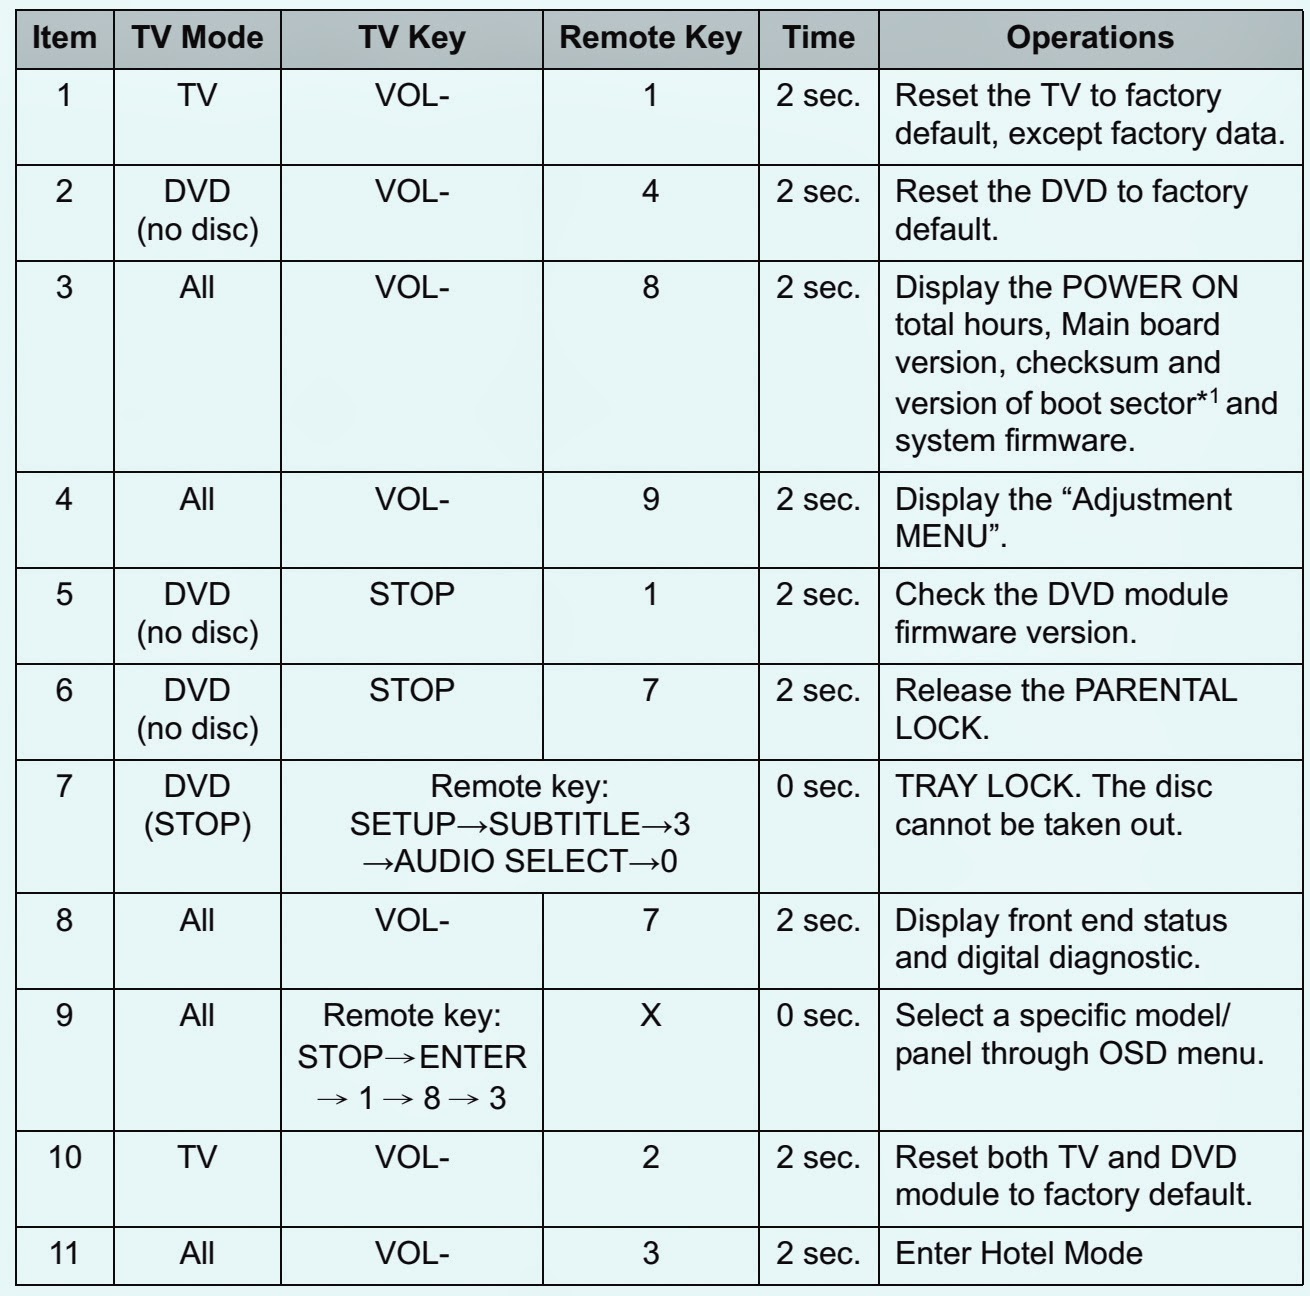
=====================================================
LG 32LX1D-UA
Pour entrer en mode service, vous devriez avoir la télécommande SVC [Ajuster à distance contrôleur]
SERVICE TELECOMMANDE & BOUTONS FONCTIONS
Réglez la télécommande peut être acheté séparément du centre de service autorisé pour LG
PRINCIPALES FONCTIONS
Lorsque vous utilisez la télécommande de service, appuyez sur la touche En-Start, et lors de l’utilisation de la télécommande de l’utilisateur, appuyez sur le menu de la touche locale et le menu de l’utilisateur télécommande simultanément pendant 10 secondes pour accéder au mode de service.
Appuyez sur la touche menu une fois de plus avec le mode OSD de service affiché et déplacer e la page de configuration de l’hôtel de l’option de mettre en place.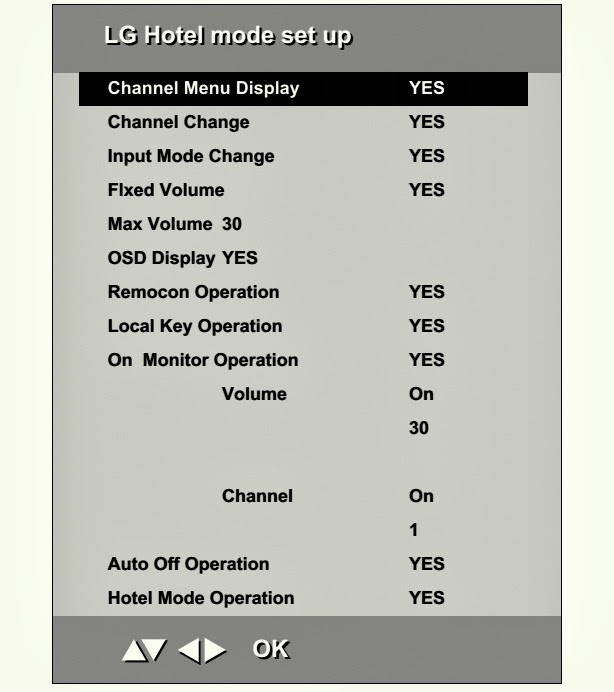
CONFIGURATION ET DÉTAILS INITIALE

=======================================================
PHILIPS 40PFL6606D ENTRER MODE DE SERVICE
SERVICE À LA CLIENTÈLE MODE
But
Quand un client a des problèmes avec son poste de télévision, il peut appeler son revendeur ou le service d’assistance à la clientèle. Le technicien de service peut alors demander au client d’activer le CSM, afin de déterminer l’état de l’ensemble. Maintenant, le technicien de maintenance peut juger de la gravité de la plainte. Dans de nombreux cas, il peut conseiller le client comment résoudre le problème, ou il peut décider s’il est nécessaire de visiter le client. Le CSM est un mode lecture seule, par conséquent, des modifications dans ce mode ne sont pas possibles.
Lorsque dans ce châssis CSM est activé, un motif de test s’affiche pendant 5 secondes (1 seconde bleus, verts et 1 seconde 1 seconde rouges, puis de nouveau 1 seconde et 1 seconde Bleu Vert). Ce modèle de test est généré par le PNX51X0 (situé sur la carte 200Hz dans le cadre de l’écran). Donc, si ce motif de test est affiché, il pourrait être décidé que la chaîne vidéo de back-end (de PNX51X0 et affichage) fonctionne. Pour les téléviseurs sans PNX51X0 l’intérieur, tous les menus du CSM sera utilisé comme contrôle pour la chaîne vidéo de la fin de l’arrière.
Lorsque CSM est activée andthere est une clé USB connectée au téléviseur, le logiciel vider le contenu de CSM à la clé USB. Le fichier (CSM_model de number.txt number_serial) sera enregistré à la racine de la clé USB. Cette information peut être utile si aucune information n’est affichée.
En mode CSM (et une clé USB connectée), en appuyant sur « OK » va créer un dump CSM prolongée sur la clé USB. Ce fichier (Extended_CSM_model number_serial number.txt) contient:
• Les informations CSM dump normale,
• Tous les articles (de SAM « charge à USB », mais dans un format lisible),
• heures de fonctionnement,
• Les codes d’erreur,
• SW / HW journaux d’événements.Pour avoir un retour rapide sur le terrain, une décharge de flash peut être demandé par le développement. En cas de CSM, appuyez sur le bouton « rouge » et touche en série chiffres ‘2679 ‘(mêmes touches pour former le mot «COPIE» avec un téléphone portable). Un fichier « number.bin number_serial Dump_model » sera écrit sur le périphérique USB connecté. Cela peut prendre 1/2 minute, en fonction de la quantité de données qui doit être sous-évaluées. Aussi, quand CSM est activé, l’erreur de la couche 1 est affiché par LED clignotante.
Comment faire pour activer CSM
Entrez le code « 123654 » via l’émetteur RC standard. Remarque: L’activation du CSM n’est possible que si il n’ya pas de menu (utilisateur) sur l’écran.
Comment naviguer
Par le biais de la « CURSOR-DOWN/UP » bouton sur l’émetteur RC, peut être navigué à travers les menus.
Contenu du CSM
Les contenus sont réduits à 3 pages: Général, versions de logiciels et des articles de qualité. Le groupe s’est noms ne sont pas affichés partout dans le menu CSM.
Général
• Définir les informations Type.This est très utile pour une assistance / atelier comme référence pour un diagnostic. De cette manière, il n’est pas nécessaire pour le client de l’air à l’arrière de la TV-ensemble. Notez que si une NVM est remplacé ou est initialisée après la corruption, ce type de jeu doit être ré-écrit à NVM. ComPair prévoira une possibilité de le faire. La mise à jour peut également être effectuée via l’éditeur NVM disponible dans SAM.
• Code.Displays de production le code de production (numéro de série) de la télévision. Notez que si une NVM est remplacé ou est initialisée après la corruption, le code de production doit être ré-écrit à NVM. ComPair prévoira une possibilité de le faire. La mise à jour peut également être effectuée via l’éditeur NVM disponible dans SAM.
• date.Indicates installé la date de la première installation du téléviseur. Cette date est acquis par extraction de temps.
• Options de 1.Gives LES HAUTES codes d’option de l’option groupe 1 comme défini dans SAM (mode de réglage de service).
• Options de 2.Gives LES HAUTES codes d’option de l’option groupe 2 comme indiqué dans SAM (mode de réglage de service).
• 12NC SSB.Gives une identification de la SSB stockée dans la mémoire permanente. Notez que si une NVM est remplacé ou est initialisée après la corruption, ce numéro d’identification doit être ré-écrit à NVM. ComPair prévoira une possibilité de le faire. Ce numéro d’identification est le nombre de 12NC de la SSB.
• 12NC display.Shows la 12NC de l’écran.
• 12NC supply.Shows le 12NC de l’alimentation.
• 12NC 200Hz board.Shows le 12NC du Groupe 200Hz (lorsqu’il est présent).• 12NC AV PIP.Shows le 12NC du conseil AV PIP (lorsqu’il est présent).
versions de logiciels
• principales SW.Displays actuelles l’accumulation de la version du logiciel principal. En cas de problèmes de terrain liés aux logiciels, le logiciel peut être mis à niveau. Comme ce logiciel est évolutif des consommateurs, il sera également publié sur Internet. Exemple: Q55xx1.2.3.4
• Stand-by SW.Displays l’accumulation en stand-by la version du logiciel du processeur. Mise à niveau de ce logiciel sera possible via ComPair ou via le port USB.
• e-UM version.Displays l’utilisateur électronique manuel SWversion (12NC de numéro de version). La plupart nombre important ici est le dernier chiffre.
• AV PIP logiciel.
• version du logiciel de dongle 3D.
Articles de qualité
• Signal quality.mauvais / moyen / bon (pas pour DVB-S). • adresse MAC Ethernet. Affiche l’adresse MAC présente dans le SSB.
• address.Displays MAC sans fil l’adresse MAC sans fil pour supporter la fonctionnalité Wi-Fi gratuite.
• key.Indicates BDS si le jeu est dans l’état BDS.
• statut CI module.Displays si le module d’interface commune est détecté.
Service.Yes • CI + protégées / Non.
• Compteur d’événements:
S: 000X 0000 (nombre de récupérations de logiciels: SW CAS-LOG # (redémarrage)
S: 0000 000X (nombre d’événements de logiciels: SW EVENTLOG # (événements)
H: 000X 0000 (nombre d’erreurs matérielles.
H: 0000 000X (nombre d’événements matériels: SW EVENTLOG # (événements).
Comment quitter CSMAppuyez sur « MENU » (ou « HOME ») touche / «Retour» sur la RC-émetteur.
DEFAULT MODE DE SERVICE
Comment faire pour activer SDM
Pour ce châssis, il existe deux types de SDM: un SDM analogique et un numérique SDM. Tuning se produira selon le tableau.
mode de service par défaut (SDM) et le Service Mode de réglage (SAM) offre plusieurs fonctionnalités pour le technicien de service, alors que le mode de service à la clientèle (CSM) est utilisé pour la communication entre le centre d’appel et le client.
Comme la plupart des signaux sont numériques, il sera difficile de mesurer des signaux avec un oscilloscope standard. Cependant, plusieurs circuits clés sont capables de générer des modèles de test, qui peuvent être contrôlées via ComPair. De cette manière, il est possible de déterminer quelle partie est défectueux.
Effectuer des mesures dans les conditions suivantes:
• Mode par défaut du service.
• Vidéo: Couleur signal de bar.
• Audio: 3 kHz gauche, à droite de 1 kHz.
Ce châssis offre également la possibilité d’utiliser ComPair, une interface matérielle entre un ordinateur et le châssis du téléviseur. Il offre les capacités de dépannage structuré, le code d’erreur de lecture, et la version du logiciel de lecture pour tous les châssis.
Remarque : Pour la nouvelle gamme de modèles, une nouvelle télécommande (RC) est utilisé avec certains boutons renommés. Cela a un impact sur l’activation des modes de service. Par exemple, le vieux bouton « MENU » est maintenant appelé « HOME » (ou est indiquée par une icône «maison»).
Mode par défaut de services (SDM)
But
• Pour créer un cadre pré-défini, pour obtenir les mêmes résultats de mesure comme indiqué dans ce manuel.
• Pour remplacer les protections SW détectés par stand-by processeur et de rendre le démarrage du téléviseur à l’étape juste avant la protection (une sorte de pas à pas automatique au démarrage).
• Pour commencer la procédure clignotant LED où seule la couche 2 erreurs sont affichées.
• Tous les réglages de l’image à 50% (luminosité, couleur, contraste).
• Le volume sonore à 25%.SDM REGLAGES PAR DEFAUT

• analogique SDM : utiliser le RC-émetteur et la clé standard dans le code « 062596 », suivie directement par la touche « MENU » (« HOME » ou). [Note: Il est possible que, avec le SDM, le menu principal apparaît. Pour passer ce « off », appuyez sur le bouton « MENU » (« HOME » ou). Analogique SDMcan également être activé par terre pour un moment le chemin de soudure sur la SSB, avec l’indication « SDM »]• SDM numérique : utiliser le RC-émetteur et la clé standard dans le code « 062593 », suivie directement par la touche « MENU » (« HOME » ou). [Note: Il est possible que, avec le SDM, le menu principal apparaît. Pour passer ce « off », appuyez sur le bouton « MENU » (ou « HOME ») de nouveau.]
Après avoir activé ce mode, « SDM » apparaît dans le coin supérieur droit de l’écran (quand une image est disponible).

Comment naviguer
Lorsque le bouton « MENU » (ou « HOME ») est enfoncée sur l’émetteur RC, le téléviseur basculera entre le SDM et le menu utilisateur normal.
Comment quitter SDM
Utilisez l’une des méthodes suivantes:
• Mettez l’ensemble de STAND-BY via la RC-émetteur.• Via un client émetteur RC norme: clé en séquence « 00 ».
++++++++++++++++++++++++++++++++++++++++++++++++++++++++++++++++++++++
Sony XBR-65X900A
COMMENT ENTRER DANS LE MODE SERVICE
1) Allumez l’interrupteur principal pour mettre en mode veille.
2) Appuyez sur les touches de la télécommande commandant dans l’ordre suivant à chaque intervalle dans 1 sec, le mode de service sera réglé.Affichage> canal 5> Volume +> Mise sous tension
SONY KLV-28R412B
Accès au mode service
1) Aller à la veille TV état par télécommande.
2) Appuyez sur « i + (info ) », « Volume + » puis « puissance de TV » « 5 » sur la télécommande.
3) Vous pouvez voir le mode service sur l’ affichage.
————————————–
Sony KLV-40S550A
ACCÉDER AU SERVICE NUMÉRIQUE
AJUSTEMENT MENUS
1. Allumez le téléviseur et afficher une chaîne numérique.
2. Mettre le téléviseur en mode veille. (Power off).
3. Appuyez sur les touches suivantes de la télécommande commandant dans une seconde:
DISPLAY> Channel 5> Volume +> Mise sous tension.
Le menu de service numérique affiche.————————————
SONY KD-55X9000A – KD-65X9000A
COMMENT ENTRER MODE DE SERVICE
1) Allumez l’interrupteur principal pour placer cet ensemble en mode veille.
2) Appuyez sur les touches de la télécommande commandant comme suit, et d’ entrer en mode de service.
3) Affichage du mode de service.INFORMATIONS> CHANNEL 5> VOLUME +> POWER ON
Remarque: Tout d’ abord, lorsque vous entrez en mode service, vous pouvez voir « Digital » mode de service. Chaque fois que vous appuyez sur « OPTIONS » ou « JUMP » sur la télécommande, chaque mode de service est modifié. « Digital » -> « Chassis » -> « VPC »————————————–
SONY KDL-50FA97 C
SERVICE D’ACCÈS MODE
1) Allumez l’interrupteur principal pour placer cet ensemble en mode veille.
2) Appuyez sur les touches de la télécommande commandant comme suit, et d’ entrer en mode de service.AFFICHAGE> CHANNEL 5> VOLUME +> POWER ON
————————————————–
SHARP
MODE DE SERVICE
—————————-
SHARP LC-39LE551U
MODE DE SERVICE
menu de service, d’ abord Appuyez sur « MENU » buton, puis écrire « 4725 » en utilisant la télécommande.—————————
SHARP 40LE430 M
MODE DE SERVICE
Pour atteindre le menu de service, d’ abord Appuyez sur « MENU » buton, puis écrire « 4725 » en utilisant la télécommande.———————-
PHILIPS
Mode de service
—————————–
PHILIPS 32PFL3505D
Mode de service à la clientèle (CSM)
but
Le mode de service à la clientèle montre les codes d’erreur et des informations sur le centre téléviseurs opération settings.The d’appel peut demander au client (par téléphone) pour entrer CSM afin d’identifier l’état des set.This aide le centre d’appels pour diagnostiquer les problèmes et les échecs le téléviseur avant de faire un appel de service .
Le CSM est un mode de lecture seule ; Par conséquent, les modifications ne sont pas possibles dans ce mode de .
caractéristiques
# Ignorer « Service modes hostiles».
# Numéro de ligne pour chaque ligne (pour faire du langage CSM indépendant).
# Réglez le mode d’écran en plein écran (tous les contenus à l’ écran est visible).
# Après avoir quitté le mode de service à la clientèle, les paramètres d’ origine sont restaurés.
# Possibilité d’utiliser « CH + » ou « CH- » pour le canal du surf, ou entrer le numéro de canal spécifique sur le RC.Comment faire pour activer CSM
Appuyez sur le bouton Menu puis « 123654 » boutons consécutivement.
Remarque: L’ activation du CSM est seulement possible s’il n’y a pas (utilisateur) menu sur l’écran!—————————
PHILIPS 55PFL4909
Comment accéder au mode de service1. Allumez l’appareil. 2. Appuyez sur [0], [6 ], [2], [5], [9], [6] et [INFO] boutons de la télécommande dans cet ordre.
———————————-
PHILIPS 40PFL6606D
Comment faire pour activer CSM
Entrez le code « 123654 » via l’émetteur RC standard.
Remarque: L’ activation du CSM est seulement possible s’il n’y a pas (utilisateur) menu sur l’écran.—————————–
PANASONIC TX-L42E30
Mode Fonction de service
MPU contrôle les fonctions de commutation pour chaque EII par bus IIC dans ce châssis. Le réglage et le réglage suivant peut
être ajusté par commande à distance dans le menu de service
Comment entrer en mode service
Tout en appuyant sur [VOLUME (-)] bouton sur l’unité principale, appuyez sur le bouton [RED] sur la télécommande pour 3 fois dans les 2 secondes.
Comment sortir
Coupez l’alimentation avec le [POWER ] enfoncé sur l’unité principale ou sur la touche [POWER] sur la télécommande.————————–
Mode de service
PANASONIC————————–
PANASONIC TC-L55DT50Mode de service
Comment entrer en mode service
Tout en appuyant sur [VOLUME (-)] bouton de l’unité principale, appuyez sur [INFO] de la télécommande à trois reprises dans les 2 secondes.
——————————————–
Panasonic TH-L32EM5A
Comment entrer en mode service
Tout en appuyant sur [VOLUME (-)] bouton de l’unité principale, appuyez sur [INFO] de la télécommande à trois reprises dans les 2 secondes.—————————
P TH-anasonic 32A300DXMode de service
Comment entrer en mode service
Après les pièces de rechange, vérifier et ajuster les contenus du mode de réglage.
Tout en appuyant sur [VOLUME (-)] bouton de l’unité principale, appuyez sur [INFO] de la télécommande à trois reprises dans les 2 secondes.———————-
Mode Service JVC
———————–
JVC LT-32DE9BJ
COMMENT ENTRER LE MODE SERVICE MENU
(1) Appuyez sur la touche [INFORMATION] et la touche [MUTING] de la TÉLÉCOMMANDE simultanément, et l’écran MENU SERVICE du sera affiché.
(2) Lorsque le menu principal est affiché, appuyez sur une touche de [1] à [0] pour accéder au mode de menu correspondant.
* Appuyez sur une des touches [1] à [0] touches avant le mode service de menu disparaît.
(3) Sélectionnez l’option de service à l’ aide de la touche [(UP / DOWN) FONCTION].
(4) Réglez la valeur à l’ aide de la touche [GAUCHE / DROITE FONCTION (].
(5) Appuyez sur la touche [OK] touche pour enregistrer la valeur.COMMENT SORTIR DU MODE SERVICE MENU
Appuyez sur la touche [INFORMATION] pour quitter le mode Menu Service.———————————–
JVC LT-32C31 BJE
COMMENT ENTRER LE MODE SERVICE MENU
(1) Appuyez sur la touche [INFORMATION] et la touche [MUTING] de la TÉLÉCOMMANDE simultanément, et l’écran SERVICE MENU de Fig.4 seront affichés.
(2) Lorsque le menu principal est affiché, appuyez sur une touche de [1] à [0] pour accéder au mode de menu correspondant.
———————————–
JVC LT-37A80ZU – LT-37DA8 BJ
COMMENT ENTRER DANS LE MODE DE SERVICE
(1) Appuyez sur la touche [INFORMATION] et [MUTING] sur l’unité de commande à distance en même temps pour entrer dans le ÉCRAN SERVICE MODECHANGEMENT ET DE LA MÉMOIRE DE LA VALEUR REGLAGES SELECTION DE CONFIGURATION ARTICLE
————————————–
JVC LT-26WX84
COMMENT ENTRER DANS LE MODE DE SERVICE
REMARQUE:
Assurez -vous que le curseur (flèche) de l’écran du menu de l’ utilisateur est dirigé vers Picture Control.
Avant d’ entrer dans le mode de service, vérifiez que le réglage de l’ interrupteur TV / CATV de l’TÉLÉCOMMANDE est à la « TV » côté et le réglage du commutateur VCR / DVD est sur le côté « VCR ». Si les commutateurs ne sont pas correctement réglé , vous ne pouvez pas entrer dans le mode de service.
(1) Situé à 0 minutes en utilisant la touche [SLEEP TIMER].
(2) Appuyez sur [VIDEO STATUS clé] et [DISPLAY] simultanément, puis entrez le mode SERVICE MODE.
(3) Lorsque le menu principal est affiché, appuyez sur une touche de [0] à [9] pour accéder au mode de menu correspondant7 janvier 2019 à 7 h 40 min #2260rockyMaître des clésSHARP LC-13AV4U _ MODE DE SERVICE
- Débranchez le téléviseur de AC prise secteur murale.
- Appuyez simultanément sur [Volume (-) et d’entrée], re-connecter le téléviseur sur une prise secteur.
- Le téléviseur s’allume avec le mode de service avec la lettre « K » sur l’écran affiché.
- Pour appeler un élément à régler, utilisez Canal + | boutons Canal Bas.
- Pour ajuster la valeur de données pour l’élément sélectionné, utilisez Volume Up | volume Dn boutons.
- Eteignez le téléviseur par le réseau AC passer [par tirer sur le cordon d’alimentation de la prise murale AC] de «mode de service de sortie.
SHARP EURO DS-1 CTV _ MODE DE SERVICE
- Contact court ‘2 ‘et ‘6’ sur le module numérique, et appuyez sur « MODE » sur le cotnrol distance.
- Utilisez Ch + | Ch – pour sélectionner et élément à régler.
- Utilisez Vol + | Vol – boutons de la télécommande pour ajuster la valeur de données de l’élément sélectionné
- Éteindre l’appareil par son interrupteur de commande de puissance en mode de service « Quitter ».
- ========================================
HAIER LD 2010A _ SERVICE MODE
POUR ENTRER MODE SERVICE- Appuyez sur touche «Affichage», puis appuyez sur la touche de couleur [rouge => Vert => Jaune => Affichage] touches de la télécommande dans l’ordre.
- Usine [2] sera affiché sur l’écran.
- Pour appeler un élément à régler, utiliser Prog-vous | touches Prog Dn.
- Pour ajuster la valeur de données pour l’élément sélectionné, l’utilisation Vol + \ Vol – clés.
- De OK ‘Appuyez sur la touche pour revenir à l’écran normal.
===================================
AKAI CT-V252NTF
- Appuyez sur la touche « Menu ».
- Dans le menu s’affiche, saisissez {4,7,2,5} par la télécommande.
- Mode de service sera affiché.
- Utilisez le bouton Jaune de la télécommande Rouge, Vert, Bleu et pour sélectionner un élément.
- Pour ajuster la valeur de données pour l’élément sélectionné, utilisez Volume Up | Volume Dn boutons de la télécommande.
- De OK « Appuyez sur le bouton pour enregistrer les paramètres.
- Menu de ‘l’Appuyez sur le bouton de mode de service « Quitter ».
=======================================
Hunday HY-DVD 580 _ RÉGION débloquer
Hunday HY-DVD 580 _ RÉGION débloquer
- Mettez l’ensemble.
- Ouvrez le tiroir du disque.
- Entrez [2> 4> 0> 5> 9> 1> 5] dans l’ordre.
- Appuyez sur la touche « Entrée » repeteadly jusqu’à ce que «Région 9 ‘arrive.
- Maintenant, le jeu est gratuit région.
==================================
LG – DVD _ RÉGION débloquer
APPLICABLES AUX
LG 3620/5063/5073/5083/5084/5095/5174/5183/5184/5193/5195/5253/5353/5930/5931/5935/6033/6053/6054/6183/6188/6193/6194/6195/6196 / 6353 / DR250 / DV1000 / DV2000 / DV7832NXC / DVB418 / DVC8700 / DVP-S500 / DVP7772 / DVS-7720 / DVS-7920 / DVS-7800 / DVT418 / LDA-511 / LDA-530 / LDA-531 / LH-CX247W / LH-CX440 / LH-D6230 / LH-D6235 / LH-D6430 / LH-D6530D / APL-534 / LG DP8821 / DP9821P / DV-8700H / DV-8600 / DV-8631V / DV-8700A / DV-8700H / DV8761 / DV-9700 / DV-9800H / DV-9900 / DVC9800 / DVD-8742X / DVX-171 / DVX -173 / DVX-9700 / DVX-9900 / DVK-9913N / DVX-7900 / DVX-8651C / DVX-8751C / DVX-8851 / DVX-9700 / DVX-9843 / DVX-9900 / DZ9311N / DZ9700 / DZ9811P / DZ9900 / LH-SW5200 / LH-T1000 / LH-T250 / LH-T252SC / LH-T751TB / LST-3510A / LXD-5230 / NS8421T
- Allumez le lecteur sans disque inséré.
- Ouvrez le bac de disque.
- Appuyez sur « Pause ».
- Appuyez sur [ 0 => 0 => 0 => (0) ]. Appuyez sur 3 zéros premiers, et attendez une seconde, puis appuyez sur le dernier zéro.
- Saisissez la région. [0 = région libre].
- Appuyez sur « Pause ».
- Éteignez le lecteur. Attendez une minute. Mettez-le à nouveau.
===============================================
SAMSUNG BD-D5300 lecteur Blue Ray

Sans aucun disque dans le lecteur, Appuyez sur le bouton « Repeat » sur la télécommande.
Entrez [57538]. Ou remplacer votre code région donnée ci-dessous.
Le code de jeu actuel s’affiche en haut de l’écran.
Appuyez sur [9] pour le rendre région libre.
Autres codes de région
1 => 29334
2 => 57538
3 => 56732
4 => 76884
5 => 53814
6 => 24462=====================================
PHILIPS – 32pF 5320 _ mode service
Image neigeuse
Vérifier ligne de CSM – 6. Si elle se lit pas réglé, vérifiez les points suivants.- L’antenne n’est pas connecté. Connectez l’antenne.
- Pas de signal de l’antenne, ou mauvais signal d’antenne.
- Le tuner est défectueux. Vérifiez le tuner. Remplacer ou réparer.
Photo noir et blanc
Si:- L’image s’améliore après avoir appuyé sur «Auto Picture » de la télécommande.
Puis:
- De la touche Auto Picture « sur la télécommande pour choisir ‘Appuyez sur le mode de l’image personnelle.
- Appuyez sur le bouton de menu de la télécommande. Ceci nous amène à manu utilisateur normal.
- Dans le menu utilisateur normal, utilisez les touches Menu Up / Dn pour mettre en surbrillance le menu sous la ‘picure.
- Appuyez sur Menu Gauche / droite pour entrer dans ‘le sous-menu de l’image ».
- Utilisez le bouton Menu Up / Dn pour sélectionner la couleur.
- Appuyez sur la touche Menu droite pour augmenter la valeur de la couleur.
- Appuyez sur le bouton Menu de la télécommande à deux reprises pour quitter le menu de l’utilisateur.
- La nouvelle valeur de préférences personnelles sera automatiquement mémorisée.
MENU TEXTE PAS ASSEZ SHARP
Si:
L’image s’améliore après avoir appuyé sur le bouton automatique de l’image de la télécommande
Puis:- Bouton Auto Picture »Appuyez sur la télécommande pour choisir le mode » Photo personnelle « .
- Menu de ‘l’Appuyez sur le bouton de la télécommande. Cela soulève le menu utilisateur normal.
- Dans le menu utilisateur normal, utilisez les touches Menu Up / Dn pour mettre en surbrillance le sous-menu de l’image.
- Appuyez sur Menu Gauche / Droite pour entrer dans le sous-menu de l’image.
- Utilisez les touches Menu Up / Dn pour sélectionner l’image.
- Appuyez sur la touche Menu gauche pour diminuer la valeur de l’image.
- Appuyez sur le bouton Menu de la télécommande deux fois pour quitter le menu utilisateur.
- Les nouvelles valeurs de préférences personnelles seront mémorisées automatiquement.
SERVICE À LA CLIENTÈLE MODE / [CSM]
But:
Le mode de service à la clientèle montre les codes d’erreur et des informations sur les paramètres de fonctionnement des téléviseurs. Le centre d’appel peut demander au client par téléphone, pour entrer CSM, afin de déterminer l’état de l’ensemble. Cela permet au centre d’appel pour diagnostiquer les problèmes et les échecs dans le téléviseur, avant de faire un appel de service.
Le CSM est un mode en lecture seule, par conséquent, aucune modification n’est pas possible dans ce mode.
COMMENT PARTICIPER [CSM] MODE
Appuyez sur la suivant la séquence de touches sur la télécommande [123654]. Ne pas permettre l’affichage de temps entre les entrées en tapant la séquence.
MENU EXPLICATIONS- L’indication de la valeur décimale du compteur d’heures de fonctionnement, l’identification du logiciel du processeur principal, et le mode de service.
- Affiche les cinq dernières erreurs, détectées dans la mémoire tampon de code d’erreur.
- Affiche les octets d’option.
- Affiche la version du numéro de type de set.
- Réservé article pour centres d’appels P3C. [AKBS] représente avancée système de base de connaissances]
- Indique la télévision et reçoit le signal IDENT sur la source sélectionnée. Si aucun signal IDENT est détecté, l’écran affiche « Not Found ».
- Affiche le système de couleur détectée. [PAL / NTSC / SECAM]
- Affiche l’audio [Stereo / Mono] détecté.
- Affiche les informations des paramètres de l’image.
- Affiche les informations des paramètres sonores.
Pour quitter [CSM] MODE
Utilisez l’une des méthodes suivantes.- Appuyez sur le [Menu, Statut / Sortie] ou le bouton [Power] de la télécommande.
- Appuyez sur le bouton « Power » sur le téléviseur.
7 janvier 2019 à 7 h 45 min #2261rockyMaître des clésService menu ,service mode en tv lcd ,crt plasma et monitor
ACERcode:6163
LCDs :* SERVICE MENU 1:
Press and hold the {CH+} & {CH -} buttons on
the TV for few seconds.* SERVICE MENU 2:
Press and hold the {VOL-} & {CH +} buttons on
the TV for few seconds.* AUTO ALIGNMENT:
Press and hold the {VOL+} & {CH -} buttons on
the TV for few seconds.* FACTORY RESET:
Press and hold the {VOL-} & {MENU} buttons on
the TV for few seconds.* Use the {UP} {DOWN} {LEFT} {RIGHT} buttons on the
remote to move through menus and change settings.* To exit, press the {MENU} button or turn the power off.
#2
* Turn the Monitor on.
* Press and hold the {DOWN} button and
then turn the power off.* Now press and hold the {UP} button and
then turn the power on.* The Service Menu will be displayed.
* To exit, turn the power off.
#3
* Turn the Monitor on.
* Press and hold the {LEFT} button and
then turn the power off.* Now press and hold the {RIGHT} button and
then turn the power on.* The Service Menu will be displayed.
* To exit, turn the power off.
AKAI
TVs :
* Turn the TV off.
* Press and hold the {VOL+} & {VOL -} buttons
on the TV and then turn the power on.* The Service Menu will be displayed.
* Use the {MUTE} and {0-9} numbered buttons to access modes.
* Use the {VOL+} {VOL -} buttons to change settings.* To exit, turn the power off.
#2
* Turn the TV on.
* Press the {F WHITE} {AUTO} {V CHIP} buttons on the remote.* The Service Menu will be displayed.
* To exit, turn the power off.
#3 xxxxxxxxxxxxxxxxxxxxxxxxxxxxxxxxxxxxxxxxxxxxxxxxxx
* Turn on the display and select the input that you want to adjust.
* Turn the display off.* In quick sequence on the remote press:
{MUTE} , {1} , {8} , {2} , {POWER} buttons.* The Display will turn on with the service menu displayed.
ADJUSTMENT – TEST PATTERN – SET OPTION BYTE – FACTORY RESET* Select the function and use the {VOL+} to enter the next screen.
* Save settings and exit by pushing {MUTE} twice then {POWER}.#4
* Turn the TV on.
* Press the {MUTE} {OK} {TV} buttons on the remote.* The Service Menu will be displayed.
* Use the {UP} {DOWN} buttons to select options.
* Use the {RIGHT} {LEFT} buttons to change settings.
* Press the {OK} button to save settings.* To exit, press the {TV} button.
#5
* Turn the TV on.
* Press and hold the {VOL -} button on the TV.* Press the {MENU} button on the remote,
release the {VOL -} button on the TV and
then press the {TV} button on the remote.* Now to access the Service Menu, press the {i} button.
* Use the {UP} {DOWN} buttons to select options.
* Use the {RIGHT} {LEFT} buttons to change settings.
* Press the {OK} button to save settings.* To exit, press the {TV} button.
AOC
LCDs :
* Press the {POWER} and {AUTO} buttons at the same time.
* « Factory1 » & « Factory2 » Menus will be displayed in the OSD.* Use the {UP} {DOWN} {LEFT} {RIGHT} buttons
to move through options and change settings.* To exit, press the {MENU} button.
#2
* While the LCD is on, unplug the power cable.
* Then press and hold the {MENU} button while
plugging in the power cable.* The Factory Mode will be displayed.
* Press the option to save settings.
* To exit, turn the power off.Bang & Olufsen
TVs :
* Using the remote control:
Press the {MENU} button.
Then press the {0} {0} {GO} buttons.* The Service Menu will be displayed.
* To exit, turn the power off.Daewoo
TVs :
* Press the {UP} {MUTE} {DISPLAY} {MUTE}
buttons on the remote control.* The Service Menu will be displayed.
* Use {CH+} {CH -} buttons to select items.
* Use {VOL+} {VOL -} buttons to change values.* To exit, press the {MENU} button or turn the power off.
#2
* Press the {VOL -} {MUTE} {DISPLAY} {MUTE}
buttons on the remote control.* The Service Menu will be displayed.
* Use {CH+} {CH -} buttons to select items.
* Use {VOL+} {VOL -} buttons to change values.* To exit, press the {MENU} button or turn the power off.
#3
* Press the {1} {MUTE} {DISPLAY} {MUTE}
buttons on the remote control.* The Service Menu will be displayed.
* Use {CH+} {CH -} buttons to select items.
* Use {VOL+} {VOL -} buttons to change values.* To exit, press the {MENU} button or turn the power off.
#4
* Press the {1} {MUTE} {RECALL} {MUTE}
buttons on the remote control.* The Service Menu will be displayed.
* Use {CH+} {CH -} buttons to select items.
* Use {VOL+} {VOL -} buttons to change values.* To exit, press the {MENU} button or turn the power off.
#5
* Turn the TV off.
* Then press the following buttons using the remote:
{DISPLAY} {MENU} {3} {8} {POWER}* The Service Menu will be displayed.
* Use {CH+} {CH -} buttons to select menus.
* Use {VOL+} button to access menus.
* Use {CH+} {CH -} buttons to select sub-menus.
* Use {VOL+} {VOL -} buttons to change values.* To exit, press the {MENU} button.
* To exit and save, turn the power off.#6
* Select Channel 91.
* Turn « Sharpness » all the way down.
* Exit all menus.
* Press the {RED} {GREEN} {MENU} buttons on the remote.* The Service Menu will be displayed.
* Use {PROG+} {PROG -} buttons to select items.
* Use {VOL+} {VOL -} buttons to change values.* To exit, press the {MENU} button or turn the power off.
DELL
LCDs :
* Turn the Display Off.
* Press and hold the {MENU} & {+} buttons.
* While holding both buttons, turn the Display On.
* Once the Display is on, release all buttons.
* Now press the {-} button.
* The Service Menu will be displayed.
* Press the {MENU} button to exit.#2
* Turn the Display Off.
* Press and hold the {MENU} & {+} buttons.
* While holding both buttons, turn the Display On.
* Once the Display is on, release all buttons.
* Press the {MENU} button and select « Factory Reset ».
* Then go to the option « Factory ».
* The Service Menu will be displayed.
* Press the {MENU} button to exit.PLASMAS :
* Press the {INPUT} {6} {1} {9} buttons on the remote.
* The Service Menu will be displayed.* Input Select: Show Inputs needs to be set to « ALL » .
If it is set to « ACTIVE », It’ll NOT work.<<< WARNING – WARNING – WARNING – WARNING – WARNING >>>
Do NOT Hit the OK Button while the « ADC Calibration » option is selected
on the service menu. Apparently, this will recalibrate the Dell W5001C
according to whatever is being fed via the HDMI input. In the factory, a
proprietary image (provided by Pixelworks) is used. If you do it at home,
you may as well kiss the set goodbye. It cannot be undone, and you will
likely have to return the set.Fujitsu
PLASMAS :
* Fujitsu has a Service Menu with limited function.
* Press and hold the {ENTER} button on the remote
until the Service Menu is displayed:Monitor Mode A – Monitor Mode B – Extend Adjust
* Using the remote keys, select a Mode and press {ENTER} to access it.
* Monitor Mode A :
Fan Settings
Temperature Reading
Hours MeterTo determine total hours, add RGB and video for the total hours on the plasma
(each number represents hours on that selected input).
Disregard total hours. That’s the number of hours the Plasma is plugged in.* Monitor Mode B :
Shows error codes, if any.* Extend Adjust :
Fan Mode
AGC
V Screen Orbiter
RS232 Baud Rate
Default (CAUTION: pressing default will reset the hours counter to zero).* Press menu to toggle from one menu to another.
Funai
Emerson / Symphonic /iloTVs : lcd (grandin)
* Enter Menu or Picture Menu.
* Then press the {9} {3} {0} {1} buttons.
* The Service Menu will be displayed.
* To exit, press the {MENU} button or turn the power off.
#2
* Enter the Main Menu.
or
Enter the Main Menu and access the Install Menu.* Then press the {4} {7} {2} {5} buttons.
* The Service Menu will be displayed.
* Use the {UP} {DOWN} buttons to select items.
* Use the {LEFT} {RIGHT} buttons to change settings.* To exit, press the {MENU} or {EXIT} buttons.
Vestel
#3
* Turn the power on using the {POWER} button on the TV.
* Press the {POWER} {2} {7} {1} {MUTE} buttons on the remote.* The Service Menu will be displayed.
* To exit, press the {POWER} button on the remote.
#4
* Press the {1} {MUTE} {DISPLAY} {MUTE}
buttons on the remote control.* The Service Menu will be displayed.
* Use {CH+} {CH -} buttons to select items.
* Use {VOL+} {VOL -} buttons to change values.* To exit, press the {MENU} button or turn the power off.
Daewoo
#5
* Press the {1} {MUTE} {RECALL} {MUTE}
buttons on the remote control.* The Service Menu will be displayed.
* Use {CH+} {CH -} buttons to select items.
* Use {VOL+} {VOL -} buttons to change values.* To exit, press the {MENU} button or turn the power off.
Daewoo
#6
* Turn volume all the way down to ‘0’
* Then press and hold the {VOL -} button on the TV and
the {9} button on the remote control for few seconds.* The Service Menu will be displayed.
* Use the {CH+} {CH-} buttons to select items.
* Use the {VOL+} {VOL-} buttons to change values.* To exit, turn the power off.
Orion
#7
* Turn volume all the way down to ‘0’
* Then press and hold the {VOL -} button on the TV and
the {0} button on the remote control for few seconds.* The Service Menu will be displayed.
* Use the {CH+} {CH-} buttons to select items.
* Use the {VOL+} {VOL-} buttons to change values.* To exit, turn the power off.
Grundig
TVs :
* With the TV in standby:
* Press and hold the {i} button on the remote
while pressing the {POWER} button on the TV.* The TV will turn on with the Service Menu displayed.
* Use the {UP}{DOWN} buttons to select menus/options.
* Use the {LEFT}{RIGHT} buttons to change settings.* To exit, turn the power off.
#2
* Press the {i} button.
* Then press ‘OK’ – ‘SERVICE’ – ‘OK’.
* Enter Service Code ‘8500’.* The Service Menu will be displayed.
* Use the {UP}{DOWN} buttons to select menus/options.
* Use the {LEFT}{RIGHT} buttons to change settings.* To exit, turn the power off.
#3
* Press and hold the {i} button.
* Then enter service code ‘8500’.* The Service Menu will be displayed.
* Use the {UP}{DOWN} buttons to select menus/options.
* Use the {LEFT}{RIGHT} buttons to change settings.* To exit, press the {TXT} button.
#4
* With the TV in standby:
* Press and hold the {P/C} button on the remote
while pressing the {POWER} button on the TV.* The TV will turn on with the Service Menu displayed.
* To exit, turn the power off.
#5
* Press the {DISPLAY} {MUTE} {SLEEP} {FUZZY}
buttons on the remote control.* The Service Menu will be displayed:
o Factory 1
o Factory 2
o Factory 3* Use {VOL+} {VOL -} buttons to access menus.
* Use {CH+} {CH -} buttons to change values.* To exit, turn the power off.
#6
* Turn the TV off.
* Press and hold the {MENU} button on the TV
while pressing the {POWER} button on the TV.* Wait until the power light turns on then
press the {POWER} button on the remote.* The Service Menu will be displayed.
* Use the {P+} {P-} buttons to select options.
* Use the {VOL+} {VOL-} buttons to change settings.* To exit, turn the power off.
Hitachi
PLASMAS :
* Turn the TV off..
* Press and hold the {POWER} and {INPUT} buttons at the
same time on the A/V Media Box for at least 5 seconds.* Release the {POWER} button first and then immediately
release the {INPUT} button.* The TV will turn on with the Service Menu displayed.
* Use the {MENU} button to move through menus.
* Use the {UP} {DOWN} buttons to select options.
* Use the {LEFT} {RIGHT} buttons to change settings.* To exit, turn the power off.
#2
* Put the TV in standby.
* Press and hold the {POWER} {INPUT} {DOWN} buttons
at the same time on the TV for at least 5 seconds.* The TV will turn on with the Service Menu displayed.
* Use the {UP} {DOWN} buttons to select options.
* Use the {LEFT} {RIGHT} buttons to change settings.
* Press the {OK} button to save settings.* To exit, press the {MENU} button.
MISC TVs :
* Turn the TV on.
* Press {MENU} {MENU} {8} {SELECT} buttons on the remote.
* The Service Menu will be displayed.* Use the {UP} {DOWN} buttons to select options.
* Use the {LEFT} {RIGHT} buttons to change settings.* Press the {EXIT} button to exit the Service Menu.
#2
* Turn the TV off.
* Press and hold the {POWER} and {INPUT} buttons on the TV.
* Hold both buttons until the TV powers on
with the Service Menu displayed.* Use the {UP} {DOWN} buttons to select options.
* Use the {LEFT} {RIGHT} buttons to change settings.* To exit, press the {EXIT} button or turn the power off..
#3
* PICTURE ADJUSTMENT MODE :
Press and hold {POWER} and {INPUT} buttons
on the TV for more than 5 seconds.* AUDIO ADJUSTMENT MODE :
Press and hold {POWER} and {INPUT} buttons
on the TV for 3-5 seconds.* Use the {UP} {DOWN} buttons to select options.
* Use the {LEFT} {RIGHT} buttons to change settings.* To exit, press the {POWER} button.
#4
* Press the {I} {M} {P} buttons.
* The Service Menu will be displayed.
* Use the {UP}{DOWN} buttons to select options.
* Use the {LEFT}{RIGHT} buttons to change settings.
* Press the {M} button to save settings.* To exit, press the {TV} button.
#5
* Press the {SETUP} button and select « Cable Mode ».
* Select « Timer » menu and set sleep timer to 30 min.
* Press {MENU} or {OK} buttons twice to exit menus.
* Tune to channel 124.
* Turn the volume all the down to ‘0’.
* Then press and hold {VOL -} button ON THE TV.* « CHK » appears in on top-left corner.
* While the « CHK » is displayed, press the {MENU} & {VOL+} buttons
ON THE TV simultaneously to toggle between Modes:Red « CHK » for Serviceman — Yellow « CHK » for Aging
* Press the {POWER} button on the remote to move through modes.
* Use the {CH+} {CH -} on the remote to select options.
* Use the {VOL+} {VOL -} on the remote to change settings.* To exit, press the {MENU} and {POWER} buttons on the TV.
RPTVs :
* Press and hold the {MENU} button on the TV.
* Then press the {MENU} {8} {SELECT} buttons on the remote.
* To exit, press the {MENU} button on the TV or
the {EXIT} button on the remote control.DCAM Mode:
* Using the remote control:
* Hold down the {TV} button.
* Press the {MENU} button.
* Press the {INFO} button.
* Release the {TV} button.Remote Control Key Functions When In DCAM Mode:
{INPUT} …………. Blue (13×9 adjust)
{ASPECT} ………… ROM Write
{DAY/NIGHT} ……… ROM Read
{MENU} ………….. Remove Color
{EXIT} ………….. Cross Hatch/Video Mode
{INFO} ………….. Green
{GUIDE} …………. Calculation
{2} …………….. Cursor UP
{5} …………….. Cursor DOWN
{6} …………….. Cursor RIGHT
{4} …………….. Cursor LEFT
{0} …………….. RED (7×5 Adjust)
{STOP} ………….. Initialize
{PLAY} ………….. Raster Position
{FAST FORWARD} …… PhaseTo Exit The DCAM Mode:
* Press and hold the {TV} button.
* Press the {0} button.
* Press the {1} button.
* Release the {TV} button.#2
* Turn the TV off and wait at least 2 minutes.
* Press and hold the {INPUT} and {POWER} buttons
* on the TV for about 2 seconds.* The TV will turn on with the Service Menu displayed.
* Use the {UP} {DOWN} buttons to move through options.
* Press the {RIGHT} button for 2 seconds to access options.
* Use the {LEFT} {RIGHT} buttons to change settings.* Press the {EXIT} button to exit the Adjustment Mode.
* Press the {EXIT} button again to exit the Service Menu.Horizon
TVs :
* Enter the ‘Main Menu’.
* Then press the {4} {7} {2} {5} buttons.* The Service Menu will be displayed.
* Use the {UP} {DOWN} buttons to select items.
* Use the {LEFT} {RIGHT} buttons to change settings.* To exit, press the {MENU} button or turn the power off.
Vestel
#2
* Enter the ‘Main Menu’ and access the ‘Install Menu’ .
* Then press the {4} {7} {2} {5} buttons.* The Service Menu will be displayed.
* Use the {UP} {DOWN} buttons to select items.
* Use the {LEFT} {RIGHT} buttons to change settings.* To exit, press the {MENU} button or turn the power off.
HP
LCDs :
* While the LCD is on, unplug the power cable.
* Then while pressing the {INPUT} & {VOL -} buttons on the remote,
plug the power cable back into the outlet.* When it powers up you will see a little « k » appear in brackets.
* Then on the TV, press and hold {VOL -} & {CH -} down and release.
* The Service Menu will be displayed.* Use {CH+} {CH -} buttons to navigate
* Use {VOL+} {VOL -} buttons to adjust the value.* Turn the set off to exit the Service Menu.
Sharp
PLASMAS :
PL-4260N / PL-5060N
* Turn the TV on.
* Press the {MENU} button and select « User OSD Menu ».
* Select « Audio », « Settings » and then « Balance ».
* Press the {9} {1} {8} {OK} buttons on the remote.
* The Service Menu will be displayed.Remote – Control Keys:
{MENU} ……………. Enter/Exit the Service Menu
{UP} {DOWN} arrows …. Select Items
{RIGHT} arrow ……… Enter Lower-Level Menus
{RIGHT} {LEFT} arrows . Change Adjustment Values
{BACK} ……………. Return to Upper-Level MenuTV – Control Keys:
{MENU} ……………. Enter/Exit the Service Menu
{CH+} {CH-} ……….. Select Items
{VOL+} ……………. Enter Lower-Level Menu
{VOL+} {VOL-} ……… Change Adjustment Values* To exit, press {9} {1} {8} {9} buttons on the remote.
NOTE: If the “M” character appears on the screen,
press the {MENU} button first.PE-4200N / PL-4200N / PL-5000N
* Hold down {VOL -} button ON THE PLASMA TV.
* While still holding down the {VOL -} button,
press {RECALL} on the remote 3 times.* The Service Menu will be displayed.
* Use the {1} {2} button to navigate main menu items.
* Use the {3} {4} buttons to navigate sub-menu items.
* Use the {VOL+} {VOL -} buttons to change settings.* To exit, turn the power off.
Hyundai
TVs :
* Press the {MUTE} {MENU} {OK} {SLEEP} buttons on the remote.
* The Service Menu will be displayed.
* To exit, turn the power off.
#2
* Press the {MENU} {4} {7} {2} {5}
buttons on the remote control.* The Service Menu will be displayed.
* There are 4 Menus available:
Display – Calibration – Deinterlacer – Factory Settings* Use the {LEFT} {RIGHT} buttons to select a Menu.
* Use the {UP} {DOWN} buttons to select Menu options and
then the {LEFT} {RIGHT} or {OK} buttons to change values.* To exit, press the {MENU} button.
Vestel
#3
* Press the {MENU} {SAP} {SLEEP} {MAGIC}
buttons on the remote control.* The Service Menu will be displayed.
* To exit, turn the power off.
#4
* Press the {CAPS} {REVEAL} buttons on the remote.
* The Service Menu will be displayed.* Use the {REVEAL} button to move through menus.
* Use the {P +} {P -} buttons to select items.
* Use the {VOL+} {VOL-} buttons to change settings.* Press the {OK} button to save and exit.
Iiyama
MONITORS :
* Turn the Display off.
* Press the {POWER} button twice while
holding down the {MENU} button.* Then press the {POWER} button again
while holding down the {-} button.* Press the {MENU} button to enter the Service Mode.
* To exit, press the {POWER} button.
JVC
PLASMAS / LCDs / CRTs / RPTVs :
* Press the {MENU} button and go to the User Menu screen, make sure
that the indicator (arrow) is pointed and highlights the « Picture Control ».* The buttons on top of the remote are set to TV & VCR respectively.
* Set sleep timer to « 0 » minutes and while it is displayed, simultaneously
press the {VIDEO STATUS} & {DISPLAY} buttons.* The Service Menu will be displayed.
* Use the number keys {1-9} to select a category.
* Use the {CH+} {CH-} buttons to select options.
* Use the {VOL+} {VOL-} buttons to change settings.
* Use the {MUTING} button to save settings.* Press the {BACK} button to exit the Service Menu.
#2
* Turn the TV on.
* Using the remote control:* Press the {INFO} & {MUTE} buttons at the same time.
* The Service Menu will be displayed
* Use the number keys {1-9} to select a category.
* Use the {VOL+} {VOL-} buttons to enter the category.
NOTE: Some models don’t have category selection.* Use the {CH+} {CH-) buttons to select options.
* Use the {VOL+} {VOL-} buttons to change settings.* To exit, press the {INFORMATION} button.
#3
* Turn the TV on.
* Using the remote control:* Press {DISPLAY} & {PIC MODE} buttons at the same time.
* The Service Menu will be displayed
* Use the number keys {1-9} to select a category.
* Use the {UP} {DOWN} buttons to enter the category.
* Use the {LEFT} {RIGHT} buttons to select options.
* Use the {UP} {DOWN} buttons to change settings.* To exit, press the {DISPLAY} button twice.
#4
* Press the {MENU} button.
* Select « Clock Set ».
* Set clock to 3:21 AM and press « Start Clock ».* While a « Thank You » message is displayed on screen,
press the {MUTE} and {MENU} buttons.* The Service Menu will come up.
* Use {UP} {DOWN} to select options.
* Use {LEFT} {RIGHT} to change settings.* To exit, turn the power off.
#5
* Press the {DISPLAY} and {PIC MODE} buttons
at the same time on the remote control.* The Service Menu will be displayed.
* Use the {MENU UP} {MENU DOWN} buttons to select options.
* Use the {MENU +} {MENU -} buttons to change settings.
* Press the {DISPLAY} button to exit menus.* Press the {DISPLAY} button again to exit the Service Menu.
LG
TVs :
* Service Menu #1
Press and hold the {MENU} button on the remote and
the {MENU} button on the TV at the same time,
until the first Service Menu is displayed.* Service Menu #2
Repeat the above sequence:
Press and hold the {MENU} button on the remote and
the {MENU} button on the TV at the same time,
until the second Service Menu is displayed.#2
* Press and hold the {MENU} button on the remote
and the {MENU} button on the TV at the same time* If a password screen comes up:
Press and hold the {MENU} button on the remote
and the {MENU} button on the TV at the same time
again, until the Service Menu is displayed.#3
* Press and hold the {MENU} button ON THE REMOTE
until a 4-digit password screen is displayed.* Then try any of the following codes to
access the Service Menu:{0} {0} {0} {0}
{7} {7} {7} {7}
{8} {7} {4} {1}#4
* Press and hold the {MENU} button ON THE REMOTE.
(The menu on the screen will disappear)* Now Press and hold the {MENU} button ON THE PANEL.
* Keep both buttons pressed until the Service Menu
is displayed, then release the 2 buttons.* Using the remote control buttons:
{MENU} = Toggles between two menu pages.
{UP} {DOWN} = Selects the item for adjustment.
{LEFT} {RIGHT} = Varies the value
{POWER} = Exit service mode and saves adjustments made.#5
* Turn the TV on.
* Hold down the {MENU} button on remote until the on-screen menu
disappears or « Welcome Message » appears then release the {MENU}
button and within two (2) seconds press the following five buttons:{9} {8} {7} {6} {ENTER}
or
{9} {8} {7} {6} {DISPLAY}* The Service Menu will be displayed.
* Using the remote control buttons:
{MENU} = Toggles between two menu pages.
{UP} {DOWN} = Selects the item for adjustment.
{LEFT} {RIGHT} = Varies the value
{POWER} = Exit service mode and saves adjustments made.Loewe
TVs :
* Press the {MENU} button on TV’s front panel.
* Select the « Service » menu option.
* Press the {MENU} button on the remote.* The Service Menu will be displayed.
* To exit, turn the set Off.
<<<< WARNING – WARNING – WARNING – WARNING – WARNING >>>>
Adjust option bits that are highlighted only. The other option bits
are for Authorized Technicians. If incorrectly adjusted, some option
bits can cause unrecoverable system failures.#2
* Press the {FUNCTION} button on TV’s front panel.
* Press and hold the {CH -} button on the remote
until the Service Menu is displayed.* Using the remote control buttons:
{CH+} {CH -} buttons move through menus
{OK} button makes selections
{VOL+} {VOL -} buttons change menu items
{OK} button saves a particular setting* To exit, turn the set Off.
<<<< WARNING – WARNING – WARNING – WARNING – WARNING >>>>
Adjust option bits that are highlighted only. The other option bits
are for Authorized Technicians. If incorrectly adjusted, some option
bits can cause unrecoverable system failures.#3
* Press the {MENU} button 5 times on TV’s front panel.
A « Service » message will appear on screen.* Then press the {MENU} button on the remote.
* The Service Menu will be displayed.
* To exit, turn the set Off.
<<<< WARNING – WARNING – WARNING – WARNING – WARNING >>>>
Adjust option bits that are highlighted only. The other option bits
are for Authorized Technicians. If incorrectly adjusted, some option
bits can cause unrecoverable system failures.Marantz
LCDs :
* Press the {MENU} {SAP} {SLEEP} {MAGIC}
buttons on the remote control.* The Service Menu will be displayed.
* To exit, turn the power off.
Matsui
TVs :
* With the TV in standby:
* Press and hold the {i} button on the remote
while pressing the {POWER} button on the TV.* The TV will turn on with the Service Menu displayed.
* Use the {UP}{DOWN} buttons to select menus/options.
* Use the {LEFT}{RIGHT} buttons to change settings.* To exit, turn the power off.
#2
* Turn the TV off.
* Press and hold the {MENU} button on the TV
while pressing the {POWER} button on the TV.* Wait until the power light turns on then
press the {POWER} button on the remote.* The Service Menu will be displayed.
* Use the {P+} {P-} buttons to select options.
* Use the {VOL+} {VOL-} buttons to change settings.* To exit, turn the power off.
#3
* Turn volume all the way down to ‘0’
* Then press and hold the {VOL -} button on the TV and
the {9} button on the remote control for few seconds.* The Service Menu will be displayed.
* Use the {CH+} {CH-} buttons to select items.
* Use the {VOL+} {VOL-} buttons to change values.* To exit, press the {8} button.
#4
* Press the {MENU} button.
or
* Press the {MENU} button and access the ‘Install’ Menu.* Then press the {4} {7} {2} {5} buttons.
* The Service Menu will be displayed.
* Use the {UP} {DOWN} buttons to select items.
* Use the {LEFT} {RIGHT} buttons to change settings.* To exit, press the {MENU} or {EXIT} buttons.
Mitsubishi
TVs :
* Using the remote control press:
{MENU} {0} {3} {5} {3} buttons.
{MENU} {0} {3} {5} {7} buttons.* Then use {VIDEO} or {AUDIO} buttons
to enter two different groups of adjustments.* {VIDEO} and {AUDIO} steps along through
the adjustments, and {+} {-} does the adjusting.* Press the {ENTER} button to save the change.
* Press the {MENU} button twice to exit service menu.#2
* Using the remote control press:
{MENU} {1} {2} {5} {7} buttons.
{MENU} {1} {2} {5} {9} buttons.
{MENU} {1} {3} {7} {0} buttons.* Then use {VIDEO} or {AUDIO} buttons
to enter two different groups of adjustments.* {VIDEO} and {AUDIO} steps along through
the adjustments, and {+} {-} does the adjusting.* Press the {ENTER} button to save the change.
* Press the {MENU} button twice to exit service menu.#3
* Using the remote control press:
{MENU} {2} {3} {5} {6} buttons.
{MENU} {2} {3} {5} {7} buttons.
{MENU} {2} {3} {5} {8} buttons.
{MENU} {2} {3} {5} {9} buttons.* Then use {VIDEO} or {AUDIO} buttons
to enter two different groups of adjustments.* {VIDEO} and {AUDIO} steps along through
the adjustments, and {+} {-} does the adjusting.* Press the {ENTER} button to save the change.
* Press the {MENU} button twice to exit service menu.#4
* Using the remote control press:
{MENU} {8} {2} {5} {7} buttons.
* Then use {VIDEO} or {AUDIO} buttons
to enter two different groups of adjustments.* {VIDEO} and {AUDIO} steps along through
the adjustments, and {+} {-} does the adjusting.* Press the {ENTER} button to save the change.
* Press the {MENU} button twice to exit service menu.NEC
TVs :
* Press {ON} {ON} {EXIT} {DISPLAY} buttons on the remote.
* The Service Menu will be displayed.
* To exit, repeat access code or turn off the display.#2
* Press {OFF TIMER} {EXIT} {MENU} {OFF TIMER} on the remote.
or
Press {OFF TIMER} {OK} {MENU} {OFF TIMER} on the remote.* The Service Menu will be displayed.
* Use the {PROCEED} or {MENU} buttons to move through menus.
* Use the {UP} {DOWN} buttons to select items.
* Use the {LEFT} {RIGHT} buttons to change settings.* To exit, turn off the display.
#3
* Press {OFF TIMER} {EXIT} {MUTE} {OFF TIMER} on the remote.
or
Press {OFF TIMER} {OK} {MUTE} {OFF TIMER} on the remote.* The Service Menu will be displayed.
* Use the {PROCEED} or {MENU} buttons to move through menus.
* Use the {UP} {DOWN} buttons to select items.
* Use the {LEFT} {RIGHT} buttons to change settings.* To exit, turn off the display.
Monitors :
* Select ‘Display Mode’.
* Press the {PROCEED} button.
* Then press and hold the {VOL+} & {VOL -} buttons.* A Warning message will be displayed.
* Press the {PROCEED} button again to enter the Service Menu.
* To exit, turn the power off.
Nokia
TVs :
* Turn the TV off (Standby).
* Press the {3} {7} {2} {POWER} buttons on the remote.* The Service Menu will be displayed.
* To exit, turn the power off.
#2
* Turn the TV on.
* Press the {MUTE} {OK} {TV} buttons on the remote.* The Service Menu will be displayed.
* Use the {UP} {DOWN} {RIGHT} {LEFT} buttons on
the remote to move through menus and change values.* Press the {OK} button to save new settings.
* To exit, press the {TV} button or turn the power off.
#3
* Press the {-/–} {MENU} {TV} buttons on the remote.
* The Service Menu will be displayed.
* Use the {PR+} {PR-} buttons to select items.
* Use the {VOL+} {VOL -} buttons to change values.* Use the {MENU} button to store new values.
* To exit, turn the power off.#4
* Press the {I} {M} {PROG} buttons on the remote.
* The Service Menu will be displayed.
* Use the {UP} {DOWN} buttons to move through menus.
* Use the {LEFT} {RIGHT} buttons to change values.
* Use the {M} button to save settings.* To exit, press the {TV} button or turn the power off.
#5
* Press the {MENU} {TV} {I} buttons on the remote.
* The Service Menu will be displayed.
* Use the number & cursor keys on the remote
to move through menus and change settings.* Use the {OK} button to store new values.
* To exit, press the {TV} button.PANASONIC
PLASMAS:
# Hold down the {VOL -} button ON THE PLASMA TV.
# Press the {RECALL} button 3 times on the remote.# The Service Menu will be displayed.
# Use the {1} {2} buttons to navigate main menu options.
# Use the {3} {4} buttons to navigate sub-menu options.
# Use the {VOL+} {VOL -} buttons to change settings.# To exit and save, turn the power off.
#2
* Using the remote control:
* Press the {MENU} button.
* Set « Antenna A » to « Cable ».
* Select « Timer » menu and set sleep timer to 30 min.
* Press {OK} twice to exit menus.
* Tune to channel 124.
* Press and hold {VOL -} button ON THE PLASMA TV.« CHK » appears in on top-left corner followed by 5 letter/numbers
(which are the cumulative hours in hex numbers)* While the « CHK » is displayed, press the {OK} and {VOL+} buttons
ON THE TV simultaneously to toggle between Modes:— Red « CHK » for Serviceman — Yellow « CHK » for Aging —
* Press the {POWER} button on the remote to select one of the six
Serviceman Adjustments Modes.A. MTS ADJUSTMENT
B. CLOCK ADJUSTMENT
C. VIDEO ADJUSTMENT
D. HDEF ADJUSTMENT
E. VDEF ADJUSTMENT
F. DAF ADJUSTMENT
G. OTHER ADJUSTMENT* Press {CH+} {CH -} on the remote to select the settings
on each of Service Adjustment Modes.Write down the original values before modifying anything.
It’s easy to erroneously adjust the wrong item.* Press {VOL+} {VOL -} on the remote to change values.
* Press the {POWER} button on the TV to exit the service menu.#3
# Using the remote control:
# Press the {MENU} button.
# Press « Setup » menu.
# On « Mode » menu, select « Cable »
# Select « Timer » menu and set sleep timer to 30 min.
# Press {ACTION} twice to exit menus.
# Tune to channel 124.
# Press and hold {VOL -} button ON THE PLASMA TV.« CHK » appears in on top-left corner followed by 5 letter/numbers
(which are the cumulative hours in hex numbers)# While the « CHK » is displayed, press the {ACTION} and {VOL+} buttons
ON THE TV simultaneously to toggle between Modes:— Red « CHK » for Serviceman — Yellow « CHK » for Aging —
# Press the {POWER} button on the remote to select one of the six
Serviceman Adjustments Modes.A. MTS ADJUSTMENT
B. CLOCK ADJUSTMENT
C. VIDEO ADJUSTMENT
D. HDEF ADJUSTMENT
E. VDEF ADJUSTMENT
F. DAF ADJUSTMENT
G. OTHER ADJUSTMENT# Press {CH+} {CH -} on the remote to select the settings
on each of Service Adjustment Modes.Write down the original values before modifying anything.
It’s easy to erroneously adjust the wrong item.# Press {VOL+} {VOL -} on the remote to change values.
# Press the {POWER} button on the TV to exit the service menu.Philips
TVs :
* Press {0} {6} {2} {5} {9} {7} {INFO+} buttons on the remote.
or
* Press {0} {6} {2} {5} {9} {7} {STATUS} buttons on the remote.
or
* Press {0} {6} {2} {5} {9} {7} {MENU} buttons on the remote.* Turn the TV off to exit the Service Menu.
#2
* Press {0} {6} {2} {5} {9} {6} {INFO+} buttons on the remote.
or
* Press {0} {6} {2} {5} {9} {6} {STATUS} buttons on the remote.
or
* Press {0} {6} {2} {5} {9} {6} {MENU} buttons on the remote.* Turn the TV off to exit the Service Menu.
#3
* Press {0} {6} {1} {5} {9} {6} {MENU} buttons on the remote.
or
* Press {0} {6} {1} {5} {9} {7} {MENU} buttons on the remote.* Turn the TV Off to exit the Service Menu.
#4
* Press {1} {6} {2} {5} {9} {6} {MENU} buttons on the remote.
or
* Press {1} {6} {2} {5} {9} {6} {STATUS} buttons on the remote.* Turn the TV off to exit the Service Menu.
#5
* With the TV off:
* Press {0} {6} {2} {5} {9} {6} {STATUS} buttons on the remote.
* Turn the TV off to exit the Service Menu.
* Press the 0 key twice on the remote to exit and save settings
#6
* Press {0} {6} {2} {5} {9} {6} {MENU} buttons on the remote.
* Press the {MENU} button again on the remote or TV* The Service Menu will be displayed.
* Use {CH+} {CH -} buttons to select items.
* Use {VOL+} {VOL -} buttons to change values.* To exit, turn the power off.
Pioneer
PLASMAS :
PDP-4214
* Press the {INPUT} button on the remote.
* The input list will come up.
* Then press the {0} {9} {1} {7} buttons on the remote.* To exit, press the {EXIT} button on the remote.
You can also press the back button when you are
in each category to get back to the main menu.#
4th / 5th / 6th / 7th GENERATION MODELS
* Make sure the Plasma and the Media Box are in standby.
* Using the remote control:
* Press {DISPLAY} button (just press, do not hold) and wait 3 seconds.
* Press {LEFT} {UP} {LEFT} {RIGHT} {POWER} buttons.* The Plasma will turn on with the « Information Menu » displayed.
* Press {MUTE} button to move through Modes:
o INFORMATION
o FUNCTION CHECK
o COMMON ADJ
o OPTION
o INITIALIZE* Press the {DOWN} button to select menus.
* To exit, turn the power off.
#
3rd GENERATION MODELS
* Power Down at the panel.
* Hold down {INPUT} & {VOL+} buttons on the panel.
* Turn on the Plasma at the panel.* The Service Menu will be displayed.
* Use the cursor keys on the remote control
to move through menus and change settings.* To exit, turn the power off.
#
2nd GENERATION MODELS
* Put the TV in Stanby.
* Press the {MENU} {SET} {POWER} buttons.
* The TV will turn on with the Service Menu displayed
* Use the {MUTE} button to move through modes:o INFO MODE
o RANGE CHECK MODE
o PICTURE MODE
Reference 1 – Press the {1} button to enter.
Reference 2 – Press the {2} button to enter
Video Box – Press the {3} button to enter.o INITIALIZE MODE
Sub Video – Press the {1} and {SET} buttons to enter.
Drive Adj – Press the {9} and {SET} buttons to enter.* Use the {VOL+} {VOL-} buttons to change settings.
* Press the {SET} button to save settings.* To exit, turn the power off.
NOTE: After accessing the Service Menu, all the regular
picture settings will be reset to default values.Proview
LCD TVs :
* Press the {CH+} {VOL+} buttons.
* The Advanced Menu will be displayed.
* To exit, turn the power off.LCD MONITORS :
* Turn the power on.
* Unplug the power cable.
* Press and hold the {MENU} button while plugging in
the power cable.* Then press the {OSD} control button to access menus.
* Use the {UP} {DOWN} buttons to select options.
* Use the {MENU} button to access options.* Use the {UP} {DOWN} buttons to change settings.
* Press the {MENU} button to save settings.* To exit, press the {EXIT} button.
#2
* Turn the Monitor on.
* Press and hold the {DOWN} button and then
turn the power off.* Now press and hold the {UP} button and then
turn the power on.* The Service Menu will be displayed.
* To exit, turn the power off.
Roadstar
TVs :
* Press the {MENU} {9} {3} {0} {1} buttons.
* The Service Menu will be displayed.
* Use the {RED} {GREEN} {BLUE} buttons to access sub-menus
* Use the {PRG+} {PRG-} buttons to select options.
* Use the {VOL+}{VOL-} buttons to change settings.* To exit, press the {TV/TX} button.
Samsung
PLASMAS / LCDs / CRTs / RPTVs :
* Turn on the TV on and select the input that you want to adjust.
* Turn the display off.* In quick sequence on the remote press:
{MUTE} {1} {8} {2} {POWER} buttons.* The TV will turn On with the Service Menu displayed.
ADJUSTMENT – TEST PATTERN – SET OPTION BYTE – FACTORY RESET* Select the function and use the {VOL+} button to enter.
* Save settings and exit by pushing {MUTE} twice then {POWER}.#2
* Put the TV in standby mode, then press:
{INFO} {MENU} {MUTE} {POWER} buttons on the remote.
* The TV will turn On with the Service Menu displayed.
* To exit, press the {POWER} button.#3
* Put the TV in standby mode, then press:
{DISPLAY} {MENU} {MUTE} {POWER} buttons on the remote.
or
{DISPLAY} {P.STD} {MUTE} {POWER} buttons on the remote.* The TV will turn On with the Service Menu displayed.
* Use the {CH+} {CH -} buttons to select options.
* Use the {VOL+} {VOL-} buttons to change settings.* To exit, press the {POWER} button.
#4
* Put the TV in standby mode, then press:
{P.STD} {AV} {SLEEP} {POWER} buttons on the remote.
or
{P.STD} {HELP} {SLEEP} {POWER} buttons on the remote.
or
{P.STD} {MENU} {SLEEP} {POWER} buttons on the remote.* The TV will turn on with the Service Menu displayed.
* Use the {CH+} {CH -} buttons to select options.
* Use the {VOL+} {VOL-} buttons to change settings.* To exit, press the {POWER} button.
#5
* Put the TV in standby mode, then press:
{P.STD} {AV} {OFF TIMER} {POWER} buttons on the remote.
* The TV will turn on with the Service Menu displayed.
* Use the {CH+} {CH -} buttons to select options.
* Use the {VOL+} {VOL-} buttons to change settings.* To exit, press the {POWER} button.
#6
* Put the TV in standby mode, then press:
{AV} {SLEEP} {POWER} buttons on the remote.
* The TV will turn on with the Service Menu displayed.
* Use the {CH+} {CH -} buttons to select options.
* Use the {VOL+} {VOL-} buttons to change settings.* To exit, press the {POWER} button.
#7
* Put the TV in standby mode, then press:
{SLEEP} {P.STD} {MUTE} {POWER} buttons on the remote.
* The TV will turn on with the Service Menu displayed.
* Use the {CH+} {CH -} buttons to select options.
* Use the {VOL+} {VOL-} buttons to change settings.* To exit, press the {POWER} button.
Sanyo
PLASMAS :
* Press and hold the {MENU} button ON THE TV then
press the {STATUS} button on the remote once.* Release both buttons.
* Within 2 seconds, press the {MUTE} button on the remote.* The Service Menu will be displayed.
* Use the {UP} {DOWN} buttons to select options.
* Use the {VOL-} {VOL+} buttons to change settings.* To exit, turn the power off.
MISC TVs :
* Press and hold the {VOL-} button ON THE TV and
the {TLTXT} button on the remote at the same time.* The Service Menu will be displayed.
* Use the {P+} {P-} buttons to select options.
* Use the {VOL+} button to access sub-menus.
* Use the {VOL-} {VOL+} buttons to change settings.
* Press the {MENU} button to return one level.* To exit, press any other button.
#2
* Unplug the power cable.
* Press and hold the {MUTE} button on the remote control
while plugging the power cable back into the outlet.* Keep pressing the {MUTE} button until
the TV powers on with the Service Menu displayed.* Use the {CH+} {CH-} buttons to select menus.
* Use the {VOL+} {VOL -} buttons to change settings.* Some menus might have sub-addresses. Use the
numeric buttons {0} to {7} to adjust sub-item data.* Press the {MENU} button or turn the TV off to exit.
#3
* Unplug the power cable.
* Press and hold the {VOL -} button on the TV
while plugging the power cable back into the outlet.* Keep pressing the {VOL -} button until
the TV powers on with the Service Menu displayed.* Use the {CH+} {CH-} buttons to select menus.
* Use the {VOL+} {VOL -} buttons to change settings.* Some menus might have sub-addresses. Use the
numeric buttons {0} to {7} to adjust sub-item data.* Press the {MENU} button or turn the TV off to exit.
#4
* Press and hold the {FUNCTION} button on the remote.
* Then press the {PROG+} button on the TV.* The Service Menu will be displayed.
* Use the {PRO+} {PROG-} buttons to select options.
* Use the {LEVEL+} {LEVEL-} buttons to change settings.* To exit, turn the power off.
Schneider
TVs :
* Press the {MENU} button.
or
* Press the {MENU} button and access the ‘Install’ Menu.* Then press the {4} {7} {2} {5} buttons.
* The Service Menu will be displayed.
* Use the {UP} {DOWN} buttons to select items.
* Use the {LEFT} {RIGHT} buttons to change settings.* To exit, press the {MENU} or {EXIT} buttons.
#2
* Press the {VOL -} button on the TV.
* Then press the {PROG} {-/–} {TV} buttons on the remote.
* The Service Menu will be displayed.* Use the {CH+} {CH-} buttons to select items.
* Use the {VOL+} {VOL-} buttons to change settings.
* Use the {RED} button to save settings.* To exit, press the {TV} button or turn the power off.
Sharp
LCD TVs :
* While the LCD is on, unplug the power cable.
* Then while pressing the {INPUT} & {VOL -} buttons on the remote,
plug the power cable back into the outlet.* When it powers up you will see a little « k » appear in brackets.
* Then on the TV, press and hold {VOL -} & {CH -} down and release.
* The Service Menu will be displayed.* Use {CH+} {CH -} buttons to navigate
* Use {VOL+} {VOL -} buttons to adjust the value.* Turn the set off to exit the Service Menu.
TVs :
* Unplug the power cable.
* Press and hold the {CH+} & {VOL+} buttons.
or
Press and hold the {CH+} & {VOL -} buttons.* While holding both buttons, plug in the power cable.
* The TV will turn on with the Service Menu displayed.
* Use the {CH+} {CH -} buttons to select items.
* Use the {VOL+} {VOL -} buttons to adjust values.* To exit, turn the set off.
Sony
PLASMA / LCD / CRT / RPTV :
* Put the TV in Standby Mode.
* Then press the following buttons on the remote:{DISPLAY} {5} {VOL+} {POWER}
or
{DISPLAY} {5} {POWER}
or
{DISPLAY} {5} {PICTURE} {POWER}
or
{DISPLAY} {5} {VOL+} {PICTURE} {POWER}* The TV will turn on with the Service Menu displayed.
* Use numbers {1} and {4} to select the item to adjust.
* Use numbers {3} and {6} to adjust the value of the data.
* Press {MUTE} then {ENTER} to save new settings.
* The words « WRITE » in red will show up in the upper right corner if saved.
* Turn the TV off to exit the service menu.Telefunken
TVs :
* Press the {MENU} button on the TV and the
{SETUP} button on the remote at the same time.* The Service Menu displayed.
* Use {CH+} {CH -} buttons to select items.
* Use {VOL+} {VOL -} buttons to change values.* To exit, press the {SETUP} button or turn the TV off.
#2
* Turn the TV on.
* Press the following buttons on the remote:
* {IMAGE} {FACTORY} {POWER} {MUTE} {1} {8} {2} {POWER}* The TV will power on with the Service Menu displayed.
* Use {VOL+} {VOL -} buttons to select items.
* Use {CH+} {CH -} buttons to change values.* Turn the set off to exit the Service Menu.
#3
* Press and hold the {VOL -} button on the TV.
* Then press the {DISPLAY} button on the remote.* The Service Menu will be displayed.
* To exit, turn the TV off.
#4
* With the TV in standby:
Press and hold the {VOL -} & {PRG -} buttons on the TV.* Keep both buttons pressed until the TV turns On
with the Service Menu displayed.* To exit, turn the TV off.
#5
* While the TV is on, press the {POWER} button
on the remote control to put TV in standby.* Turn the TV off using the {POWER} button on the TV.
* Using the buttons on the TV:
* Turn the TV On while pressing the {PRG -} & {VOL -} buttons* The Service Menu will be displayed.
* To exit, turn the TV off.
#6 xxxxxxxxxxxxxxxxxxxxxxxxxxxxxxxxxxxxxxxxxxxxxxxxxx
* Turn the TV on.
* Press the {MUTE} {OK} {TV} buttons on the remote.* The Service Menu will be displayed.
* Use the {UP} {DOWN} {RIGHT} {LEFT} buttons on
the remote to move through menus and change values.* Press the {OK} button to save new settings.
* To exit, press the {TV} button or turn the power off.
Thomson
TVs :
* With the TV in standby:
Press and hold the {VOL -} & {PRG -} buttons on the TV.* Keep both buttons pressed until the TV turns On
with the Service Menu displayed.* Use {PR+} {PR -} buttons to select items.
* Use {VOL+} {VOL -} buttons to change values.* To exit, turn the TV Off.
#2 xxxxxxxxxxxxxxxxxxxxxxxxxxxxxxxxxxxxxxxxxxxxxxxxxx
* While the TV is On, press the {POWER} button
on the remote control to put TV in standby.* Turn the TV Off using the {POWER} button on the TV.
* Using the buttons on the TV:
* Turn the TV On while pressing the {PRG -} & {VOL -} buttons* The Service Menu will be displayed.
* Use {PR+} {PR -} buttons to select items.
* Use {VOL+} {VOL -} buttons to change values.* To exit, turn the TV Off.
Toshiba
LCDs :
* Press the {MENU} button on the remote.
* Highlight the « Picture » icon.
* Press the {9} {3} {0} {1} buttons on the remote.* The Service Menu will be displayed:
o Options
o Adjustments
o Selections* Use the {OK} button to access and
navigate through these Modes.* Use the {VOL +} {VOL-) {P+} {P-} buttons to
move through options and change settings.* To exit, press the {MENU} button.
MISC TVs :
* Turn the TV on.
* Press the {MUTE} button three times on the remote.
* Press the {MUTE} button again on the remote and hold.
* Then press the {MENU} button on the TV’s front panel.
* Release both buttons
* There should be a letter « S » on the upper right of the screen.
* Press the {MENU} button on the TV’s front panel again.* The Service Menu will be displayed.
* Use the {CH+} {CH-} buttons to select options.
* Use the {VOL+} {VOL -} buttons to change settings.* To exit, turn the power off..
#2 xxxxxxxxxxxxxxxxxxxxxxxxxxxxxxxxxxxxxxxxxxxxxxxxxx
* Turn the TV on.
* Press the {MUTE} button twice on the remote.
* Press the {MUTE} button again on the remote and hold.
* Then press the {MENU} button on the TV’s front panel.
* Release both buttons
* There should be a letter « S » on the upper right of the screen.
* Press the {MENU} button on the TV’s front panel again.* The Service Menu will be displayed.
* Use the {CH+} {CH-} buttons to select options.
* Use the {VOL+} and {VOL -} buttons to chnage settings.* To exit, turn the power off.
#3 xxxxxxxxxxxxxxxxxxxxxxxxxxxxxxxxxxxxxxxxxxxxxxxxxx
* Turn the TV on.
* Press the {MUTE} button on the remote.
* Press the {MUTE} button again on the remote and hold.
* Then press the {MENU} button on the TV’s front panel.
* Release both buttons
* There should be a letter « S » on the upper right of the screen.
* Press the {MENU} button on the TV’s front panel again.* The Service Menu will be displayed.
* Use the {CH+} {CH-} buttons to select options.
* Use the {VOL+} and {VOL -} buttons to change settings.* To exit, turn the power off.
#4 xxxxxxxxxxxxxxxxxxxxxxxxxxxxxxxxxxxxxxxxxxxxxxxxxx
* Turn volume all the way down to ‘0’
* Then press and hold the {VOL -} button on the TV and
the {9} button on the remote control for few seconds.* The Service Menu will be displayed.
* Use the {CH+} {CH-} buttons to select options.
* Use the {VOL+} {VOL-} buttons to change settings.* To exit, press the {MENU} button or turn the power off.
Viewsonic
LCDs :
* Turn the TV on.
* Press the {MENU} {9} {9} {1} buttons on the remote.* The Service Menu will be displayed.
* To exit, turn the TV Off.#2 xxxxxxxxxxxxxxxxxxxxxxxxxxxxxxxxxxxxxxxxxxxxxxxxxx
* Turn the TV on.
* Press the {-/–} {9} {9} {1} buttons on the remote.
* The Service Menu will be displayed.* To change pages, press the {MENU} button then
the {-/–} {9} {9} {1} buttons again.* Press the {EXIT} button to exit the Service Menu.
Your adjustments will be memorized.NOTES:
* You´ll have to make adjustments separately for different
input signals (component, composite, RGB, HDMI).
* Many of the parameters are not accessible.
* Pressing the « User Initialise » Menu will erase
all channels and personal settings.CRTs :
* Press and hold the {2} button on the remote
while turning the power on.* Keep the {2} button pressed for at least 4 seconds.
* The Service Menu will be displayed.
* To exit, turn the power off.
Yamaha
PLASMA DISPLAYS:
PDM-1 50″
* Hold down the {VOL -} button ON THE PLASMA DISPLAY.
* Press the {STATUS} button 3 times on the remote control.
(Status button is the one below Power button)* The Service Menu (CAT) will be displayed.
(CAT = Computer Aided Test Menu)* Use the cursors keys on the remote to select a mode.
* And press the action key {} to access the menu.* To exit each mode, use the {R} button.
* To exit the CAT menu, use the {STATUS} button.
* To exit, press the {POWER} button on the Plasma.7 janvier 2019 à 7 h 48 min #2262rockyMaître des cléssamsung
retrouvé ma TNT :
Lancer le menu caché (mettre en veille, puis appuyez assez rapidement dans cet ordre sur : info menu mute power. La TV s’allume puis affiche le fameux menu « caché »).
Aller dans : 2. Option Table (Service)=> Ensuite, à la toute première ligne « Ready », si elle est sur « ON » il faut la mettre sur OFF (avec flèche de droite).
Une fois ce « Ready » sur « OFF » appuyer sur Power pour sortir du menu caché, puis rallumer la TV.
Les touches « TV/DTV » et « D.Menu » doivent maintenant être réactivées (cela n’affiche plus « Indisponible ») : la TNT interne est de nouveau opérationnelle.
Pour initialiser les chaines, passer par le Menu normal et lancer un « Plug and Play ».==============================
LCD Samsung, il y a un menu caché, le « Service Menu ». Pour y accéder :
– Téléviseur éteint
– Appuyez sur Info
– Appuyez sur Menu
– Appuyez sur Mute
– Appuyez sur Power Onattention à ce que vous changez Notez tous vos réglages avant d’activer ce menu
========================================
LG
essayer 7777, c’est le code par défaut pour le verrouillage parental
======================================
TOSHIBA
– Accès au menu « S » : Touche MUTE, puis en maintenant à nouveau MUTE enfoncée, appuyer sur la touche MENU en facade. (Il suffit ensuite par exemple de presser la touche 9 et de faire défiler pour voir la durée de la lampe !)
– Accès au menu « D » : Etre déjà dans le menu « S », puis appuyer sur CALL (maintenir enfocé) et Menu en facade. Et là il faut être très prudent ! : les touches P+ et P+ font défiler les sujets, les touches Vol+ et Vol- font changer les valeurs.
===========================================
7 janvier 2019 à 7 h 49 min #2263rockyMaître des clés
PHILIPSLog into the service menu :
# c is rapidly gaining remote 062596i (i- button « info »,)
# window appears with a warning in English.
Warning: Access only to employees of service centers.
Unauthorized access may terminate the guarantee of your TV.
# Do you want to go – simply press the Menu button on the remote . Exiting the Menu – click the red button on the remote.
Useful information
1. hours worked . SM -> Operation hours
2. type matrix. SM -> Options -> Display -> Screen
# 062. LCD LPL WX5 SLB1 32 « . LPL – native filipsovskaya matrix. The most desirable option.TOSHIBA
Log into the service menu :
# Turn on TV and press the MUTE button on the remote . Further MENU on the TV casing and simultaneously MUTE on the remote.
# press the » 9 » once and see the top line on time.
# pressing » 9 » several times looking type of matrix .
# Press the AV input call splash of blue, red and green colors.
Warning: Press « 2 » do not press in any case ! (reason not specified, but unconfirmed reports included calibration mode, white)
Exit – turn off TV -click » Network. »SAMSUNG
Log into the service menu :
For all LCD and PDP TV in Europe – a way to enter the Service Menu is universal
When TV is turned off rapidly and continuously press on the remote control keys INFO – MENU – MUTE – POWER
TV less than 25 » sometimes works the American way MUTE – 1 – 8 – 2 – POWER
Log in Service Menu possible only at very high speed pressing all the buttons for 1-2 seconds.
# Move – Enter – enter the submenu , Menu – access to the upper level, up / down – move .
# How to change – think a hundred times , save the settings that were – they are not restored by Reset, left / right – change
Warning: Do not enter the Calibrate and Reset in general, if you do not know why you need it !
# Exit – turn off the TV .
To enter the Advanced Menu – Dial 0000.
Immediately prepare to re- issuing all the custom settings – they will be exposed by default.
# In the engineering menus Panel On Time (Hour) – time between panels.
What can change or adjust in Service Menu?
# Option table is responsible for the overall configuration of the entrance and the telly does not depend on !
# Dimm Type / Type – Information about the matrix .
# Ready responsible for the DTV tuner (OFF – enabled , ON – OFF)
# Shop Mode – enables or disables the magazine mode.
# Adjust – after 2008, hid in the Advanced Menu.
# Video Mute Time – Reduce the value for the quickening of channel switching .SHARP
Log into the service menu :
# Click on MENU button
# We go to the audio settings .
# Later in the balance
# Rapidly gaining on the remote control -> 0532
# TV dolzhekn go to sevisny mode.
# To exit the SM press the » network » on the remote.2nd version of the entrance to the service menu :
# TV must be switched off.
# Press and hold the « VOLUME – » and « MENU » on the TV and turn it on the button « ON / OFF ».
Button « VOLUME – » and « MENU » do not let until TV lights up the screen. In the upper left corner should be lighted sign.
# Press the buttons simultaneously « PR- » and « MENU ».
# Further navigation panel.
To exit the service menu to turn off the TV button « ON / OFF » on the TV.
# Press and hold the « VOLUME – » and « MENU » on the TV switch on the TV button « ON / OFF ».
Button « VOLUME – » and « MENU » do not let until TV lights up the screen.The third version of the entrance to the service menu :
# Turn off the TV button « Power »
# Push the TV button, « Vol – » and « INPUT »
# Hold them turn on the TV . In the left corner appear bukvochki .
To exit the service menu to turn off the TV button « ON / OFF » on the TV.
# Press and hold the « VOLUME – » and « INPUT » on the TV switch on the TV button « ON / OFF ».
Button « VOLUME – » and « INPUT » not to let TV do not shine until the screen.+++++++++++++++++++++++++++++++++++++++++++++++++
Sony TV Service Menu Code
Plasma / LCD / CRT / RPTV :
# Using the remote control:
# Turn the TV off.
# Press {DISPLAY} {5} {VOL+} {POWER ON} buttons.
or
Press {DISPLAY} {5} {POWER ON} buttons.
# The Service Menu will be displayed.
# Use numbers {1} and {4} to select the item to adjust.
# Use numbers {3} and {6} to adjust the value of the data.
# Press {MUTE} then {ENTER} to save new settings.
# The words « WRITE » in red will show up in the upper right corner if saved.
# Turn the TV off to exit the service menu.PROJECTORS :
* Service Menu :
* Using the remote control
* Press {ENTER} {ENTER} {UP ARROW} {DOWN ARROW} {ENTER}.
* Then {UP ARROW} when it asks: « Do you want to enter the Service mode? ».* Factory Mode :
* Using the remote control
* Press {ENTER} {ENTER} {LEFT ARROW} {ENTER}.
* Then {UP ARROW} when it asks: « Do you want to enter the Factory Mode? ».
* Any additional menus usually pop up under the main INFORMATION menu.Service Menu Key Sequence:
* Access « Menu » and make sure « Status » is On.
* Exit the « Menu ».* Service Menu :
* Using the remote control
* Press {ENTER} {ENTER} {UP ARROW} {DOWN ARROW} {ENTER}.
* Select « Yes » when it asks: « Do you want to enter the Service Mode? ».* Factory Mode :
* Using the remote control
* Press {ENTER} {ENTER} {LEFT ARROW} {ENTER}.
* Select « Yes » when it asks: « Do you want to enter the Factory Mode+++++++++++++++++++++++++++++++++++++++++++++++++
menu service LCD PhilipS
code pour rentrer dans le menu service
par contre ta reference est inconnu chez philips il existe 2 code
tapez a l’aide de la telecommande
la sequence 0 6 2 5 9 6 puis la touche OSD
( un carre avec un I+]
………………………………………….. ..
ou tapez a l’aide de la telecommandela sequence 1 2 3 6 5 4 une mire apparaitra ensuite
tu arrivera dans le menu service
+++++++++++++++++++++++++++++++++++++++
AKAI CT-2119PD/PDT, U2E/Y2/Y2E
On the TV at the same time press the button VOL + and VOL-and hold them, turn on the TV.
Exit – (POWER OFF)AKAI CT2161 CT2565 CT2567 CT2865 CT2867, Chassis SP
On the keypad press the button – (MUTE) (OK) (TV). Data record (OK). Out – (TV)AKAI CT2899, 7171 Processor CCU11 \ 12, chassis B-E2
For CCU 11 (. °) (C) (H), CCU 12 for a screwdriver Press contact in the hole
about the keyboard and press the right button (S). Exit – (LOAD)AKIRA CT-14PF9
On the keypad to dial: (MENU) (MENU) (V. WIEV) (MUTE) (SLEEP) – turning the pages. Exit – (MENU)AKIRA CT-21HS9C (S) CPU LC863324A
Login: Menu – Menu – Q. View – MuteAKIRA CT-2155, Processor VESTEL 19V1, Chassis 11AK19PRO
Press the blue button to enter the SETUP menu to press buttons 4, 7, 2, 5.AKIRA CT-2155, CT-2160 Processor: VESTEL 19V1.0NT
The entrance to the service. Push MENU (INSTALL), put cursor on « Settings ».
Then click successively 4 => 7 = 2 => 5AKURA, CROWN, MINOKA CX25/26/34 CR20NT CR1406FT MK1498N / N MK2183 / N
Conclusion 8 processor TVPO2066 D05/047 to activate
service mode. On-board TV is a special button S009. Clicking on it simultaneously with a button (DISPLAY) on the RC
included in the service menu. Exit – (TV / TEXT)ALLSTAR 3750
Turning off the Hotel Mode: Select the program 38. At the same time hold for 3 seconds STORE and CONTROL + on
panel TV.
Enable Hotel Mode: Select the program 38. At the same time hold for 3 seconds STORE and CONTROL-panel TV.ARAY ACT2130 Processor – LC863328A, video processor – LA76810A
Log into the service mode: Push button hidden (FACTORY) on the remote control, it also switches the menu.
chip remote SC7461-103 (pins 2 and 16)AUDIOTON 5502 Chassis 10.3 90 ° MONO
Turning off the protection of children: Press UP & DOWN buttons together on tv’s local control
and then switch on. You will see SERVICE MODE. Do not press any button, just power off the set, then on ..
Enabling the service menu: Press UP & DOWN buttons together on tv’s local control and then switch on
+++++++++++++++++++++++++++++++++++++++
BANG & OLUFSEN LX4500/5500 L4500/5500 MX3500/5500
Prepare
your TV, set: Brightness 32 Saturation 32, contrast 44. Click (TV) on
the remote control and lock for a minute (60 seconds) click PCB5, which
is located close to Terminals VM. Exit – (STOP) or (POWER OFF)BEKO, Processor SDA20563-A512/A514, Chassis AR-3
While holding down the button on the TV (PROG-) (PROG +) toggle switch on the TV network. Exit – (POWER OFF)BEKO CTV, processor SAA5563, Chassis 14.1
Close a chip RC legs 10 and 17. Exit – Close the remote control at the chip legs 10 and 17.BEKO chassis 12.6 Processor SDA5535A049
- PICTURE MENU
- 8500″
- EXIT « 850 »
BEKO chassis 12.7 Processor SDA5535A056
- PICTURE MENU
- « 9301 »
- EXIT « 0 »
BLAUPUNKT IS63 (72) 1953 DIGITAL PRO, CPU MC68HC11F1, chassis FM640.40
Starting
the internal memory of the processor. Shorted to ground (earth) pin 1
processor (contact MP2) and turn on the TV to the network. Services (i)
(E). Output (i)BLAUPUNKT MM63-13VT MM63-14HT, processor ZC88649P ZC88644P ZC424701, Chassis FM-240/00
Hold down the (i) to enable remote power switch. Exit – (POWER OFF).BLAUPUNKT MS70-100 Digital PRO, CS82-100 Digital PRO, Chassis FM600.70 FM600.71
Click
(i) on the remote. Choose the position PROGRAMMIER OPTIONEN press (ME)
(AUX). Choose the position of SERVICE MODE Press (ME) (3) (2) (0) (0).
Exit – (TV).BLAUPUNKT MS70-76VT, Processor HD6305Y1B80P, chassis FM100-30CTS
Log into the service mode:- Turn off the TV with remote control
- Include a remote control, keeping ME on the local panel TV.
Adjustment using the (+) (-) on the keypad. TB: Brightness (on TV) –
vertical size, saturation (on TV) – the size of the horizontal volume
(TV) – centering on the horizontal fine adjustment (on TV) – centering
on a vertical,>-Select the sound standard Memory – ME (on TV) after
each adjustment. With the remote you can set the initial values of
picture and sound settings, press the ME (on TV) – write to memory. Exit
– (POWER OFF).BRAND Processors ST9093 ST92T93J9B1, chassis ICC9
- With the remote turn the TV into standby mode.
- Turn off the TV network switch.
- By pressing the blue button (VT) enable the network switch.
- Press the button again (VT).
BRAND, Chassis TX807
Push the purple button on the remote control and turn. Exit – (POWER OFF)CIRTIS C-14/21/25/28M1/M2. Processor MC68HC705T10B
Close conclusions 13 and 23 of the SAA3010 in the RC.CONTINENTAL CT1412. Processor ST6375
To enter the service menu to hold the button (+) (-) in front of the TV turn on the power switch
+++++++++++++++++++++++++++++++++++++++++++++++++++
DAEWOO CHASSIS CP-375 Processor DW5255M2, DW5255RM.
All changes in service are made only through a special panel.DAEWOO KR20V1T
Switch the TV on channel 91. Hide clarity to the minimum. On the remote
control to press the (red) (green) (menu). Exit – (POWER OFF).DAEWOO DTC-14V1/V3/V4/V5/U1, DTC-20V1/V3/V4/V5/U1, DTC-21V1/V3/V4/U1/U3, Chassis CP-002
- Select Channel 91
- Set the sharpness to minimum
- Exit Menu mode
- Fast sequence of buttons to press RED – GREEN – MENU
You should see the inscription Service Mode OSD
Exit the service mode – Power off- Data Preset (D.P.) Adjustment
- Select Channel 91
- Set the sharpness to minimum
- Fast sequence of buttons to press RED – GREEN – BLUE – MENU
- You should see the inscription DP OSD
- Channel Up, Down – choice
- Volume Up, Down – Management
DAYTEK DCT-2062-S
On the keypad (DISPLAY) – (MUTE) – (SLEEP) – (FUZZY) further pressing
(DISPLAY) or (SLEEP) introduces a TV set in the service menu.DUAL HANSEATIC SCHNEIDER M4055, ST6714, CTV2703. Processor CCU09 \ 10 \ 13. Chassis DTV-1
Pressed simultaneously (S) on TV and the button (C) on the remote controlDUAL HANSEATIC SCHNEIDER TV5504, TV5520, TV5525. Processor STV6385. Chassis TV-4
Press both the blue and red button on the remote control. Immediately press simultaneously (P +) and the (VOL +) on TV.DUAL HANSEATIC SCHNEIDER TV1170, STV6156. Chassis DTV-2
Simultaneously press the button – the remote control (C), and the service button located on the bottom row console.ELEKTA CTR-2145, DTV21F4 CPU LC863320A, videoprots. LA76810A
Log into the service mode: press a hidden button (PROD) on the remote control right of the Vol +
it also switches the menu.
chip remote SC7461-103 (pins 2 and 15)
chip remote LC7461 (pins 2 and 16)ERISSON S14, ERISSON 2120 or ERC 21NI60 chassis 3S10
Processor: ST92185BN4B1/PBI 3S10B-ENG/RUSS
videoprots.: STV2248C
Log-in service:
Menu – AV – ANAL
OK – a choice
PP – outputERRISON 2102, 2103 Processor: S3P8849XZZ-AQB9
Close contacts 2 and 4 of the connector CN601. (ADJUST and GND)
Appears on the screen « KWTVA COMPUTER 11-23 »
Then click « OK » button on the remote.
Menu appears on the « KWTVA SERVICE 11-23 »
OPTION 5473176706ERISSON S14 Processor: LC863324A, videoprots.: LA76810A
Log into the service mode: In the operating mode press the sequence on the remote: MENU – MENU-Q.VIEW – MUTE
OFF TIMER – regime change menu
MENU – write the new values
++++++++++++++++++++++++++++++++++++++++++++++++
FINLUX 4028D. Processor SDA20160
Immediately after the TV issue the command from the console (PRG) (EXT). Exit – (POWER OFF).FINLUX SERIA 5000. Processor SDA20320
Immediately after the TV issue the command from the remote (TV) (PRG) (EXT). Exit – (POWER OFF).FINLUX 3021. CPU SDA2080
Click on the (N1) front panel TV and
quickly press the button which is located to the left of the button
(N3). Exit – click on the button located to the left of the button (N3).FUNAI TV-2100A MK-7 MK-8
Close to each other 2 and 14 feet in
the RC circuit D6600A. Button 6 mode « PICTURE SELEKT » switch character –
a graphical display information OSD. It only works with an R-514FUNAI TV-2100A MK10
To enter the service mode TV include the
operating mode and briefly join the free output resistor R137 to the
hull. Resistor located on a plateau near the control buttons.
In the corners of the screen appear the letters F. Choose the appropriate option button remote control:
1 – a horizontal line;
2 – AGC (AGC);
3 – VCO (HRA);
4 – H POSI (horizontal alignment);
5 – L-STER , H-STER [R], H-STER , L-STER [R] – color shades;
6 – point in the center of the screen;
7 – the illumination of the screen one of the primary colors;
8 – CUT OFF (black level RG B);
9 – DRIVE (increasing R, G, B);
0 – brightness, contrast, tint, NTSC, sharpness, saturation;
VOL + – Auto Search;
DISPLAY – adjust brightness, saturation and contrast. Definition;
SLEEP – Auto Search;
0/AV – cubyarkost, subnasyschennost, subkontrastnost, subchetkost;
PREVIOUS – AFT (AFT);
VR541 – vertical size.
VR542 – centering vertically.
Parameter value change buttons L CH V.
Adjusting the white balance to « white »:
• Press the button on the remote control 9;
• Press 1 to adjust the amplitude of R;
• Press the 2 button to adjust the amplitude B.
Adjusting the buttons L CH V.
Adjusting the white balance to « black »:
• Press the button 8
• Press 1 for adjusting the black level of R
• Press the 2 button to adjust the black level B
• Press the 3 button to adjust the black level of G
The parameters governing the buttons L CH V
Adjusting subyarkosti, saturation, contrast, sharpness, hue NTSC:
• pressing the 0 button several times, choosing the parameter;
• regulate the setting buttons L CH V.
To exit the service mode, press the button POWER.
Adjust settings are saved automatically.Funai TV-2100A MK11 CPU LC863320A, videoprots. LA76810A
Log into the service mode: Close each pin. 2 and 16 RC
Valid for chips or remote SD7461GO RT2461-103Funai TV-2100A MK12 Processor L11PAL 2ND M372CH8-056FP
In remote assembled on a chip 67N705 close third with the second (ground) terminal.
In the native RC is designated as the jumper J1. Login – SLEEP. Exit – STBY.
Work: Picture (bre, cnt, clr, tnt) VOL – switch other settings
buttons .. 2.3 6.8.9. At certain positions VOL – button work 1.2.3.
Adjusting the values of buttons CH
+++++++++++++++++++++++++++++++++++++++++++++++++++++++
GRAETZ
Turn the switch to digital module ‘TV Internal Service Program’ (SE on display).GRUNDIG M63-105 ST63-160, ST63-781, E63-911. Processor MC68HC11F1. Chassis CUC1822/1823/1852
Starting
the internal memory of the processor. Shorted to ground (earth) pin 1
processor (contact MP2) and turn on the TV to the network. Click (i) on
the remote control (TP760). With the help of (P +) and (P) to select
SERVICE. Press (OK), enter the code ( (5) (0) (0)
GRUNDIG ST82775, ST95775, Processor SC415008FN4. Chassis CUC7880/7890
Push (i) will INFO CENTER. SPECIAL FUNCTION to select and click OK. Enter the code ( (5) (0) (0).GRUNDIG M55-.., M63-.., ST63-.., ST70-.. Processor SDA2056/20562. Chassis CUC5360/5361/5510/551.
Click on the button (P / C) on the remote control to include a network switch. Exit – POWER OFF.GRUNDIG ST55-725 ST55-750 ST55-800 ST55-95. Processor ZC411867P (MC68HC05T3). Chassis CUC2075, CUC7350.
Hold down the (i) to enable remote power switch.GRUNDIG P37 .. P40 .. P42 .. P45 .. P50 .. T5 .. T55 .. Processor ZC88642P/88644P/42470. Chassis CUC6300.
Hold down the (i) to enable remote power switch.GRUNDIG BOSTON ST270/8/IDTV/LOG. Chassis CUC1825, CUC1826.
Press the key (i) on the TV and click (OK) on the remote. Remember the value of (QA).GRUNDIG GV200VPS. Processor SDA2087N.
On the remote press (CODE), then (4) (9) (3) (4). Confirm (OK) and press (STANDBY).GRUNDIG M70-100, M70-580, M82-100, M95-100, M70-681. Processor SDA30161. Chassis CUC1835, CUC1860, CUC1880, CUC1890
Click
(i) on the remote. Use the (P) to cause the regime SERVICE DEMO press
(OK) (AUX). Call SERVICE MODE (OK) ( (5) (0) (0). Unlock: (VIDEOTEXT)
(PAGE) (CANSEL) (PAGE) (OK). Something to remember adjustment in service
mode to 7yu SDA3526 foot planted on the ground.GRUNDIG M70-290 / 9 M84-211 / 8. CPU SDA5250-100. Chassis CUC1836, CUC1929.
Click
(i) on the remote. Use the (P) to cause the regime to press DIALOG
CENTER (OC). Call For authories dealer (OK) ( (5) (0) (0). Exit –
POWER OFF.GRUNDIG P37/40/50 T51/55/65. Chassis CUC5301
Close legs processor RC MC144105 findings 6 and 10.GRUNDIG P37-065/070/730. Processor ZC88667P ZC411718P SDA5222. Chassis CUC7300, CUC7301, CUC7303
Hold down the (i) to enable remote power switch.GOLDSTAR CF-25 \ 29C44 chassis MC-51A
Click the OK button for a long time on the board Control board and the yellow button on the remote.GOLDSTAR CF-25, CF-29, C26, C36, C76 chassis MC-51B
Simultaneously
press (MENU) (- VOL) (- PR) Panel (OK)-store changes. To go to the
adjustment of white: = i – for GGB =? – For RGb = h – for BG.
Choose
option buttons L (CH) V. Change the value of buttons + (VOL) -.
Parameters recorded in the memory is automatically output – POWER OFFGOLDSTAR Model CTK-4745. Programming produced by domestic remote PC-4
GOLDSTAR Model CB25C20X Processor GS831001A (SDA20160) Chassis
PC33B. Log in with a special remote control. Press and hold (SVC).
Console is built on a chip SAA3010. Close pins 1 and 11
+++++++++++++++++++++++++++++++++++++++++++++++++
HITACHI CP2893TAN, CL2995TAN, CL28500TAN. Processor M37270MF. Chassis A5WK.
Hold down the button on TV (VOL +) and (VOL-) and turn the power switch. POWER OFF.HITACHI CS2840TA. Processor NES3-…, NES2-… Chassis EUROSTE REO-2
(-/–) (MENU) (TV) – 1 sec. Exit – POWER OFF.HITACHI C25 \ 28P445VT, C21 \ 1925 \ 28P745VT, C28P405VT. Processor CCU-SALO-09 (CCU20XX). Chassis DIGIT2000.
(P) (*) (O / V) (#) (M). Exit – (TV).HITACHI 43FDX, 53FDX.
Open the front panel (four screws, two on each side). Remove the center
panel (six screws). Press the blue button in the left corner of the
board set. Exit – Press the blue button againHITACHI C2578FS, C2589FS, CMT2578. Chassis V1
At the front of the TV, press (TV \ AV) and holding it turn on the TV.
After completing all adjustments, press the ENTER button on the remote
control (remembering), then the MENU button or turn the TV off.HITACHI C2135MN
Turn on the TV’s front panel while holding the (-) button.HITACHI C2160FS Z90234-4481 processor, videoprots. TDA8842
Log-in service: turn on the TV power switch holding the TV \ VIDEO on the front.ITT 359, 387, 8F HIFI, CB5373Z, 6578F. Processor CCU SEL04/SEL07A
Mode 1: Press the screwdriver, the contact in the hole about the keypad and press the right button (S)
Mode 2: Press the screwdriver, the contact in the hole about the keypad
and press the right button (S) and re-click on the contact. Exit –
(LOAD).ITT Processors: SAA1293-03-03 SAA1293A
On the keypad on the TV horizon without graphics click « SERVICE », the indicator will show
CH, press it paz – there will be OP, on volume select number of registers
(1-4) and figures (1-9) to change bits. After you press the ‘Memory’. (You can also close the
conclusions of 15 and 23 SAA1250 chip in the console). Exit – POWER OFF.JVC AV-29PRO
Set the volume control 04, and then successively press on the remote (DISPLAY) (MENU).JVC C-21ZE, AV-G140T, AV-210T, AV-14ME, AV-14TE, AV-21TE/TE, AVG21T, AV-G250MX, 21A4EE, 21F4EE. Chassis MZ2, CA2
Simultaneously press the Control (DISPLAY) and (PICTURE MODE). (OFF TIMER) – remember.
Processors: M37102M8-C41SP. Menu is displayed as in Figure 1.1. VCM PRESET change the preset brightness contrast and clarity.
2. SUB VSM switching color standards.
3. IF V \ C to change the settings correct screen mode and RGB matrices.
Next, you must again press the key combination and DISPLAY PICTURE MODE to display
screen system constants. The screen image will appear as in Figure 2.
Key PICTUPE ADJUST selects the position and the key PICTUPE ADJUST + / – changes
value. For storing settings, click the button OFF TIMER. To return
to the normal screen twice, press MUTE.JVC A32020
Set (SLEEP TIMER) to 0 MIN, and so far is displayed on-screen information, press (DISPLAY) + (AV)JVC AV-29TH3ER
On the remote control at the same time (MUTE) and (INFORMATION).JVC AV-25TS2EK. Processor M37204MCC40SP. Chassis JE.
(I) (MUTE). Exit – (TV).JVC AV-25VM1EN, AV-28VM1EN. Chassis JC.
DISPLAY) (CINEMA / GAME). Exit – (DISPLAY).
++++++++++++++++++++++++++++++++++++++++++++++
LG MC64, MC84, SF-20/21, F60, CF-20/21, F80, CF-14/20/21, K40E, CF-14/20/21 K50/E/X, CF-14/20 / 21 K52E / X,
CF-14/16/20/21 S10EX, CF-14/16/20/21 S12E Chassis – MC64, MC84, MC84A.
Log into the service menu: Simultaneously press OK on the remote control and on the TV.LG KF-14/20V30, KF-14/20/21U30/40, TVCR-060898 Use a regular
remote control, if removed from his upper lid, then you will see 4
groups of contacts for the 4 buttons, but not in the top cover under
these buttons holes and keys. Second from the left button is used to
enter the service mode.LORENZ. Models: 359, 387, 8F, HIFI, CB5373Z, 6578F. Processor CCU SEL04/SEL07A.
Mode 1: Press the screwdriver, the contact in the hole about the keypad and press the right button (S)
Mode 2: Press the screwdriver, the contact in the hole about the keypad
and press the right button (S) and re-click on the contact. Exit –
(LOAD)LORENZ. Processors: SAA1293-2003, SAA1293A-03.
C remote from TV « Horizon » without graphics click « SERVICE »,
indekatore displayed on CH, Press again – there will be OP, on volume
choose the number of registers (1-4) and figures (1-9) to change bits. After the press
« Memory » (you can just close the conclusions of 15 and 23 IC SAA1250
in the control) Exit – POWER OFFLIFETEC Model LT7000, STV6708, CTV2781. Processor ST6365.
Simultaneously pressing the red and blue buttons on the remote control.
Immediately thereafter, simultaneously press the (P-) and (VOL-). Exit –
(TV)LOEWE. Model, ART500, ART630, ART700. Chassis – C9002S.
Hold the button (SERVICE) on the TV press on the remote control (CM). Exit – (TV)LOEWE. Model 9000. Processor CUC2070. Chassis – DIGIT2000.
Press the service button on the motherboard around the CPU (pins 22 and 39) and click (CM) on the remote.LOEWE. Model 7000. Chassis – S9003.
Five times to press the cursor right on the TV and just press the button (MEN) on the remote.LOEWE . Chassis – Q2200.
Select ‘SERVICE’ in the menu, and then quickly press the ‘MENU’ button
on the remote. Choice: the yellow cells. Setting: + / -. Remembering:
‘X’. Output: ‘TV’.LUXOR 5585-21A1, 7057-27, 63/7954 Chassis – « STEREO PLUS ».
Log in Service: MUTE -> OK (M) -> TV Remember: OK (M). Exit: TV.MITSUBISHI CT-21M5E \ ET \ RT, CT-25M5E \ EN \ ET \ ETN \ RT \ RTN:
Login: Hazhat on sepvisny pepeklyuchatel S701 (Close to tyunepom), then knopky 9 (in the limits of 5s).
« * » – Pepeklyuchenie pegylipovochnogo monitor displays, « 2 » – 8 « – pegylipovka code » 6 « – » 4 « – pegylipovka data » 0 « –
write to the memory, « 1 » Undo changes to records in memory. Output:
stand by. Button TV / AV – Exit from those. menu.
TUN 1 (0) – bands UHF, VHF
HTL 1 (0) – Disable the button « INSTALL »
TXT 0 (1,2) – 1 – Teletext incl. 2 – off
MNP – press « * » – entry in the settings menu
AVI 0 (1,2) – inputs AV: 1,2 – is
SYS 0 (1,2,3) – standard color (it should be SYS 1 or SYS 2)
STD 0 (1,2,3,4,5) – Standard audio (must STD 3)
Button TV / AV – Exit from those. menu.MITSUBISI CT-29B3EEST
Log into the service menu:
Turn on the power. Small screwdriver, press on the micro switch S701, located
next to the slot antenna. And then on the remote 9 button for 5 seconds. Record
– Button 4. Buttons 2 and 0 to change the code control buttons 5 and 7, change the value
data.MITSUBISHI Model: CT-29B3EEST, CT-29B2EEST, CT-21M5E/ET/RT, CT-25M5E, CT-25M5G.
Processors: CXP80424, ST9291N6B1NO/B10, ST9291N6B1ECS/B20.
Chassis: EURO-11, EE-3, EE-4
Powering up. A small screwdriver to press the mikrik S701, located near
with an antenna jack, and then – on the remote button « 9 » for 5 seconds.
Exit – (CM) POWER OFFMAGNAVOX. Chassis – SOME.
To access the menu with the remote, press the following combination (0), (6), (2), (5), (9), (6). The channels are
change. Then press (MENU). To save your changes, press POWER on the TV.MEDION SEG. Stamps – CT8050, CT8100, MD7103. Chassis – 11AK18.
Log into the service mode by pressing (MENU) + (1) + (6) + (7) + (5). Exit – (MENUNOKIA 6364, 7364 CHASSIS 2B-F:
Click on the button to turn the console – \ – -> MENU -> TV last button hold
within 1 second. Output from the service button to turn off the console.NOKIA, SELECO, SABBA ITT, TELEFUNKEN (Chassis
STEREO PLUS)
Input: 1. (Mute); 2. (OK); 3. (Tv); record pezyltata « OK »
Exit: TVNOKIA Model SAT1700.
(STORE ),(-/–),( TV / SAT)NOKIA Model 8003.
(OK), (MUTE), (TV / SAT)NOKIA Model: 3725CW, 4525CW, 5125CW. Processor – ST6367.
Pushing quickly (MUTE) (OK) (TV). Output – TVNOKIA Models 61971, 6197, 6197DPL, 7282, 7295, 7296, 8296. Processor – SDA30C163.
Turn on the TV power switch in the lodge for 5 seconds command with the remote control (MENU) (TV) (i).
Exit from the menu – POWER OFFNOKIA. Models: 6384, 6394, 7184, 7194. Processor CCU3000. Chassis – EURODIGI.
Initialize memory: Turn on the TV and just type a command from the control (MUTE) (TV).
Exit – POWER OFF
ORION 28BDF TV790 Processor SAA 5297PS/262.
Turn on the power button while holding down the MENU button on the front
panel, until the LED. Next, turn to the STBY button remote control.
Yield: menu OFFORION TV2180MK6 Processor OEC6027A (TMP87CH37N3194-9901H)
At the front of the TV, press and hold down the « VOLUME < » to « 0 », then hold, press the remote button « 9 ».
The service menu consists of two sub-menus.-
First:
- CUT OFF
- AGC
- V. SIZE
- BRIGHT
- COLOUR
- TINT
- END
- Second:
- AUTO
- SUB BRIGHT AUTO
- VCO AUTO
- AFT AUTO
- VCO
- AFT
- CONTRAST
- END
Selecting items in the submenu by pressing the appropriate « license »
keys on the keypad. Adjustment parameters are the keys « VOL »
or « – SET + » button on the RC.
The yield of the items in a submenu, as well as the transition from one
submenu to another made the same combination: « VOLUME < » to « 0 »,
holding it press on the remote control key « 9 ».
All values are stored automatically.
Exit the service menu is by selecting « 8 » in any menu or by pressing the
« POWER ».ORION T2157/67/97, T2567/97, T2967/97 CPU LC863328A (5W63)
- In the « STAND BY » press « RECALL » button on the RC
- Pressing the « VOLUME < » on the front of TV set the volume level to « 0 »
- Hold down the « VOLUME <« , repeatedly press the « RECALL » button on the RC
Note: At default, paragraph 1 – the entrance to service the fifth attempt
The service menu is composed of four sub-menus:
- FACTORY (training)
- B / W (WB)
- ADJUST (control)
- SETUP (setup system constants)
Selecting a submenu by pressing the « RECALL » on the remote.
Note: At default, paragraph 1 – to select the fifth menu by pressing the « RECALL » button on the RC
Access to adjusting the parameters of the keys « VOLUME « .
Selection and adjustment of parameters, the keys « P + / P – » and « VOLUME
« .
All values are stored automatically.
Exit the service menu – pressing the « POWER
++++++++++++++++++++++++++++++++++++++++++++++++++++++
PANASONIC TX-29GF35T, TX-33GF85T, TX-29GF85T chassis M18
Optional test is included if you press both
OFF TIMER button on the remote button and VOLUME-(minus) on the front of the TV.
Setting memory chips after e | replacement. Jumper TRA4 (contact
3 IC1213) and the TV (by mass). Then turn on the TV’s power.
Apparatus clicking | m mode Market Mode. After the operation the jumper should be removed.PANASONIC TC-24WG12H, TC-28WG12H GAOO Chassis M17W
Optional test is included if you press the button simultaneously OFF TIMER
button on the remote and VOLUME-(minus) on the front of the TV. Configuring Products
memory after e | replacement. Jumper TRA14 (pin 3 IC1213) and the body
TV (mass). Then turn on the TV’s power. Apparatus clicking | m mode
Market Mode. After the operation the jumper should be removed.PANASONIC TC-21E1R To enter the service
mode you must click on the main board of TV service button S1101.
Appears SNK. After the first nahatiya can adjust the basic (control
Brightness, Contrast, saturation, volume and phase (horizontal alignment)).
A second press of the button allows you to adjust modes tsvitnost RGB. FUNC –
change of the controlled object, NORM output.PANASONIC TC-29V50R CHASSIS MX-2A
Tuning mode: Press the service switch S1101 (located near
alignment with the switch) TV switches to check on the screen
appears SNK. Click S1103 (FUN) to select the desired adjustment,
To exit, press S1101.PANASONIC TC14S1RCP, TX14S1TCC, TC21S1RCP, TX21S1TCC, TX21S1TCP CHASSIS Z5
This chassis has the ability to self-test. To call the regime of self-testing
need to press buttons simultaneously OFF Timer button on the remote and VOL (-) on
the TV. After which the TV will go down in the process of self-testing and
will give on-screen message which is shown in Figure 1What is the significance of these data. 1 (+) test EEROM (IC1205) plus indicates that
okay, 2 (+) Verify the microprocessor teletext, 3 (+) Check the tuner.
Attention TV model without teletext show option 2 (-).
Next, you need to make the installation options.
1.Set color saturation and sharpness to the minimum
2. Press the OFF Timer button on the remote control and the F key on the TV. Will
picture as in Figure 23. Select the desired option UP / DOWN keys on the remote.
4. Select the decimal value of the buttons 0-7.
5. Click on STR to store the changes.
6. To exit the TEST mode, press F.PANASONIC CHASSIS MX3, MX-3C
Simultaneously press the RECALL button on the remote and-VOL on the TV. Output 2 times click on
remote button NORMAL.PANASONIC TX-21AD2C, TX-29A3C, TX-25A3C CHASSIS EURO-2, EURO-1
Set the BASS control of the lower audio frequencies at a maximum, TREBLE knob treble
at a minimum. Press F on the TV at the same time with a button REVEAL
on the remote.PANASONIC GAOO70 TX2170T
To enter the service menu you must click on the television V-(volume down) and hold
it pressed click the button on the remote which izabrazhen ekranchik plus. For
exit the menu should go to the submenu. Tam in the upper right corner is written in yellow and CHK nazhat N.PHILIPS 14PT-1342 / 43, 14PT-1352 \ 00 \ 01 \ 05 \ 07 \ 11 \ 39
14PT-1542 \ 01 \ 43, 14PT-1552 \ 00 \ 01 \ 05 \ 11, 20PT-1342 / 43, 20PT-1542 / 43, 21PT-1532 \ 58,
21PT-1542 \ 43, 37TA-1232 \ 03, 37TA1432 \ 03, 37TA1462 \ 18, 37TA1473 \ 18, 52TB-2452 \ 19,
M-2052 \ 00 \ 01, M2152 \ 00 \ 07 \ 15, M2182 \ 00, M2192 \ 05 CHASSIS L6, 1 AA
There are 2 ways to enter the service.
1.Zakorotit contacts S1 S2 on the processor (pin 14 IC7600)
2.C using the service console model RC7150 pressing the mute button DEFAULT or ALIGN.
Output from the service click on the button STAN-BY.PHILIPS 25PT8303
Log odnovpemenno press « ? » and « sleep » under kpyshkoy.PHILIPS Anubis S \ DD.
Log in to the service mode by contact closure, M31 and M32 (land) near IC7710. Exit STAN-BY.PHILIPS 14PT-118A \ 50B \ 67R \ 94R, 14PT132A \ 50B \ 50R \ 75R,
14PT133A \ 162R, 14PT137A \ 162R, 14PT138A \ 54R \ 58T \ 67R \ 71R \ 74R \ 75R \ 93S, 20PT188A \ 50B \ 67R \ 73R,
20PT120A \ 78R, 20PT132A \ 75R, 20PT137A \ 62R, 20PT138A \ 50D \ 58R \ 58H \ 58R \ 67R \ 71R \ 73R \ 74R \ 75R \ 94R \ 97R.
CHASSIS L7, 1A \ AA
Short-circuit contacts M24 and M25 on the circuit board (PCB). Output from the service click on the button STAN-BY.
Attention buffer error is cleared!PHILIPS 21PT440B, 21PT441B/02B, 21PT442B, 21PT4303,
21PT4422, 24PW6302, 24PW6322, 25PT5403, 25PT45, 25PT4523, 25PT5302, 25PT5322,
25PT5403, 25PT5423, 25PT6322, 25PT4503, 52TA4311. CHASSIS MD1.2/AA / Processors
TMP87CM36, TMP87CM38N
To enter the service mode is used panel type RC7150. With this panel TV can be translated
in two modes. 1 service is the default mode SDM (button DEFAULT). In regime
default, you can also enter through the contact closure S42 S43 on SSP (Panel
Small signal). To exit, press the button (Stand-by) (buffer error
cleared). 2 service adjustment mode SAM. Log in SAM mode is carried out
by sending commands ALING simultaneous pressing (MENU) and (-). After
enter the menu you will see a picture like Figure 1.To exit, use the button (Stand-by) for errors can be monitored by
LEDs on the front of the TV. The list of error codes in the table.Error CodeError DescriptionCount – in the blinkFaulty component
0 No Error ——— ———————- 1 Error BIMOS (TDA8366) 1 IC7119 (SSP) 2 Error MSP3400/3410 2 IC7353 (SSP) 3 I2C bus error 3 All components on the I2C bus 4 Not the Rom (EEROM) 4 IC7685 (SSP) 5 Defective ROM (EEROM) 5 IC7685 (SSP) 6 Error Tuner 6 U1000 (SSP) 7 Error Teletext TXT 7 IC7702 (SSP) 8 CPU error Histogram 8 IC7210 (reserve) 9 CPU error 16:9 9 IC7440 (module 16:9) 10 Error module WSSB 10 IC7540 (module WSSB) 11 Error processing Dolby 11 IC7600 (audio module)
PHILIPS 25PT400/42, 25PT410A/42, 28PT400A/42, 28PT450A/42 CHASSIS GR2.2AA. Processor TMP47C1637
Log in servistny mode as follows. Zamyknite contacts M33 and M34 (service), and pressing
INSTALL on letsivoy panel enable the network pareklyuchatel. The screen should appear
Post SER. To exit the service please click on the button STANDBY.
Also in these models is servistnoe menu. Activated by pressing
VOL +, and then ETOGES time by pressing P +. In the second variant values
stored immediately. Go to the hotel mode as follows.
Turn on the TV for 38 channel while nazhamite keys VOL-, P-front
the TV.PACE PRIMA Model: MSS100, MSS200, MSS500
Log into the service menu – (MENU), (0), (STORE), (RIGHT ANOW), (LEFT ANOW)PRINCETON Model – AR2.7T
Log in – holding the button (+ VOL) switch on / off switchPROELCO Models: TAP2131, TAP2531, TAP2831 Processor 82C52.
Close the control points TR501. Hold (R +) (P) include
power switch.
Exit from the menu – remove the jumper TR501.PROELCO processor-based SDA20563-A508/A516/A518.
Close the output processor 21 to ground. Click on the TV (P +) and (P) and include a network switch.
Exit – POWER OFFPROSONIC Model CTV7289DVT Processor – SAA5296. Chassis – 11AK16
Log – (MENU) (3) (2) (9) (7)
Exit – (TV+++++++++++++++++++++++++++++++++++++++
SABA Model – 21MG77C Processor – ST9291 Chassis – TX-90, TX-91, TX-92
- On the keypad press (STAND BY)
- Turn off the TV power switch
- Hold the button on the remote control teletext (blue) – turn the power switch.
- After turning on the TV, let teletext.
- If you do not work, then in paragraph 4 of the button and release again quickly, briefly press.
- Output from the service – POWER OFF
SABA Models: 28DT178ME, 28WS78KE/M/MP, 28DH78K, 28DU78K,
28DU88M/NE, 28DU98MP, 32VT88NP, 37WS88ME. Chassis – ICC19.
To access the menu to hold down the button (PR-) and (VOL-) on the front panel
TV turn on the power switch.SABA Models: 52RW64E, 44W65ES, 52RW65ES, 52RW77WS
Turn on the TV while holding the button (PROG-) and (VOL-)SABA processor ST9093. Chassis – ICC9.
Turn on the TV holding the blue button on the remote. Hold 5 seconds. Exit – POWER OFFSABA Processor ST90R91 Chassis – ICC10
Method 1: Turn on the TV holding the blue button on the remote for 5 seconds.
Method 2: Turn on the TV holding the button (PROG-) and (VOL-). Hold button
8 sec.
Exit from the menu – POWER OFFSALORA 6390, 7190, MV4000, PL14, 24101 852 SAT SOLI, 882 SAT SOLI, 885 SAT SOLI processor CCU-SALO-07 (CCU20XX), M1 chassis
(C) (*) (O / V) (#) (M), Output – (!)SALORA 5575SFN, 28T7, processor ST92T93, chassis STEREO PLUS
(I) (M) (P)
Exit – (TV)SALORA DIGIVISION 63 .. 2 71 .. 2, 2, .. N6 Processor NES3-… NES2-.., chassis EUROSTE REO-1
(-/–) (MENU) (TV) – 1 sec.SALORA Processors TVPO2065-DO1, TVPO2066-A24
Close contacts 15 and 23 SAA1250 in remote or close contacts 14 and 19
in the SAA1250 RC. If not immediately included in the menu, you will
need an additional close contacts 11 and 21 in the SAA1250 RC.
Exit – (AV)SAMSUNG(Candy bar) CHASSIS: SCV11A, B Model TVP3350, TVP5050, TVP5350
Login: StandBy -> P. Std -> Menu -> Sleep -> Power On
After logging into the service mode the on-screen menu appears: Adjustment, Option byte, Reset.
Abbreviations used in the mode of Adjustment: AGC – Auto Gain Control, SBT –
Sub Bright, SCT – Sub Contrast, SCR – Sub Color, STT – Sub Tint, PDL – Pal Delay,
NDL – NTSC Delay, RC – Red Cutoff, GC – Green, Cutoff, BC – Blue Cutoff, RG
– Red-Green drive gain, BG – Blue-Green drive gain, PSL – PAL vertical SLope,
PVS – PAL Vertical Shift, PVA – PAL Vertical Amplitude, PHS – PAL Horizontal
Shift, NSL – NTSC vertical SLope, NVS – NTSC Vertical Shift, NVA – NTSC Vertical
Amplitude, NHS – NTSC Horizontal Shift.OPTION
BIT ITEM 0 1 7 TTXNO TTXTTX6 TTX SYSTEMLIST FIRSTFLOF FIRST5 CONTRAST901004 TUNER QUANTTITY123 TUNER KINDS288908892 SYSTEM (L)––1 SYSTEM (D / K)––0 SYSTEM (I)––OPTION 2
BIT ITEM 0 1 7 NOT USED––6 NOT USED––5 POWER ON AFTONCETWICE4 PDCNOYES3 VPSNOYES2 3.58 X-TALNOYES1 VIDEO PLUSNOYES0 SHOWVIEWNOYESVCR OPTION
BIT ITEM 0 1 7 NOT USED––6 NOT USED––5 NOT USED––4 HEAD2-HEAD4-HEAD3 SP / LPSP-ONLYSP / LP2 SECAMN / APOSSIBLE1 MESECAMN / APOSSIBLE0 NTSC3.58N / APOSSIBLE
SAMSUNG CK5038 ZR \ TBWCX CHASSIS SCT11B
Press the following sequence of buttons on the remote: STAND-BY -> P. STD
-> HELP -> SLEEP -> POWER ON.
Exit from I STATUS.
Under the panel
console is a hidden button HIDDEN using this button, you can enter and
exit the menu.SAMSUNG CS7272 PTR \ BWX CHASSIS SCT 51A
Enter the menu allows the following sequence of commands: PICTURE OFF ->
SLEEP -> P. STD -> MUTE -> PICTURE ON.SAMSUNG CK6202 CK7202 CHASSIS SCT12B
Press the following sequence of buttons on the remote: STAND-BY -> P. STD
-> HELP -> SLEEP -> POWER ON.
Exit button or HIDDEN STATUS.SAMSUNG CS-721, CS-723 CHASSIS SCT-52A
Alternately, press the button on the remote PICTURE OFF -> SLEEP -> P. STD -> MUTE -> PICTURE ON. Movement
cursor keys CHANNEL and VOLUME.SAMSUNG CK 6271 WP
To enter the service
menu to 1. Hazhat button (HIDDEN) – hidden on the remote control 2. Hazhat very
rapid follow-up. (Stand-by) 3. (P.std) 4. (Help) 5. (Sleep) 6. (Power-on)SAMSUNG CS 2139TR, CS21A0QWT, CK-564BVR, CZ-21H12T, CS-25M6HNQ, CS-21S4WR, CS-21S1S, CS-21D9 Chassis KS1A
(STAND-BY) (DISPLAY) (MENU) (MUTE) (POWER ON)SAMSUNG CS-29A6HTR PLANO
(STAND BY) (DISPLAY) (P. STD) (MUTE) (POWER ON)SANYO C21ML1 (MG) Processor: VESTEL 19V1.0NT
The entrance to the service. Push MENU (INSTALL), put cursor on « Configure ».
Then click successively 4 => 7 = 2 => 5SONOLOR Models: 5552, 6352, 6363, 6372, 6383, 7163, 7172, 7183, 63SN601. Processor NES3AR01/02, NES2-2R01/4R01
Login: (-/–) (MENU) (TV) – a combination of all the press for 1 second.SONY KV-S2171K, KV-C2171KR, KV-X2101K, KV-X2501K, KV-X2581K, KV-X2581KR, KV-M2540K, KV-M2541K, KV-X2901K, KV-X2981K, KV-X2981KR Chassis BE-3B
In standby mode for up to 20 seconds on the remote control RM833 Repeatedly
Button: (Display on screen) (5) (VOL +) (TV). In the upper right corner will
inscription TT -.SONY KV-M1440, KV-M2170, KV-M2171, KV-M2181, KV-M2101
Set the TV to standby mode. Next, you need to press a remote button in a sequence of ON SCREEN DISPLAY ->
5 -> VOLUME + -> TV. Data are given for the console type RM-836.The number of flashes the LED Value error 2IC301ne confirms the transfer of 12C-volatile memory in order
.3IC301neispravna flags. 4No flyback horizontally. 5IC301perepolnenie stack. 6Fired Over Voltage Protection / current (pin 52)-high (1). 7IC002ne confirms the transfer of I2C, IC301-right 8IC002i IC301-no confirmation I2C. 9Total oschibka I2C (SDAi SCLna low (0) IC301, IC001, IC002, CN001). SONY KV-24WS1A/B/D/E/K/R/U CHASSIS BE-3B CXP85340A-116Q/117Q RM-837
Set the TV to standby mode. Next, you need to press a remote button in the sequence
ON SCREEN DISPLAY -> 5 -> VOLUME + -> TV.Number of outbreaks
LEDsIC TypeFatal error if2….9 NVM (EEROM) YES 10 TELETEXT © 11 RGB / JUNGLE YES 12 Switch AV TV. © 13 PLLtyunera YES SONY KV-24WS2A/B/D/E/K/R/U CHASSIS BE-3D MSP3410B-PS-F7-T, MSP3410C-PS-C6-T RM-862
Set the TV to standby mode. Next, you need to press a remote button in a sequence of ON SCREEN DISPLAY ->
5 -> VOLUME + -> TV.SONY KV25C1/A/D/B/E/R/K, KV29C1/A/B/D/C/K/R/E/D1 CHASSIS BE-3D RM-839
Set the TV to standby mode. Next, you need to press a remote button in a sequence of ON SCREEN DISPLAY -> 5 -> VOLUME +
-> TV.SONY KV-2170, KV2180, KV2540 CHASSIS BE4
Set the TV into standby mode and press the button on the remote in the next
sequence ON SCREEN DISPLAY -> 5 -> VOLUME + -> TV.
Exit 00.SONY KV2181KR SHASSIS BE-4
Set the TV to standby mode. Next, you need to press a remote button in the sequence
ON SCREEN DISPLAY -> 5 -> VOLUME + -> TV. Data are given for the console type RM-836.Number outbreaks LEDs Value Error 2IC301ne confirms the transfer of 12C-volatile memory in order
.3IC301neispravna flags. 4No flyback horizontally. 5IC301perepolnenie stack. 6Fired Over Voltage Protection / current (pin 52)-high (1). 7IC002ne confirms the transfer of I2C, IC301-right 8IC002i IC301-no confirmation I2C. 9Total oschibka I2C (SDAi SCLna low (0) IC301, IC001, IC002, CN001). SONY KV-E2551A \ B \ E \ K, KV-S29 JN1 \ MN1 \ SN1, KV-S34 JN1 \ MN1 \ SN1 CHASSIS AE-2B
Use the remote type RM-831. Turn on the TV while pressing the button on any 2
front of the TV.Number outbreaks LEDsType Products Functional appointment 1 I2C bus At SDAnizky level (0). 3 SDA3202 Tuner (PLL). 4 TDA9145 Chroma decoder. 5 CXA1587 RGB / Jungle. 6 TDA6612 Sound processor. 7 CXD2018Q Scan vertically. 8 CXA1545 Switch AV / TV. 9 © Protect scan vertically. SONY KR-S4613 SHASSIS AP-2
Use the remote type RM-832. Turn on the TV while pressing any 2
button on the front of the TV.Number outbreaks LEDs Type Products Functional appointment 1 I2C bus Low level at SDA 2 X24C16 EEROM 3 SDA3202 PLLtyunera 4 TDA9145 Chroma decoder 5 CXA1587S RGB / JUNGLE 6 TDA6612 Sound processor 7 CXD2018 Vertical Scan 8 CXA1545 Switch AV TV. 11 SDA5248 Teletext. 13 © Sewn vertical sweep. SONY KV-B2911/A/D/B/K, KV-B2912V, KV-B2913E CHASSIS AE-2
Use the remote type RM-830. Turn on the TV while pressing any 2 buttons on the front
the TV. In the upper right corner of the screen appears TT. After
then press MENU. Error can be opredilit the number of LED flashes
on the front of the TV. Process called self-diagnosis.Number outbreaks LEDs Type Products Functional appointment 1 I2C bus Low level at SDA 2 X24C16 EEROM 3 SDA3202 PLLtyunera 4 TDA9145 Chroma decoder 5 CXA1587S RGB / JUNGLE 6 TDA6612 Sound processor 7 CXD2018 Vertical Scan 8 CXA1545 Switch AV TV. 11 SDA5248 Teletext. 13 © Sewn vertical sweep. SONY KV-T25MF1
Install the TV in standby mode with the remote then enter the following commands DISPLAY
-> 5 -> VOLUME + -> POWER. The sequence of operations in the mode of SERVIS
follows. 1i4 movement by position, 3i6 increasing and decreasing values
MUTING write 0 performance record. Applied remote RM-870SONY KV-M2540
Set the TV into standby mode and press the button on the remote control in sequence ON
SCREEN DISPLAY -> 5 -> VOLUME + -> TV. Applied remote model RM-833SONY KV-S29 RN1 \ 34RN1 SHASSIS G1
Entry into service mode by using the remote control RM-821. Turn on the TV in
standby mode. Then press the following combination of buttons on the remote: DISPLAY ->
5 -> VOL + -> POWERSONY KV-S2941A \ B \ D \ K, KV-S2942U, KV-S2943E SHASSIS AE-2F RM-831
Turn on the TV, and then double-click on the button on to do. In the upper right corner appears on the TT, then press
click on MENU.Number outbreaks LEDs Type Products Functional appointment 1 I2C bus Low level at SDA 2 X24C16 EEROM 3 SDA3202 PLLtyunera 4 TDA9145 Chroma decoder 5 CXA1587S RGB / JUNGLE 6 TDA6612 Sound processor 7 CXD2018 Vertical Scan 8 CXA1545 Switch AV TV. 11 SDA5248 Teletext. 13 © Sewn vertical sweep. SONY KV-B2911/A/D/B/K, KV-B2912V, KV-B2913E CHASSIS AE-2
Use the remote type RM-830. Turn on the TV while pressing any 2 buttons on the front
the TV. In the upper right corner of the screen appears TT. After
then press MENU. Error can be opredilit the number of LED flashes
on the front of the TV. Process called self-diagnosis.Number outbreaks LEDs Type Products Functional appointment 1 I2C bus Low level at SDA 2 X24C16 EEROM 3 SDA3202 PLLtyunera 4 TDA9145 Chroma decoder 5 CXA1587S RGB / JUNGLE 6 TDA6612 Sound processor 7 CXD2018 Vertical Scan 8 CXA1545 Switch AV TV. 11 SDA5248 Teletext. 13 © Sewn vertical sweep. SONY KV-29X1A \ B \ D \ E \ K \ L \ R \ U CHASSIS BE-3D
Set the TV into standby mode and press the button on the remote in the next
sequence ON SCREEN DISPLAY -> 5 -> VOLUME + -> TV. Applied
Remote model RM-839.Error Number outbreaks LEDsProtection circuit 2 Low signal SLCna I2C bus 3 Low signal SDAna I2C bus 4 Low signal SLCi SDA 5 Kontreller JUNGLE / CHROMAne answers 6 Video switch is not responding 7 Tuner does not respond 8 MSPne answers 9 NVMne answers 10 Low signal M3L TXD 11 Low signal M3L RDX 12 Low signal M3L ENABLE 13 Low signal M3L TXD and RXD 14 Damage to test Compact Text 15 Switch AVne reset when power is turned 16 Unable to initialize the jungle 17 Reply NVMpovrezhden after initialization 18 A few chips do not meet 19 Wrong time of the Compact Text 20 Response switch AVpovrezhden after answering 21 Reply controller JUNGLE / CHROMApovrezhden after the response 22 Compact Textne answers 23 SONY KV-29X1A \ B \ D \ E \ K \ L \ R \ U CHASSIS BE-5
Set the TV into standby mode and press
on the remote control in sequence ON SCREEN DISPLAY -> 5 -> VOLUME +
-> TV. Applied remote model RM-836.The number of flashes the LED Value Error 2IC301ne confirms the transfer of 12C-volatile
memory-to-right3IC301neispravna flags. 4No flyback horizontally. 5IC301perepolnenie stack. 6Fired Over Voltage Protection / current (pin 52) high-
level (1).7IC002ne confirms the transfer of I2C, IC301-right 8IC002i IC301-no confirmation I2C. 9Total oschibka I2C (SDAi SCLna low (0) IC301, IC001,
IC002, CN001).SONY KV-S2951 KR CHASSIS AE-3
Use the remote type RM-831. Turn on the TV while pressing the button
– And + on the front of the TV.Number – in Meghann LEDs Description Fee 1 Common error I2C Bus – 2 Error IC ST24C16 A 3 Error sub-controller CXP85332 A 4 Error video processor CXD2030R B B 1 5 Failed to digital converter sampling CXD2032R B B 1 6 Error converter review CXD2035R B B 1 7 Error video controller TDA1839 A 8 Driver error CRT TDA1840 A 9 Failed to switch AV TV CXA1855 J 11 Error chip Megatext CDA5273 A 12 CPU error sound TDA6812 A 16 V-protectionzaschita voltage – SONY KV-16WT1 A \ K \ R \ U
Set the TV into standby mode and press the button on the remote in the following sequence
ON SCREEN DISPLAY -> 5 -> VOLUME + -> TV. Applied remote model RM-836.The number of flashes the LED Value Error 2IC301ne confirms the transfer of 12C-volatile memory in order
.3IC301neispravna flags. 4No flyback horizontally. 5IC301perepolnenie stack. 6Fired Over Voltage Protection / current (pin 52)-high (1). 7IC002ne confirms the transfer of I2C, IC301-right 8IC002i IC301-no confirmation I2C. 9Total oschibka I2C (SDAi SCLna low (0) IC301, IC001, IC002, CN001). SONY KV-C2173 B / E, KV-C2171 D / K / KR CHASSIS BE-3B:
Set the TV into standby mode and press the button on the remote in the next
sequence ON SCREEN DISPLAY -> 5 -> VOLUME + -> TV. Applied
Remote model RM-833.Number outbreaks
LEDsType ProductsFatal whether error2….9 NVM (EEROM) YES 10 TELETEXT © 11 RGB / JUNGLE YES 12 Switch AV TV. © 13 PLLtyunera YES SONY KV-2501 A / D / K, KV-C2503 B / E, KV-C2508 D / E, KV-C2509 B / D / E / K.
Set the TV into standby mode and press
on the remote control in sequence ON SCREEN DISPLAY -> 5 -> VOLUME +
-> TV. Applied remote model RM-833.Number outbreaks
LEDsType ProductsFatal whether error2….9 NVM (EEROM) YES 10 TELETEXT © 11 RGB / JUNGLE YES 12 Switch AV TV. © 13 PLLtyunera YES SONY KV-G21M1 \ G21P1 \ G21S11, KV-T21M1 \ T21MF1 \ T21MN1 \ T21MN11
Method of exit from the service: Press 2 times the button POWER. Recording method
in memory: Log in to press service combination of buttons on the remote one (UP) 4 (DOWN) will choose
adjustable parameters. Press the MUTE button to call the screen WRITE (green), press
0 key to enter into memory.SONY KV-21T10R
Set the TV into standby mode and press the button on the remote control in sequence ON SCREEN DISPLAY
-> 5 -> VOLUME + -> TV.SONY KV-21C4B/D/E/K/R KV-21X4A/B/D/E/K/L/R/U CHASSIS BE-5 CPU SDA5255-A024. Remote RM-836.
Set the TV into standby mode and press the button on the remote in the next
sequence ON SCREEN DISPLAY -> 5 -> VOLUME + -> TV.Number outbreaks LEDs Code Error Description 2 30 Controller chip Junglene confirms the transfer of high
level I2C bus3 31 Error flag controller chip Jungle 4 32 No signal reversal in the horizontal 5 40 Sound processor does not support the transmission of high-level
I2C bus6 91 No vertical sync 7 10 Nonvolatile memory NVMne confirms the transfer of low-
level I2C bus8 20 The tuner does not confirm the transfer of high-level I2C bus 9 01 Error general I2C Bus 10 90 Input protection: protection of the X-ray (X-rays). SONY KV29F3A/B/D/E/K/R/U CHASSIC BE-3D Processor SDA302C263-GEG Remote RM-862
Set the TV into standby mode and press the button on the remote in the following sequence
ON SCREEN DISPLAY -> 5 -> VOLUME + -> TV.Error Number outbreaks LEDsProtection circuit 2 Low signal SLCna I2C bus 3 Low signal SDAna I2C bus 4 Low signal SLCi SDA 5 Kontreller JUNGLE / CHROMA not responding 6 Video switch is not responding 7 Tuner does not respond 8 MSP does not meet the 9 NVM is not responsible 10 Low signal M3L TXD 11 Low signal M3L RDX 12 Low signal M3L ENABLE 13 Low signal M3L TXD and RXD 14 Damage to test Compact Text 15 Switch AVne reset when power is turned 16 Unable to initialize the jungle 17 Reply NVMpovrezhden after initialization 18 A few chips do not meet 19 Wrong time of the Compact Text 20 Response switch AVpovrezhden after answering 21 Reply controller JUNGLE / CHROMApovrezhden after the response 22 Compact Textne answers 23 SHARP 14 \ 21 JN1 CHASSIS SP-51
When the input of the microcontroller 37 for 3 adjacent periods in a state
High-level call service menu.SHARP VT-1428M, VT-2128M
Set the TV into standby mode and press the button on the remote in the next
CH UP sequence for 2 seconds or more, and simultaneously press
button POWER. Exit the menu button MENU.SHARP 54AT-15SC
To enter the service, press the following buttons in sequence to the console. POWER OFF and then simultaneously
VOL-and CH + on the TV. After that POWER ON and hold the VOL-and CH + until the TV will not start.SHARP 14D-SC, 14B-SC, 20B-SC, 14D-CM, 21D-CK1, CV-2132CK1 CHASSIS PAL-A.
Set the switch S1008 to the position servistnogo regime.SHARP 14R-SC/M8/M10, 14R-W, CV-14RU
Set the switch S1006 to the position servistnogo regime.SHARP DV-5450SC CHASSIS S3B Processor IX1492BM, SDA-20561
To enter the service mode is necessary to block VIDEO
connect terminals (2) and (6). Then press the MODE button on the remote.
A message-SERV-. Then remove the jumper. The choice of adjustment of the CH and
CH +.SHIVAKI CHASSIS 11AK19
To enter the sersisny mode, do the following manipulation. First enter the installation menu
INSTALL button and then press a key on the remote in the following sequence
4, 7, 2 and 5. Look for the menu position ADJUST (all adjustments are changed through it).SHIVAKI STV1415 CHASSIS 11AK20
To enter the service menu must be made within 4 seconds to perform the login procedure. Must
press the remote control the following sequence of keys. (VOL-), (Prog), (-),
(TV). Options selected buttons (PROGRAM UP) (PROGRAM DOWN), and the change (VOL-),
(VOL +). To store, press the red button. To exit, use the button TV.SHIVAKI STV2905 CHASSIS DY-900
- Click on SERVICE remote.
- In this case, the image appears OSD (onscreen display) « Line SVC ». Then click on the button -/– control.
- At this time the load data recorded in the micro-channels of memory.
- The downloaded data are as follows:
(1). STD4CHand 62,25 Mg(2). STD5CHand 172,25 Mg(3). STD7CHand 189,25 Mg(4). STD25CHand 503,25 Mg(5). STD34CHand 575,25 Mg(6). STD40CHand 623,25 Mg(7). STD50CHand 703,25 Mg
- Color fixed channels OSD – Green.
- To view the channels recorded in the memory press PR +, -.
Adjust V-SIZE (vertical size)
- To receive a test table RETMA press the PR +, -.
- To perform the adjustment, press « 6 » remote control, and the image appears OSD « STV VAMP32 ».
- Clicking on knokli VOL +, – to adjust the vertical size. The remaining adjustment onalogichny.
SHIVAKI STV 2040 Chassis 11AK30-2 processor – ST92195C7B1/PAL VESTEL/T30F016, video processor – STV2248C
Log-in service: Press MENU, then press the sequence 4 => 7 = 2 => 5SHIVAKI STV-2139 Processor – Z9023306PSC, video processor – TB1238BN
Log-in service: in the operating mode to click in sequence on the remote control: DISPLAY => MUTE => SLEEP => FUZZY
Mode selection menu: DISPLAY, SLEEP, MUTE++++++++++++++++++++++++++++++
THOMSON, TELEFUNKEN CHASSIS TX-90, TX-91
Put TV into standby mode with remote control. Then turn off the mains button. Press the teletext button on the remote (blue)
and holding to include a network switch. Then release the button Teletext dramatically and immediately click.THOMSON a new generation.
With the power off press the side « V- » and « P- » deduct and include meals. Services menu appears.THOMSON 21MG77C
THOMSON 21MG10E Processor: TDA9554PS/N1/0301
To access the menu, do the following- TV – in stand-by (standby mode) with the remote.
- Turn off the TV network button.
- Udepzhivaya teletext button on the remote, switch on the TV network button.
- After turning on the LEDs in full REGIME – what have you got – green, lupus?), Release the button Teletext
- If you do not spabotaet, all the same, only in part 4 teletext button again and release quickly to kpatkovpemenno press.
TOSHIBA 1450 XN \ XNE 1458XNH 2050XN 2150 XNE \ XHC \ XC CHASSIS S5E
Enabling self-control: When the screen displays the menu control, press
the 9 button on your remote. Begin the process of self-testing.TOSHIBA 2150 (chassis – S5E)
Login:- mute
- again press the MUTE and otpyskat
- press the MENU button on the TV
« 4 » – correction were kontpasta. « 1 », « 2 », « 3 » – cutoff R, G, B « AV » – Choice of test
signal. « – gpomkost + » – pegylipovka.
Output: off – power.TOSHIBA 2185XR
To enter the service menu to- Hazhat button on the remote control (MUTE)
- More paz press (MUTE) and do not let it go
- Hazhat on the TV button (Menu)
Each press of a button (CHANNEL
UP) changes the position pegulipovochnye Each press of a button (+ VOLUME) and (-VOLUME)
change data. Exit – Turn off the TV.TOSHIBA
1.B regime: SERVICE click on the button box – line of horizontal
ON / OFF (kpuzhochek with stpelkoy). Each subsequent press changes kaptinku.
2. In the regime of the menu pegulipovok book. (9) entry in the menu self
SELF CHECK. ******** – Nome.p mikpoppotsessopa Power – 00 – diagnostics unit
supply. 00 – nopma if the numerals of one another in many shows paz spabatyvala system
protection – a tendency to current overload. Bus line – the verification of tire chains.
OK-nopma, SDA – GND – goat SDA bus on the lot, SCL – GND – similar bus SCL.
SDA-SCL – essno among themselves. Bus cont – the verification of tire components. OK – nopma.
Q *** NY – mikposhema with nome.p *** neisppavna. SYNC – sinhponizatsiya. OK – nopma.
NG – ppots. This function operates and attempts to define a type of video++++++++++++++++++++++++++++++++++++
UNIMOR Model – SIESTA-3/3A Processor SDA20562-A508/A515/A522.
Log into the service menu: Close the output 21 to ground. Click on the TV (P +) and (P) and include a network switch.
Exit from the menu – POWER OFFWALTHAM Model – WT821
Log into the service menu – the TV remote control « Horizon » without graphics click (SERVICE),
indekatore displayed on CH, Press again – there will be PR on the volume selected number of registers (1-4)
and numbers (1-9) to change bits. After the press (Memory).XANTRAX TC-2172S (chassis TD-18)
Video Processor: TD1238N
Control Processor: TMP87CK38N
There are three service modes: S, D, M.
S-Mode – the service;
D-mode – extended service;
M-mode – expedited + training.
Log in to the service S-mode control (SERVICE MODE) with a conventional
remote control: in the operating mode of the TV, press and hold
on the front panel button VOL-(volume at minimum position), press the
button on the remote DISPLAY. In the upper left corner of the screen
TV will be the symbol S is the inclusion of a special regime of service
regulation.
Selection of a new function by pressing the button on the remote control or PROG + PROG-.
Adjusting the value of the function by pressing the remote button VOL + or VOL-.
When pressed on the remote control button on the screen disappears -/–
Frame Scan. From the emission of a narrow horizontal band handle
accelerating voltage.
The values of the controlled functions are stored in memory automatically.
Log in to service mode D, M possible only with a special service remote control.
TV returns to normal operation after turning off the network and then on again.XANTRAX TC-1466, TC-2066S, TC-2166S, TC-2068S, TC-2168S, Chassis ST-208, 209
Video Processor: TDA8842
Control Processor: MTV212MS64U
Log in to the service adjustment mode (SERVICE MODE) with a conventional remote control:
in standby mode, press the TV series on the remote control button, MUTE, AV, MENU, POWER.
In the main user menu there is a new line – SERVICE.
To enter a basic service menu, press the remote button VOL +.
Reulirovka value of the function by pressing the remote button VOL + or VOL-.
Selection of a new function by pressing the button on the remote control P + or P-.
Schedule of Basic Tools:
SCREEN – Reg. Screen settings
CATHODE – Reg. Regimes cathodes
TUNING – choice of parameters of the tuner
SCR – subnasyschennost
OSD Pos. – Adjusts the OSD position horizontally
SCREEN, CATHODE, TUNING have their own sub-sub-menu.
The values of
the controlled functions are stored in memory automatically. TV returnsZENITH IQB64W10W
8-6-5-4-5-6-8
7-5-3-2-3-5-7
6-4-2-1-2-4-6
7-5-3-2-3-5-7
8-6-5-4-5-6-8
Gain from control of the codes and press (ENTER) or (DISPLAY)ZENITH IQB64W10W
9-8-7-6
Gain from the control code and press (ENTER) or (DISPLAY)
7 janvier 2019 à 7 h 54 min #2264rockyMaître des clésLG 37LH55 SERVICE MENU

POUR ENTRER MENU SERVICELe mettre sous tension
En même temps, la presse et « Hold » sur la touche Menu du côté Clavier de presse et de « Hold » sur la touche Menu de la télécommande pendant environ 5 secondes.
Si le menu du client apparaît, continuez à tenir jusqu’à ce qu’il disparaisse.
Le menu de service apparaît.Remarque: Il est possible, dépend de la version du logiciel, un mot de passe peut être nécessaire pour entrer dans le menu de service. Si un mot de passe est requis, entrez (0000).
Ne jamais entrer dans le menu des paramètres, et d’ajuster les valeurs de données là-bas, si vous n’êtes pas qualifié pour le faire. Paramètres de données erronées à ce mode peut rendre l’ensemble irréparable.
================================================
MODE DE SERVICE PHILIPS – 21PT1532 _ 20PT3732 _ 14PT3782
IC UTILISE
TMP87CH36N _ ST24C08 _ TDA8374 OU TDA8375 _ TDA8335N29 _ TDA4665 _ TDA9302H _ HEF4052B _ UPC1853 _ AN7161N _ BA3313L _ TDA7056B & MC44603P SMPS alimentation.Pour entrer en mode de service, appuyez sur les touches suivantes dans l’ordre. Soyez aussi vite que vous le pouvez , et ne jamais laisser plus de temps entre les deux pressions de bouton.
[0 => 6 => 2 => 5 => 9 => 6 => OSD]
Pour appeler un élément à régler, utilisez Ch + et Ch (-) touches de la télécommande . contrôle
Pour ajuster la valeur de données de l’élément sélectionné, utilisez Vol + et Vol (-) touches de la télécommande.
Pour quitter le mode de service, éteindre l’appareil par l’interrupteur d’alimentation secteur ON / OFF.=============================================
MODE DE SERVICE THOMSON – TX-807 _ 90 _ TX-TX-91
IC UTILISE
TMP 47P1637N => microprocesseur [SYSTEM CONTROL]
ST24C04 => MÉMOIRE SYSTÈME.
TDA 9302H => sortie vertical.
STV 8225 => AM FIS.
TDA 7263 => SORTIE AUDIO.
TDA 8842 => VIDEO CHROMA JUNGLE.Pour entrer en mode de service , éteignez le téléviseur par la télécommande de position [veille] et attendre que le LED de veille à sa face avant à off. Appuyez sur le bouton « VT » sur la télécommande, et basculer le téléviseur avec l’interrupteur ses conduites. Pour appeler un élément à ajuster, utiliser Prog + et Prog (-). touches de la télécommande Pour adjsut la valeur des données de l’élément sélectionné, l’utilisation Vol + et Vol (-). touches de la télécommande pour quitter le menu de service, éteindre l’appareil par ses conduites interrupteur ON / OFF.
=================================================
TOSHIBA 17MB16P

MENU SERVICETous les systèmes, la géométrie et la balance des blancs alignements sont effectuées en mode de service de production.
Avant de commencer les alignements de mode de production, assurez-vous que tous les réglages manuels sont effectués correctement.
Pour démarrer la production alignements de mode entrer dans le menu principal avec le bouton « M » en appuyant sur puis appuyez sur les chiffres 4 , 7 , 2 et 5 respectivement.
Le menu suivant apparaît sur l’écran.
Après être entré dans le menu Service, vous pouvez accéder à ses éléments en appuyant sur » ▲ / ▼ « boutons. Pour entrer dans le menu sélectionné, utilisez » ◄ / ► « boutons.
Pour quitter le menu de service sur « M bouton « .Ensemble des paramètres du menu de service de télévision TFT sont énumérés ci-dessous.
Menu de réglage ADJUST
Pour entrer dans le menu Adjust déplacer le curseur pour ajuster … paramètre en appuyant sur » ▲ / ▼ « » boutons dans le menu Service et appuyez sur ◄ / ► « bouton. Le menu suivant apparaît sur l’écran.Il n’y a aucun élément de réglage dans le menu RÉGLER pour le moment.

RÉGLAGES OPTION
Je n pour entrer dans le menu Options, déplacez le curseur sur les options … paramètre en appuyant sur » ▲ / ▼ « » boutons de menu Service et appuyez sur ◄ / ► « bouton. Le menu suivant apparaît sur l’écran.
Il ya 50 articles dans le menu des options, mais 10 d’entre eux sont visibles lorsque vous entrez dans le menu. L’utilisation de « ▲ / ▼ » boutons éléments restants peuvent être vus.

AJUSTEMENT MENUIl ya 50 articles dans le menu des options, mais 10 d’entre eux sont visibles lorsque vous entrez dans le menu. L’utilisation de « ▲ / ▼ » boutons éléments restants peuvent être vus.
AVL> On / Off
Top TXT> On / Off
Rapide TXT> On / Off
TXT Lang> Bascule entre les groupes linguistiques télétexte. Min. Valeur: 0000 00000 Max. Valeur: 0004 00004
SI Freq. > Ajuste la valeur si la fréquence. Min. Valeur: 0000 00000 Max. Valeur: 00FF 00255
Son> On / Off
Carrier> On / Off
RC_Options> Règle le type de contrôle à distance. Les valeurs sont les suivantes: 1: RCMM télécommande standard. 2: Metz RC 3: Toshiba RC 4: Carte de crédit 2025. Les valeurs supérieures à 4 ne sont pas valides et RC standard seront choisis automatiquement.
AV-1> On / Off
AV-2> On / Off
S-VIDEO> On / Off
AV-3> On / Off
PC> On / Off
MENU> On / Off Active / désactive MENU semi-transparent.
MIX> Active / désactive le mode télétexte MIX. Activer: 00000001 Disable: 00000000
MODE HÔTEL> Active / désactive Hôtel fonction de mode. Activer: 00000001 Disable: 00000000
X> Non utilisé.
AUTRES> Règle la valeur standard pour l’APS pour les pays d’Europe orientale. Les valeurs sont: norme BG 1: 0 norme DK.
X> Non utilisé.
LDLY> Ajuste la valeur de Luna / chrominance Delay. Min. Valeur: 0000 00000 Max. Valeur: 0008 00008.
AGC> Règle la valeur de contrôle automatique de gain. Min. Valeur: 0000 00000 Max. Valeur: 00FF 00255
APS WSS MENU TEST
Pour entrer Aps sea Testmenu, déplacer le curseur sur le paramètre de test Aps WSS en appuyant sur les touches « ▲ / ▼ » « ◄ / ► » bouton boutons dans le menu Service et appuyez sur. Le menu suivant apparaît sur l’écran.
Il ya 7 articles dans le menu Test Aps WSS.
Programme
Recherche
VPS
Pdc Format 1
Pdc Format 2
NomWSS

===================================================
SIEMENS FS-369M4
- Allumez le téléviseur.
- Appuyez sur « Information » => Fonctions spéciales => Service => 0,8,9.
- fenêtre du mode de service s’affiche.
- Pour quitter le mode de service, éteindre le téléviseur
- Pour appeler un élément à régler, utiliser les boutons Ch Up \ Ch Dn.
- Pour ajuster la valeur de données pour l’élément sélectionné, utilisez Vol Up | Vol – boutons.
- ====================================
MODE SERVICE LG [USINE MODE]
POUR ENTRER MODE SERVICE- appuyez simultanément sur les boutons « Tenez Channel haut » « Menu » et sur le téléviseur pendant 3 secondes.
- Appuyez sur CH + | CH – pour sélectionner un élément à régler.
- Appuyez sur Vol + | Vol – pour régler la valeur de données pour l’élément sélectionné.
- =================================
11AK36
- Appuyez sur la touche « Menu » pour afficher le menu de la clientèle.
- Entrez [4 => 7 => 2 => 5] en succession rapide, withing secondes »’5.
- Utilisez les boutons ‘jaunes’ «rouge», «bleu», «vert» et d’appeler un élément à régler et d’ajuster la valeur de données de l’élément sélectionné.
- OK « de presse pour enregistrer les modifications.
- Appuyez sur la touche « Menu » pour ‘Exit’ Mode Service.
- ==========================================
PANASONIC – SERVICE MODE
procédure-1- Bouton – [Volume ()] sur le panneau de télévision Appuyez et maintenez enfoncé.
- Appuyez sur le bouton « Recall » sur la télécommande [3] fois.
- La fenêtre de menu de service sera affiché.
- Utilisez [1] et [2] de la télécommande pour naviguer les éléments du menu.
- Utilisez [3] et [4] de la télécommande pour naviguer dans les sous-menus.
- Utilisez [Vol +] et [Vol -] situés sur la télécommande, pour ajuster la valeur de données de l’élément sélectionné.
- Pour la sortie , de mise hors tension du téléviseur, par son interrupteur d’alimentation principal.
Procédure -2
- Allumez le téléviseur et réglez-le en mode veille.
- Appuyez sur la touche « Menu » de la télécommande.
- Set ‘Antenna’ [A] à ‘Cable’.
- Sélectionnez «Menu du programmateur» et régler la minuterie de sommeil [30] minutes.
- Appuyez sur le bouton [OK] deux fois.
- Syntoniser le canal (124).
- Appuyez et maintenez enfoncé le bouton « Vol-ve » sur le téléviseur.
- L’affichage «CHK» s’affiche dans le coin supérieur gauche de l’écran.
- Alors que « CHK » est affiché, appuyez simultanément sur les boutons « Ok » et « Vol + » sur le téléviseur pour basculer entre les modes.
- Red « CHK » pour le service et l’homme « CHK » jaune pour le vieillissement.
- Appuyez sur le bouton « Power » sur la télécommande pour sélectionner l’un des [6] Service ajustement de l’homme dans ce qui suit.
- MTS ajustement.
- réglage de l’horloge.
- ajustement de la vidéo.
- Ajustement HDEF.
- Ajustement VDEF.
- Ajustement DAF.
- Autres ajustements.
Canal + de presse | Canal Dn boutons sur la télécommande pour sélectionner les paramètres de chacun des ajustements du mode de service.Utilisez « Volume + | Volume-ve boutons de la télécommande, pour ajuster la valeur de données de l’élément sélectionné.
Eteignez le téléviseur par son interrupteur principal à son panneau, à QUITTER Service Mode.
============================================================
Menu de service pour led Nei 32NE4900 smart >
Menu>paramètres>son>haut-parleurs>balance 0.
Lorsque l’option Solde 0 est sélectionnée, le code 1,9,6,9 est saisi.
Un M vert apparaît à gauche de l’écran. Appuyez sur la touche menu. Entrez dans l’option Design.
Pour changer le modèle d’écran, accédez à l’ID du projet.
Ici, la version est modifiée, par exemple VS0132FB1_0101 ou VS0432FB1_0102, etc. jusqu’à ce que la bonne soit trouvée.
Le menu de service est le même que celui des LED Hisense.
La télécommande qui fonctionne sur ce téléviseur émet IC 6121 sys 00BF exactement comme celle d’Hisense.
Attention! Pour les écrans de 32 pouces, vous ne devez pas sélectionner les options VS0140FB1 ou VS0440FB1, qui sont destinées aux écrans FHD de 40 pouces, et l’image devient vide.
-
AuteurMessages


- Le sujet ‘Mode Service plusieurs Marques’ est fermé à de nouvelles réponses.